Visual Mods: Minor Hardware
Visual mods are perhaps the coolest way to make a guitar truly feel special and one-of-a-kind. While it’s true that basically all of the things I talk about in this book technically do change the appearance of your guitar, I want to talk specifically about the mods that have no functional purpose in this section; the things that are “just for looks”.
One aspect I will not talk about in detail is stickerbombing and repainting your instrument — refinishing is a complicated, difficult, and expensive operation that could have an entire book devoted to itself alone; stickers are basically self-explanatory.
Headstock decals
Decals are a bit more complex to apply and generally will need a coat of clear paint over them for protection anyway, so I won’t talk about them in-depth either.
In the guitar world, there is one particular flavor of decal that needs special mention, though - headstock decals.
Yes, you can buy bootleg “Fender” or “Gibson” logos to put on your headstock. You probably shouldn’t, though, except maybe ironically on a guitar that clearly isn’t one. These headstock decals are primarily applied by scammers trying to sell fake guitars, and if there’s ever a chance you’ll be selling your instrument, websites may take down your posting, delivery services may refuse to ship your instrument, and potential buyers may hate you for selling a “fake”.
Having said that, applying a custom decal with your own logo to the headstock — even if it’s a brand-name neck — doesn’t have the same legal and ethical problems, and it’s pretty cool to play a guitar that has your name on the headstock.
Broadly, visual mods can be divided into two distinct categories: “flat” things where the primary way to modify them is through changing their outline or surface colors or patterns, and “three-dimensional” objects where it’s possible to replace them with something of an entirely different shape.
Things You Can Paint
Throughout this book, I try to stay away from talking about painting things on your own, but parts in this category are simple enough where you can usually get away with just giving them a couple coats of spray paint, and may not even need to sand down or polish the finish.
If you want to do decorate your “flat” hardware with some sick patterns, stickers are the obvious solution, but you may also want to draw something freehand. In that case, I suggest looking into acrylic paint pens.
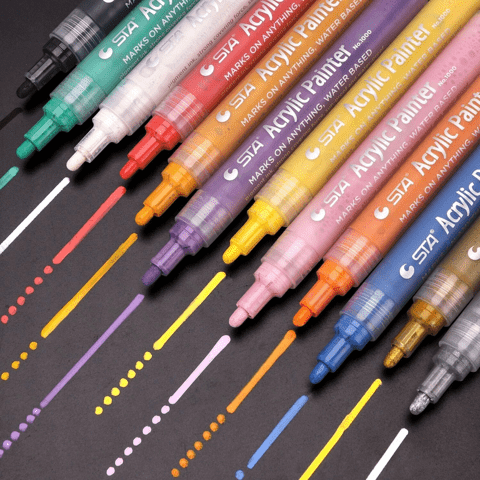 Acrylic paint pens.
These are just like normal marker pens, except they use acrylic paint — the same kind that your guitar finish may use! The result is waterproof and very durable, and if you pop a coat of clearcoat over it, will be able to stand up to even the hardest playing.
Pickguards
A lot of guitars come with a pickguard.
“Pick guard”?
The name “pickguard” is a bit of a misnomer, actually; the pickguard doesn’t actually guard against the pick scratching the finish.
On acoustic guitars, pickguards serve to protect the wood from the nails or fingerpicks when playing the guitar fingerstyle — when playing with a pick, the pick comes nowhere near to the pickguard.
On electric guitars, even that use for a pickguard is mostly irrelevant. It’s much cheaper and faster to manufacture an instrument if you can route all the control cavities into the top — without any complicated routing or drilling necessary for the cable runs — and a pickguard serves as a plate that hides the routs and allows easy mounting of components. Going a step further, mounting all the electronics to the pickguard enables the manufacturer (or anyone else who works on the guitar later) to solder and mount all the electronics outside of the guitar, and then just screw the complete assembly to the body of the guitar itself with a couple screws. Pickguards can make manufacturing and repairs easier!
…But sometimes — like on a Les Paul — they’re just decorative.
Since a pickguard is generally just a flat sheet of plastic (rarely, metal) cut into a shape, it’s very easy to paint or make your own.
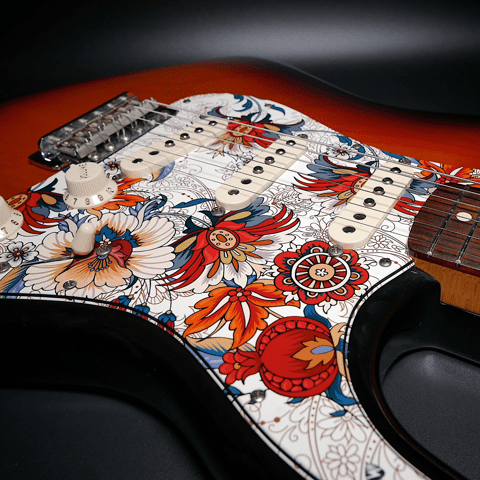 A custom pickguard on a
Strat.
A custom pickguard on a
Strat.
Custom pickguards can be found all over the Internet easily for common models of guitars; if your guitar is more unique or doesn’t normally have a pickguard, you can buy sheets of pickguard material and easily trace and cut your own, custom pickguard. A bit of sanding and it will look stunning.
One thing to bear in mind when buying replacement pickguards is that screw placement is… all over the place, generally. Sometimes the screw holes will match what you have, but generally you should not rely on that being true, and you may need to drill some new holes in your pickguard or guitar — or affix it with double-sided tape instead; that works too.
Pickup covers
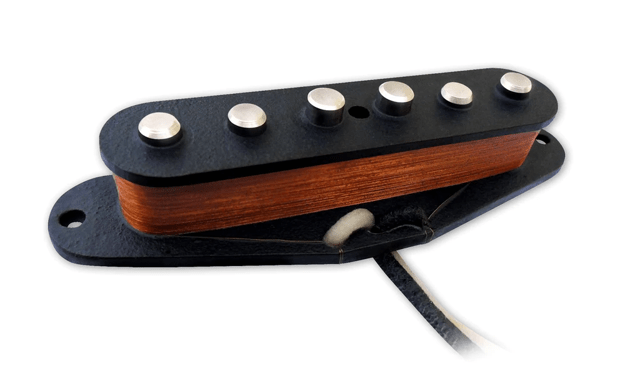 An uncovered single-coil
guitar pickup.
An uncovered single-coil
guitar pickup.
Pickups generally come with plastic or metal covers that protect the fragile coils from damage, but some (especially humbuckers) eschew covers and just use some tape wrapped around the coils.
It’s sometimes possible to remove covers from pickups that have them on — the exact process may be difficult and is outside the scope of this book.
If you have a pickup without a cover — whether because that’s the way it shipped from the factory, or because you removed the covers it came with — congratulations, you have a wonderful opportunity for a striking visual mod!
Plastic covers for common pickup form factors can easily be found in a variety of different colors, and they’re trivial to spray-paint if the existing selection doesn’t satisfy you.
Because the pickups are so central to the whole look of an instrument, putting some striking covers on can make a dramatic impact on how your instrument looks — they can provide a lot of contrast and visual interest, or offer a splash of color amid a mostly monochrome design.
If plastic pickup covers are not to your liking, there are also metal pickup covers that come in various shades of chrome, nickel, black, and gold. They come in a couple different varieties — “open” covers, which only cover the sides of a pickup, leaving the top open (to minimize the impact on tone that I’ll address in the next paragraph), covers with exposed pole pieces (the kind you might see on a classic Les Paul), and fully-closed covers (typical for active and “modern” pickups).
There’s a catch here, though — metal pickup covers can have a non-negligible impact on tone. The exact specifics are slightly out-of-scope for this book, so I will direct you instead to this stellar analysis by Alex Kenis.
The takeaway, overall, is that the material, thickness, and distance of a pickup cover from the poles can influence the noise level and sound of a pickup quite a bit — cheap and thick brass and steel pickup covers lying very close to the pole pieces dull high frequencies quite a bit but offer a significant level of noise shielding, whereas higher-quality thin nickel silver covers spaced out from the pole pieces don’t reduce noise as well but will also not impact tone nearly as much.
When using metal pickup covers, you should attach them to the pickup by soldering them onto the pickup’s metal base plate, or running a short grounding wire from a grounded point to the cover to shield the pickup from electromagnetic interference.
Metal pickup covers have one advantage over plastic ones when it comes to visual mods — you can pull off a really sick “etched” look by masking off a pattern with some tape and then carefully scratching the pickup cover within the outlines with a knife or something similar. You could probably take them to a local laser-etching place and ask for a custom laser-engraved pattern, too; the possibilities are endless.
On pickup pole piece spacing
Not all pickups are created equal. Take humbuckers, for example — although they look very similar, there are actually two equally common types of humbucker, differing in pole spacing; more if we go into details and extra strings, but we’ll talk about that in the chapter on pickups.
Gibson-style bridges have a narrower string spacing than Fender-style bridges. While it makes little difference for humbuckers in neck position, the difference closer to the bridge is significant enough where you’ll find two different designs, depending on the style of bridge your guitar has.
“Standard” or “G-style” humbuckers are the ones you’ll find in Gibson-style guitars. They have a spacing of somewhere between 49-50 mm between the centers of the outermost pole pieces.
On Fender guitars and ones with Fender-style vibrato systems, the string spacing at the bridge is wider than on Gibson designs, which in turn implies the pickups themselves are wider and have wider pole spacing. These are referred to as “trembuckers” or “F-style” humbuckers. The string spacing on these is somewhere between 51-52 mm.
This issue gets even more complicated when combined with the fact that Gibson have recently started moving towards wider pole spacing, with some modern Gibson pickups being as wide as 52 mm in the bridge position.
Similarly to humbuckers, single-coil pickups vary wildly in pole-piece spacing as well. Some Stratocaster sets can have as much as 4 mm of difference in the pole spacing of the neck and bridge pickups!
When shopping for pickup covers with exposed pole pieces, measure the pickup you’re going to be putting the cover on, and make sure the pole spacing matches!
Minor Hardware
There’s a lot of other minor hardware on your guitar, and the good news is: the more standard your guitar is (i.e. the closer it is to e.g. the standard Stratocaster formula), the more likely it is you’ll find a drop-in replacement!
Pickup Rings
There are two ways to mount a humbucker — directly to the body, or to a pickup ring which decouples height adjustment and mounting force. Pickup rings generally come in a variety of different sizes, differing in height and profile. Guitars like the Les Paul, with a significant neck angle and a bridge that sits at quite some height above the body will use pickup rings with an arched bottom surface — to match the contour of the body — and an angled top surface — to match the angle of the neck — where the bridge pickup ring will be significantly taller than the neck pickup ring. On the other extreme, guitars with low bridges and a neck that’s parallel to the body will generally use very thin and flat pickup rings. Make sure to inspect and measure your pickup rings before buying replacements.
Other sizes of pickup — trembuckers and mini-humbuckers, and even some P90s — may also mount to pickup rings, but they’re harder to find replacements for.
You can find pickup rings made of metal or plastic in a variety of different colors and designs — even clear acrylic ones! They’re trivial to replace, and a set of eye-catching pickup rings can add a lot of flair to an instrument.
A Triple Shot, in default configuration, allows you to achieve four different tones out of a single humbucker — the two coils connected in series, parallel, the neck-side coil solo, or the bridge-side coil solo. With two Triple Shots and two humbuckers, that’s a four tones out of the neck pickup, four tones out of the bridge pickup, and \(4\times4=16\) tones out of both, for a whopping total of 24 different tones!
The downside is — Triple Shots are really expensive. Frankly, obscenely so, but that comes down to the lack of competition — they’re the only such product on the market, as far as I know. If you have too much money and want the ultimate flexibility out of your guitar without sacrificing aesthetics, they might be the choice for you.
Control Plates
I’m going to cheat a little bit in this section and talk about two very different pieces of hardware.
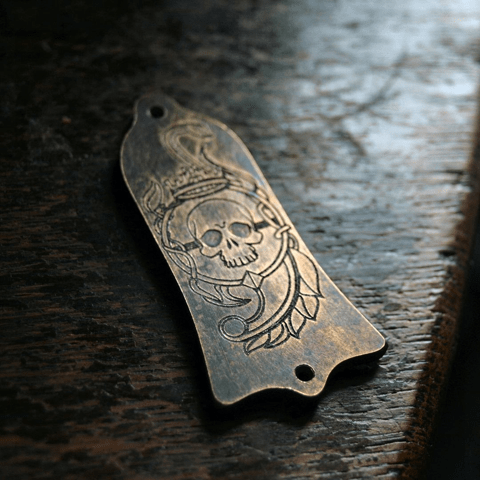
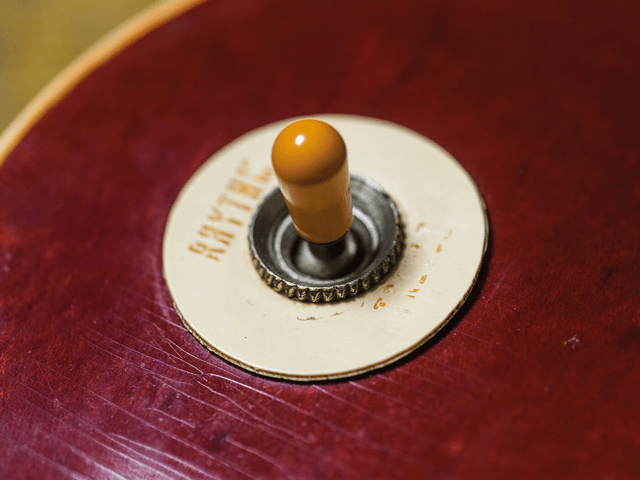
The first is toggle switch plates. You know those little chips you get under a Les Paul-style toggle switch that say “RHYTHM” and “TREBLE”? You can easily find places that will make those with custom text, or even with elaborate metal designs, like skulls and stars. A custom toggle switch plate is another fantastic way to add a small visual accent to your instrument. These are also absolutely trivial to install, and pretty cheap.
Then there’s control plates. These are not particularly common, but feature prominently on e.g. Jazz Basses and Telecasters. They’re the metal plates the electronics are attached to for shielding and ease of assembly.
As with most metal hardware, you can generally find them at least in the standard colors of nickel, chrome, gold, and black. There’s a significantly wider selection of Tele control plates compared to bass ones, so you might also find those made out of different materials, like wood. Both variants exist with custom engraving on them, as pictured.
The Tele Switch Conundrum
The Telecaster control plate has a pretty famous minor design flaw — it puts the volume knob extremely close to the pickup selector, so that with the bridge pickup selected, it’s difficult to adjust the volume without bumping the pickup selector or get a solid grip on the pickup selector without bumping the volume knob.
For that reason, fiddling with the control plate itself is one of the most common mods done to Telecasters.
A Telecaster with a reversed control plate.
Players who strongly favor the bridge pickup or want easier access to their volume knob will often reverse the control plate entirely — it’s an easy $0 mod that just requires flipping the existing control plate and rewiring the controls “in reverse”. This allows very easy access to the volume or tone knob and stops the switch from interfering with the knobs when in the bridge position.
A variety of Telecaster control plate styles.
For those who want to put more space between the knobs and the switch entirely, there exist a variety of Telecaster control plates that change the positioning of the potentiometer and switch holes to adjust the spacing of the individual controls on the instrument. A particularly common variant has the switch mounted at an angle, rather than in-line with the knobs; there also exist control plates that have cutouts for Les Paul-style toggle switches, rather than the stock blade switch, or ones that just move the knobs closer together.
If you have a Telecaster, consider getting yourself a control plate with a non-standard layout — they’re cheap, not particularly visually intrusive, easy to install, and they can make a big difference to how your instrument feels.
Neck Plates, Truss Rod Covers, and Other Minor Things
There’s a lot of other minor hardware on a guitar — bolt-on designs often have neck plates that prevent the screws from damaging the woods (although more modern instruments often use per-screw ferrules), a lot of guitars with tiltback headstocks have the truss rod covered by a little plastic cover, and if your guitar has a rear-routed control cavity (like a Les Paul), its covers can also often be replaced.
I’ll run through these with examples very quick.
Neck Plates
 An engraved neck
plate from Gotoh.
An engraved neck
plate from Gotoh.
Neck plates, most commonly found on Fender-style bolt-on designs, serve to distribute the force from the neck screws — to avoid damaging the wood or finish of the instrument. They’re just a flat metal plate with (usually) four screw holes, so they’re very cheap and easily available with a variety of custom designs and engravings.
Control Cavity Covers
![]() A clear
control cavity cover for a Les Paul.
A clear
control cavity cover for a Les Paul.
Guitars with rear-routed control cavities generally have them covered by a plastic (rarely, wooden) control cavity cover plate. Since it’s yet another flat, untextured piece of plastic, it’s a prime candidate for stickerbombing or replacing with a different-colored one, much like a pickguard! They’re also pretty easy to make yourself with a hand saw, some sandpaper, and time. I particularly like clear acrylic control cavity covers that let you see the electronics inside. Replacement Strat tremolo covers and Les Paul control cavity covers are easily available in a million different variants.
Truss Rod Covers
 A custom metal truss
rod cover.
A custom metal truss
rod cover.
On guitars with tiltback headstocks, the truss rod — if accessible at the headstock — is usually hidden under a plastic cover. This also happens to be one of the most commonly misplaced parts of a guitar — lots of secondhand guitars are missing this little piece of plastic, and a lot of players (yours truly included) prefer to keep it permanently off, since it does nothing but make setup more of a hassle. If you do, however, choose to keep your truss rod cover on, you may want to get some fun custom text on it, or maybe an entirely custom-made metal one. There are a lot of options, especially if you have a Les Paul or are willing to drill a couple tiny holes in your headstock.
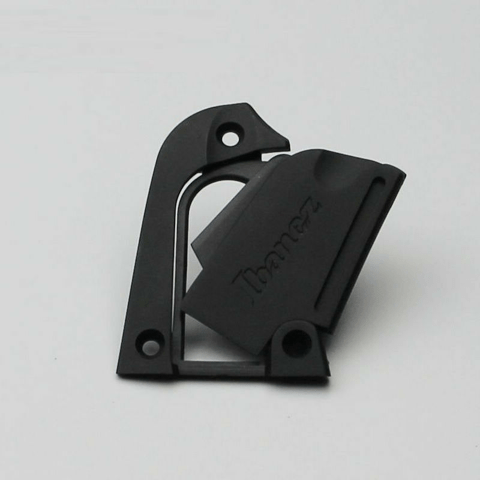 An Ibanez truss rod
cover.
An Ibanez truss rod
cover.
If you want the best of both worlds — to keep your truss rod covered, yet not have to unscrew the cover for adjustment — Ibanez, in their never-ending quest to overengineer every single part of a guitar, have truss rod covers that have a little plastic “door” that swings out to the side and a channel cut in-line with the truss rod to allow you to get an adjustment tool in there without unscrewing the pickup cover. Neat!
Things You Can Make
Everything we’ve talked about so far is mostly “flat” stuff where most of the visual customization options available to you will be changing the part to one of a different color or pattern. It’s time to talk about things that vary in shape.
Knobs
Okay, let’s get the laughter out of the way first, ha ha, there’s going to be lots of unfortunate phrasing in this section. It was unavoidable.
Knobs. My favorite thing to swap out, believe it or not. The knobs on a guitar can be anything from a purely utilitarian piece of plastic to a beautiful central piece of the composition that is your instrument. Every knob is a design statement.
How To Avoid Getting Shafted By Shafts
Before we talk about the different styles of knobs, let’s talk about compatibility first. As far as knobs are concerned, there are two types of potentiometers (there are more, but only this distinction matters for the purpose of what knobs will fit): split shaft and solid shaft.
Split shaft potentiometers have — you guessed it — a split shaft. The shaft is knurled to stop the knob from spinning freely, and split down the middle to allow you to adjust the pressure it exerts on the inner surface of the knob by slightly forcing the two halves apart with e.g. a flat-blade screwdriver. These are used on virtually all modern guitars.
Split shaft pot shafts have an outer diameter of 6 mm or 0.235“.
Cryptid pots
I’m told there are two different types of split shaft pots that differ by the density of the knurling, but… I’ve never seen them actually used. In my experience, split shaft knobs fit on split shaft pots; if there are distinct types of split shaft pots, then the “other” kind is extremely obscure and I have never come across it or knobs made for it.
To install a knob with a set screw on a split shaft pot, align the set screw with the split.
A solid shaft potentiometer’s shaft is a completely smooth, solid cylinder. Since they don’t have knurling or a way to compress and exert pressure that would hold a knob in place, solid shaft potentiometers rely instead on a small set screw in the knob itself that presses up against the shaft.
The outer diameter of a solid shaft potentiometer’s shaft is about 6.35 mm, or 1/4“. This means they will not fit most knobs.
Solid shaft potentiometers are used pretty much only in vintage guitars — primarily on Telecasters.
Before shopping for knobs, make sure to check what style of potentiometer your guitar is using, and plan accordingly. Most knobs will fit split shafts; if you have a solid shaft, double-check that the description of the knob specifies a 1/4“ inner diameter.
Classic Knob Styles
There are many, many styles of knobs in the guitar world. Let’s start by looking at the classics.
-
Strat-style
If there is a classic knob design, this is it. Legible, utilitarian, available in a plethora of colors — I never quite figured out which way the numbers are supposed to go. These have a certain air of lightness and yet ruggedness to them — they will feel right at home on a sleek yet classic-influenced guitar — just like a Strat!
-
Gibson “Top Hat”
These are the knobs most Les Pauls and similar designs come with. They have a solid colored plastic base plate with numbers, while the top of the knob is made of a different, translucent plastic. Their shape is similar to the Strat knobs’, but they lack any knurling. You can also get them with metal inserts on the top with labels describing the knob functions.
-
Speed knobs
Somewhere in the 80s (I think) Gibson introduced a new knob design that wasn’t stepped midway through to a wide cone, like the classic top hats, but rather had completely straight walls. For whatever reason, these are called speed knobs. They used to be a favorite of many, many guitar manufacturers, until metal dome knobs became fashionable in recent years.
-
Telecaster/Precision Bass
These are classy as hell. Heavy, solid knurled metal, these were made for the 1/4“ solid shaft potentiometers — but you can easily find copies for split shafts. There are two styles of these — the more vintage flat-tops, and the more modern “dome” variant.
The set screw makes them uniquely easy to adjust or replace even on split-shaft pots, because rather than try to pull the knob off with force all you need to do is loosen one screw. They also feel great — the knurling provides lots of grip, and a lot of the knobs of this style feel very substantial and high-quality due to the material choices — solid brass is popular, as is aluminium.
The Fender replacement tele knobs are… questionable. They are horrifically overpriced, and the “Tele/Precision Bass Knurled Knobs” are garbage quality as well — they’re probably cast zinc or something similarly cheap. The “Pure Vintage” ‘52, ‘58, and ‘60s knobs Fender stocks are much higher quality — and made from proper brass and aluminium — but cost over $20, which is slightly ridiculous for a pair of knobs.
Psst, Allparts makes very nice replacement tele knobs for half the price Fender wants.
-
Jazz Bass
These are quite funky and look more like amp or pedal knobs than like typical guitar knobs — in fact, MXR uses these on a lot of their pedals.
- “Witch Hats” Not only do these have the sickest name of any knob style, they also have tremendous vibes. They were used by both Gibson (ES-335s, SGs) and Fender (Jazzmaster, Tele Deluxe) — they are minor variations between the two styles, and you can find “witch hat” knobs with or without a set screw, but they all look broadly similar — a narrow knurled shaft with a silver plate at the top and a flatter, wide base.
-
PRS “Lampshade”
These are quite similar to Gibson speed knobs but have a polygonal, rather than completely round, profile and flare out slightly towards the bottom. I think they look sick. Especially the clear ones look stunning on a guitar with e.g. a flat black and white color scheme, they look almost like crystal or glass.
Unique and Novelty Knobs
Of course, the classic knobs are not the only flavor of knob out there. Etsy in particular has tons of unique knobs, and I highly recommend browsing through all the varieties out there and picking something that will look great on your guitar. Here are some of my favorites to give you an idea of the variety of knobs you could put on your guitar:
-
Lucky Dog Dragonback II (Etsy)
Self-describing as “the most aggressively knurled knob on the market”, these are machined out of solid aluminium and have a particularly heavy industrial look to them. Excellent.
-
Fancy-topped knobs
Feel like solid brass isn’t premium enough for you? How about solid brass with a mother-of-pearl top? There are plenty of these in all shapes and sizes. Similarly, you can find ones topped with abalone, faux-tortoiseshell, faux-gemstones (and probably real ones too!), and a variety of other eye-catching materials. Want a geeky Star Trek-themed guitar? How about some Starfleet insignia-topped knobs?
The possibilities are endless.
-
Wooden knobs
If you want to add a “handmade” flavor to your guitar — especially if it has a natural finish — it’s hard to beat wooden knobs. These can be found in a million billion designs and you’re certain to find one that will fit your instrument.
-
Funky knob shapes
Want a knob that looks like a star? A D20? A shotgun shell? How about a skull? Anything you can drill a hole in, someone probably makes guitar knobs out of. Thingiverse also has plenty of these, if you have access to a 3D printer.
-
Patterned knobs
A particularly common trend in knob design is to have a metal knob with some kind of pattern or symbol engraved on the top. You can find a wide variety of these — with vines, celtic weaves, pentagrams, old US coins pressed into the top, etc etc.
Summary
The knobs are the second most-frequently touched part of your instrument, after the neck.
If you want to give your guitar that extra bit of premium feel, try swapping them out for heavy, solid metal knobs. If you want a more industrial vibe, try witch hats or any of the rougher, beefier metal knobs. If you want something high-class and shiny, try PRS knobs or ones with premium material inlays.
Fox’s Gear: Screw-fit Dome Knobs
Knobs are one of the first things I replace on my instruments, because they’re cheap and taking off press-in (as opposed to screw-tightened) knobs is an absolute pain in the ass, so I’d rather avoid doing it more than once — especially if I’m going to ever mess with the electronics.
Metal knobs also, subjectively, for me, make an instrument feel a lot more premium than plastic ones, so I usually get rid of plastic knobs and replace them with brass dome knobs held on by set screws.
Experiment! Knobs are inexpensive and easy to swap out, and they can add a lot of flavor to an instrument. Well-selected knobs really tie together a guitar visually and can make it feel more personal and consciously designed rather than mass-produced on an assembly line.
Switch tips
We’ve talked about switches in-depth in the chapter on wiring — this is about switch tips.
Most “big” guitar switches (the kind you find used as pickup selectors) come with (usually plastic) removable switch tips.
 The toggle switch on
a Les Paul, with a cream plastic switch tip.
The toggle switch on
a Les Paul, with a cream plastic switch tip.
Switch tips come in almost as wide a variety as knobs. The blade-style switch tips are interchangeable, for toggle switches you’ll have to find one made specifically for your switch (although the Les Paul shaft is pretty standard).
Much like we did with knobs, you’re going to have the most luck looking for novelty switch tips on sites like Etsy and Ebay; some show up on Amazon and Aliexpress, and sometimes you can find interesting switch tips in stock at usual guitar hardware retailers or sold by individual manufacturers.
The interesting thing about switch tips — and knobs, now that I think about it — is that basically anything you can drill a hole in (if you have a toggle switch) or cut a slot in (if you have a blade switch) can be a switch tip. Go wild — hell, make switch tips out of old Hot Wheels cars if you so desire. With a drill or a dremel and maybe some hot glue, anything you want can be a switch tip.
Plastic switch tips can also be easily purchased in basically any color you’d like, and are very easy to paint yourself — just give it a couple quick layers of spray paint and you might not even need to sand it.