Acquiring And Installing Gear
Before we start talking about swapping stuff on your guitar for other stuff, it helps to know where and what other stuff to get. I’ll also quickly run through tools but try not to give specific recommendations because I don’t want to get into tool discourse.
Tools, or “How Do I Actually Install This Thing?”
Every hardware upgrade or swap will fall into one of a few categories, based on the tooling necessary to achieve it. I will run through them quickly and suggest additional equipment that might make your job easier.
Hope you have a screwdriver!
For virtually all of these, you will need at least a screwdriver. I will assume you have an appropriate screwdriver for any screw you may encounter, and will not mention screwdrivers when listing requirements from this point onwards. If you do not have a set of screwdrivers, I highly recommend getting e.g. an iFixit driver kit or anything similar.
-
“It Just Goes On” This is stuff like knobs, strap buttons, pickguards (sometimes), string trees, some tuners, etc etc etc, where it’s held on by friction or a couple screws. If I don’t mention tools when talking about a piece of hardware, that probably means it falls into this category.
-
“A Soldering Iron” Pickups, jacks, switches — anything that’s wired up, you will need to desolder to replace and solder back together afterwards.
I cannot overstate the utility of a good soldering iron — use a chisel tip, and the hotter it gets, the better.
Also, use leaded solder — although “leaded” sounds scary, the lead-free solder is more expensive, is an absolute pain to work with, and doesn’t actually make a difference to your health (disclaimer: am not a doctor, this is not medical advice, don’t sue me if you decide to snort leaded solder) because the boiling point of lead is far above the temperature of soldering irons, so the smoke from soldering is not lead but toxic flux fumes which are equally present in both types of solder.
Speaking of toxic flux fumes, if you’re soldering, please do so in a well-ventilated area. Worst case, just pop a window open as far as it will go, solder everything up, and vacate the room after you’re done. Other than solder and a soldering iron, a third hand is often a tremendous help. Third hands are cheap and basically all the same, just preferably get one with gooseneck arms; the ones with solid, jointed arms can be hard to get into the right position.
A multimeter with a continuity tester is extremely useful for double-checking that the connections you make are solid, and there’s no connection between anything that shouldn’t be connected. It’s also useful to measure pots and pickups sometimes when trying to troubleshoot a broken circuit.
For neatness, I also suggest having handy multiple colors of wire if you ever need to splice some in, some heatshrink, and electrical tape. Copper tape might also come in handy if you ever need to fix some shielding, or decide to do the Fox Bridge Grounding Fix:
The Fox Bridge Grounding Fix
The Fox Bridge Grounding Fix is a mod I always do the first time I’m messing with a guitar.
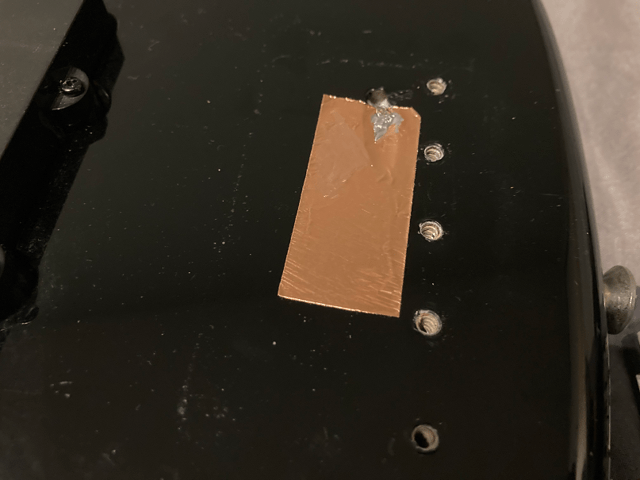 A bit of copper
tape under the bridge, with a ground wire spot-soldered on.
A bit of copper
tape under the bridge, with a ground wire spot-soldered on. Unfortunately, most manufacturers only run an extremely thin ground wire to the bridge and rely entirely on pressure to hold it there; that wire can easily become dislodged and make the guitar noisy as all hell. I’ve played gigs where I’ve had to twist an aluminium sandwich wrapper up and lodge it between the bridge and output jack to fix the noise from a grounding wire that came loose mid-show!
On voltage and grounding
Voltage is the difference in electric potential between two points — saying one point is at 1.5V is meaningless without a reference point. For that reason, one “end” of a circuit must be connected to “ground”, i.e. a reference point that can absorb lots of electricity without changing its electrical potential.
In most guitars, the ground is connected to the bridge, which contacts the strings and in turn grounds the entire circuit through the strings to the player’s body. This means that if the contact is poor or the connection to the bridge breaks, the circuit’s reference point will lose its “stability” and the guitar will become much more susceptible to noise.
I have a simple solution: the first time I take the strings off a new guitar, I always unscrew the bridge and stick a little square of copper tape underneath it, then solder the grounding wire to it. The copper tape ensures excellent conductivity and a large contact area, and the solder joint makes sure the wire will never come loose.
There’s two categories of tooling left, and those are the two I will only gloss over in this guide.
-
“A Paint Booth”
Some visual alterations, like adding decals on a headstock or painting patterns onto the body, will require you to refinish at least part of the guitar.
You can paint a guitar at home. I’ve done it. Would I recommend doing it? Fuck no.
First of all, unless you have a balcony, garage, or garden that you can afford to splatter in paint, you cannot paint a guitar safely. Paint fumes are extremely toxic and you need an extremely well-ventilated area and respiratory protection at the very minimum.
The problem with well-ventilated areas is… they’re well-ventilated. If you’re painting in a garage or a garden, you will end up with tons of plant pollen, seeds, other floaty plant bits, dust, debris, insects, and all that stuff embedded in your finish. You can get around some of it by building yourself a little paint booth with forced exhaust (I built one out of cardboard boxes and used an array of computer fans to pull air and dust out), but you’ll still end up needing to sand down every couple layers because a mosquito got stuck in the clearcoat. It takes weeks, and then the sheer amount of scrubbing and sanding necessary to get the finish to be smooth and glossy and polished will absolutely destroy your arms.
Just, don’t. It’s not worth it.
-
“A Woodworking Shop”
Take it to a luthier. Some of the more extreme mods will require you to drill or route out significant amounts of wood from your guitar. Want to replace a single coil pickup with a humbucker? You’ll probably1 need to do some woodworking — or, I would suggest, have someone else do the woodworking.
1Some Telecaster bodies are routed for humbuckers under the pickguard, even though they come with single coils.
Where To Buy Hardware From
We’re going to be talking about guitar hardware, so I would suggest finding a guitar hardware store that carries a broad range of parts at good prices and with good shipping times. If you’re in the US, stewmac is great but they kinda just carry a few items from each category. There are probably retailers with a wider selection of gear.
If you’re in Europe, Thomann is very hard to beat, although for very specialized things you might have to look elsewhere. They’re improving year by year, though — they used to have a very small selection of e.g. pickups, and now they carry pretty much everything I’m interested in.
If you’re looking for novelty hardware — knobs, pickguards, etc with cool patterns or made of funky materials — spend some time searching Reverb, Etsy, Ebay, and Amazon. Chances are you’ll find what you’re looking for; if not, googling for e.g. “custom pickguards” should bring up plenty of craftspeople who will happily make what you want.
Who To Buy Hardware From
Like with most things, there are dozens of hardware manufacturers that make products at every price point, and it can be tricky to choose if you’re not already familiar with their offerings.
My recommendations, in descending order of price:
- Hipshot (USA) — Very pricy. They make some of the highest-quality bridges you can get, excellent tuners (especially their bass tuners are somewhat of an industry standard in basses with high-end hardware), and some funky specialty hardware like detuners (under the X-Tender name) and B-benders.
- Graph-tech (Canada) — Very pricy. They mainly make nuts, but also piezo bridge systems and saddles made out of specialty engineered materials. They also make tuners.
- ABM (Germany) — Pricy. They mainly make bridges; usually out of very high quality brass.
- Schaller (Germany) — Very high quality, but still somewhat reasonably priced. They make virtually everything, from bridges, through tuners, to switches and knobs. Always superbly machined, usually using premium materials (brass, aluminium, titanium). Their straplocks are also pretty much the industry standard.
- Gotoh (Japan) — My preferred supplier of guitar hardware. Not only do they make virtually everything and at reasonable prices, but they also have an extremely wide selection of colors, styles, and materials for their products. I also appreciate that unlike most other manufacturers, they prominently list the materials used in their products — so you have the luxury of making an informed choice when you try to decide between e.g. steel, brass, or titanium saddles.
- Göldo (Germany) — They make everything, pretty cheap, and generally pretty good. Not much else I can say here. I often reach to Göldo for minor hardware that doesn’t affect playability. Göldo owns Duesenberg, btw.
- Allparts (USA, but I’d be shocked if their hardware is not made in China at those prices) — Affordable! They also make virtually everything. Hardware is good quality with solid materials.
Honorable mentions:
- Fender (USA, but hardware generally made in China) — Fender designs are so standard and so widely copied that sometimes the best way to ensure you have something that fits is to go directly to the source. Fender stuff ranges from overpriced as hell to pretty reasonable, and the quality is also all over the place, so make sure to read reviews and make a decision for yourself.