Tuners, Nuts, String Trees: On Tuning Stability
Tuning Stability Issues And Their Common Causes
Some guitars seem almost incapable of staying in tune. There’s nothing worse than going into a big, climactic solo only to realize one or more of your strings are wildly flat! Fortunately, problems with tuning stability generally arise from the same set of common causes. I’ll run through them from most to least common.
-
Improper stringing or tuning technique, string choice
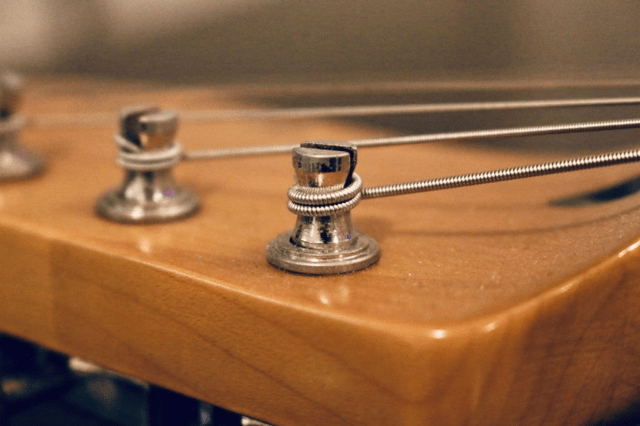 A somewhat correctly
wrapped low E string — although personally I’d use a couple more windings!
A somewhat correctly
wrapped low E string — although personally I’d use a couple more windings!
It’s quite surprising how many guitarists and bassists don’t know how to actually restring their instrument properly. It’s not good enough for the strings to “be on”; electric guitar and bass tuning machines are part of a complex system carefully designed to keep your instrument in tune, and not utilizing them to the fullest is asking for trouble.
On a properly strung instrument, the string winds around the tuner multiple times in a way such that previous windings push the new windings down, helping increase the break angle over the nut. It’s a bit of a balancing act and the ability to guesstimate the correct length of string necessary to achieve a good break angle comes with practice — too little and you won’t get enough break angle, too much and you’ll have to wrap the string around itself, leading to friction and tuning instability.
Roundcore strings need special care when restringing — since the wrappings are free to move around the core of the string, you need to put a sharp bend in them before cutting the excess off, to prevent the windings from coming loose.
After a string is secure on your tuning machine, you should give it a couple solid (and I mean really solid) tugs — tuning it back up to pitch every time — to get the slack out of the string and let it stretch to the length it “wants” to be at. Repeat until the string stops going out of tune after giving it a sharp pull.
Do strings “stretch”?
Whether strings actually stretch or if the slackening that happens when tugging on fresh strings is a combination of windings shifting around and tuner slop has long been a topic of debate in the guitar world.
Do metal strings really stretch? I don’t know — let’s do some math and find out!
The formula for the elongation of a circular bar is
\[ \Delta L = \frac{4WL}{\pi d^2 E} \]
where:
- \(W\) is the load on the bar, in Newtons
- \(L\) is the length and \(\Delta L\) is the resulting elongation (stretching) in meters
- \(d\) is the diameter of the bar, in meters
- \(E\) is the elastic modulus of the material, in \(\frac{\mathrm{N}}{\mathrm{m^2}}\)
We can see that the elongation depends on these terms as follows:
- Increasing the load on the string \(W\) or its length \(L\) makes it stretch more, and decreasing them makes it stretch less
- Increasing the diameter of the string \(d\) makes it stretch less, and decreasing it makes it stretch more
- \(E\) is constant for the material, so we don’t need to consider changing it (but it works similarly to the diameter, i.e. the greater the elastic modulus, the smaller the elongation).
I’ve often heard people say that the metal in the string doesn’t actually stretch meaningfully, and by “stretching” the strings all we do is remove slack and distribute it across the entire length of the string and its wrappings. I figure the most promising way to prove or disprove that claim is to calculate the elongation in terms of length for the most stretch-friendly conditions possible — i.e. we’ll choose our values to maximize \(\Delta L\).
We know that the thinner a string, the more it stretches; the thinnest-core string I could find is a .007“ (0.0001778 m), so that’s the number we’ll use.
We know that the higher the tension, the more a string stretches; the highest tension I could find listed in any string tension chart was around 30 lbs, so let’s double that to adjust for ridiculous tunings and use 60 lbs (267 N) as our \(W\).
All that’s left now is the elastic modulus — which is a constant, and for steel is equal to \( 29~\mathrm{GPa} = 29 000 000 000~\mathrm{Pa} = 2.9 \times 10^{10} \frac{\mathrm{N}}{\mathrm{m^2}} \).
Let’s solve for \(\Delta L\) in terms of \(L\) for those extremes:
\( \Delta L = \frac{4WL}{\pi d^2 E} = \frac{4 \times 267~\mathrm{N} \times L} {\pi (0.0001778~\mathrm{m})^2 \times 2.9 \times 10^{10} \frac{\mathrm{N}}{\mathrm{m^2}}} = \frac{1068}{2880.125}L = 0.371~L \)
Huh. There’s our answer: a guitar string can theoretically stretch to over 30% longer than its unloaded length! That’s a significant change.
In practice, it will probably break long before then, but still, that’s not what I expected; I learned a new thing today!
It’s always fun to disprove your misconceptions with hard numbers. Turns out — it’s hard to steer clear of misinformation. I rewrote the paragraph immediately preceding this section after doing the math, since I originally wrote it with the assumption that the metal does not actually stretch meaningfully under the forces present in a guitar!
So: yes. Guitar strings do stretch. And lesson learned for me: always do your research before repeating factual claims heard from someone else.
Knowing that strings do actually stretch, I would suggest pre-stretching your strings by pulling on them not only after putting fresh strings on, but also with every tuning change.
Another common source of tuning instability I see all the time is tuning from above. To avoid string binding and help the slack settle better, you should always tune a string up to pitch from below and avoid over-tightening then tuning down to pitch.
While we’re on the topic of strings, please change your strings regularly, or at least clean them. The more gunk, rust, and dead skin cells accumulate on a string, the more its behavior diverges from how an ideal string should vibrate — and that can not only ruin your tone, but also be a problem for having your instrument hold tuning.
If your strings seem to drift out of tune no matter what you do, you may also want to try heavier gauges, which tend to hold a tuning better than thinner strings.
Although, personally, I wouldn’t trade the feel of playing thin strings even for an improvement in tuning stability.
-
Bad string break angle over the nut
Oh gods. It blows my mind how some manufacturers have still not figured this out in 2022.
Break angle is a balancing act. On one hand, we want an angle as sharp as possible, so that there is a lot of force holding the string in place. On the other hand, we also want to minimize the friction in the nut slot, because a nut that “grabs” a string too tightly can prevent it from moving the way it wants to move to ring out clearly and achieve stable tuning.
A nut slot is cut precisely by the luthier or guitar manufacturer so that it has a “ramp” that allows the string to break over the nut smoothly, rather than forming an abrupt edge that can catch on windings, leading to tuning issues. The slot is cut vertically into the nut.
If the string doesn’t come into the nut at a right angle, but instead approaches diagonally from one of the sides, it will bear and exert force not just on the carefully-cut “ramp”, but also on one of the walls of the nut slot. This greatly increases the friction present in the system, and diminishes the benefits of a properly cut nut.
Thinking about this three-dimensionally, there are two ways the angle of the string coming into the nut can pose a problem: the angle can be too shallow vertically, or too steep horizontally (i.e. side-to-side).
Coincidentally, the first of these problems is particularly prevalent in Fender-style designs, while the latter is common to Gibson designs. Let’s look at how to fix them.
Shallow vertical angle
If you hear people talking about string break angle, this is usually what they mean.
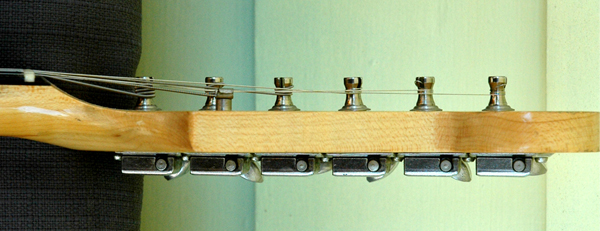 Somewhat shallow
string break angle on a Stratocaster-style headstock.
Somewhat shallow
string break angle on a Stratocaster-style headstock. Broadly speaking, there are two kinds of guitar headstock designs — “straight” and “angled” (or “tiltback”) headstocks. Most Fender-style headstocks are “straight” — i.e. the headstock is parallel to the fretboard — which can lead to break angle problems, if not supplemented by one or more workarounds.
The most common of these is a string tree.
String trees
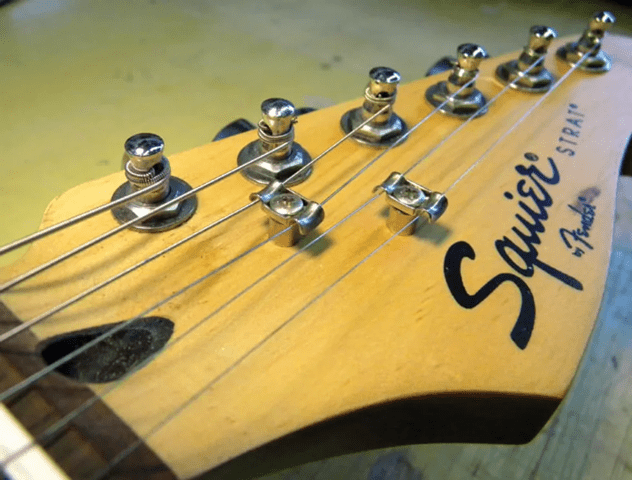 A pair of string trees
on a Squier Strat.
A pair of string trees
on a Squier Strat. A string tree is anything that holds one or more strings down, helping increase the angle they enter the nut at. They’re extremely inexpensive, require drilling just one screw hole to install, and they offer a pretty great solution to the problem of insufficient string break angle.
Unfortunately, string trees introduce yet another source of friction that impedes the string’s movement, and another edge that the string can bind against.
Higher-end instruments will often use retainer bars (a round bar of metal that sits across all the strings, providing an identical break angle and a smooth, round surface that minimizes friction) or roller string trees that use freely rotating “rollers” to hold down the string.
These are especially handy if you have a vibrato system, the use of which would cause lots of friction — and even the risk of string breakage! — with a conventional string tree.
If you have a straight-headstock instrument and it seems like you’re not getting enough break angle, try adding a string tree. It might be just what your instrument needs to get rid of annoying string buzz and tuning instability.
Staggered tuners
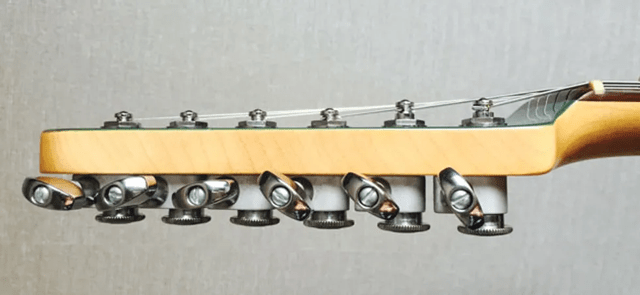 A Strat-style guitar
fitted with staggered tuners.
A Strat-style guitar
fitted with staggered tuners. I mentioned string trees come with their own friction and binding issues, and while roller-style trees somewhat address the issue, another clear solution is to… just avoid having string trees altogether.
Unfortunately, this is only really possible by building the headstock at an angle, like Gibson do. There does, however, exist a kind of a middle-ground solution — staggered-height tuners.
These are made so that the tuners’ string posts get shorter and shorter as you get further away from the nut, in a way “creating” an angle in the stringing where the headstock provides none.
This does make the situation better, but, due to how short a tuner post is, relatively to the distance from the nut, doesn’t provide nearly the benefit that an actual string tree does. Due to their limited usefulness, staggered tuners have a bit of a “last-resort gimmick” reputation, but perhaps you’ll find that they are just the fix you need.
Steep horizontal angle
This problem is as old as the guitar itself. While Fender’s flat, inline-six headstock design often makes the vertical angle of the strings too shallow to provide stable and buzz-free tuning, he did a fantastic job — first with the Fender inline six, and later with the Music Man 4+2 headstocks — at keeping the strings straight, horizontally, as they break over the nut.
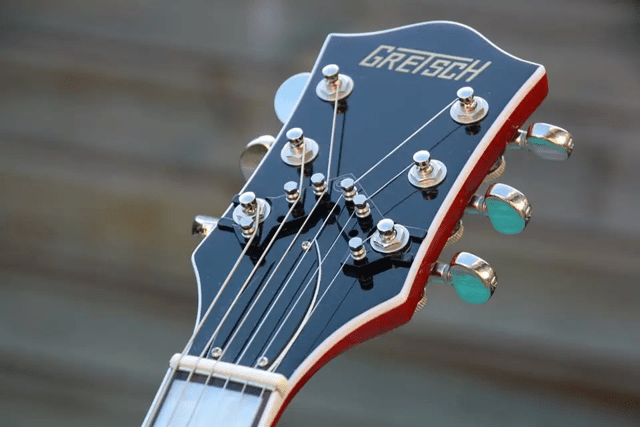
Instruments with classic 3+3 headstocks aren’t as fortunate. Especially the middle strings will often enter the nut at very steep angles, causing lots of friction and throwing the instrument out of tune with every bend.
Not all 3+3 headstocks suffer from this problem! PRS, for example, does a pretty good job of keeping the strings straight, even with a 3+3 headstock.
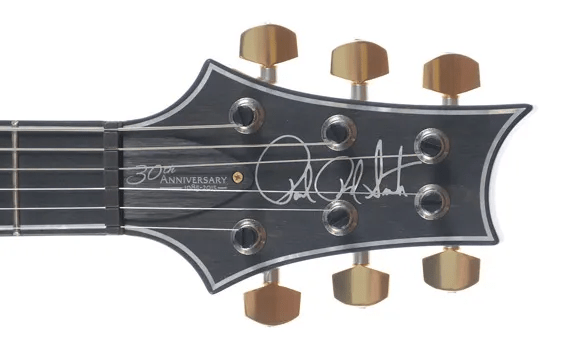 A PRS headstock, with
the strings entering the nut pretty close to straight.
A PRS headstock, with
the strings entering the nut pretty close to straight.The solution to this problem is a device not unlike a string tree, sold commercially under the name String Butler but trivial to DIY — any thin vertical post attached to the headstock that can be used to “anchor” the strings and change their direction will work just as well.
 A String Butler in use.
Where a string tree forces the string vertically down, a String Butler forces it to extend sideways, horizontally. This way, the strings can be brought in-line with the nut slots, minimizing friction and binding.
There are a number of similar devices available, even in novelty shapes — I found a skull-shaped string guide on Etsy, visible on the right!
-
Nut and bridge saddle friction
Have you ever had one of your strings suddenly go “ping!” mid-bend and drop in pitch? That can happen when using strings too thick for your nut slots, or when there’s enough friction between your string and the nut or bridge saddle to make your string bind up against it.
This is rarely a problem with properly manufactured nuts on guitars without a vibrato system. It doesn’t hurt seeing if lube can fix your issues, but I wouldn’t suggest a nut replacement unless you know for certain that nut friction is causing issues and your guitar has a vibrato bridge or tailpiece.
Nevertheless, we’ve talked about bridges in a previous section, so let’s examine the nuts now.
Nut lubricants
Want to reduce friction? Use lube! Obvious in hindsight, there are a number of dedicated guitar nut lubricants on the market. Most famous perhaps is Big Bends Nut Sauce, but in a pinch, even a bit of pencil lead scrubbed up and down the nut slot will do — graphite is a pretty good lubricant.
Self-lubricating nuts
Nuts traditionally used to be made from bone; over time, we’ve partly shifted to plastic, then to specialized engineered materials and more specialized substances like brass or graphite.
Self-lubricating nuts are made from graphite or a specially engineered plastic that coats the surface of an object rubbing against it with microscopic particles of itself, making it smooth and greatly reducing the friction present in the system.
A particularly popular brand and material for engineered nuts is Graph Tech’s TUSQ plastic, which they advertise as “man-made bone”; marketing bullshit (like claims that it “increases harmonic content by 200%”, whatever the fuck that may mean) aside, it is — unlike real bone — isotropic and consistent, which makes it easy to work with and predictable — bone can have softer and harder spots, which may interfere with proper nut setup and use.
Graph Tech sells two brands of TUSQ nuts — “TUSQ” and “TUSQ XL”. Only TUSQ XL is self-lubricating, as it’s impregnated with PTFE (teflon).
The most “premium” option is brass, a self-lubricating metal. Since brass is much harder to file than bone or graphite, you’ll often find adjustable brass nuts. These have the benefit of being able to adjust string action without having to file the nut — which always risks rendering it unusable — and allowing for upwards action adjustments without a nut replacement.
Being much harder than other options, brass nuts also wear down much slower — they’re as close as you can get to a “nut for life”, “never needs a replacement” option. Unfortunately, they are also generally quite costly.
If you happen to need a nut replacement and have found friction to be a problem in the past, consider a brass, graphite or TUSQ XL nut!
Roller nuts
Just like with string trees and bridges, at some point someone figured using rollers for the bearing surface under the string would help reduce the friction present in a nut.
If you use your vibrato bar so heavily that even a lubricated nut cannot keep up, a roller nut might be the solution.
Nowadays, pretty much the only company making roller nuts is Fender, and they require permanent modification to the fretboard that will make it impossible to go back to a “normal” nut later. On the other hand, a roller nut has significant benefits — much like some brass nuts it is adjustable for height, and, since it uses rollers rather than pre-cut channels, the same nut can work for any string gauges.
Locking nuts
Finally, if even a roller nut interferes with your wild vibrato use, there’s one ultimate solution to the problem — preventing any movement of the string across the nut at all, therefore eliminating any friction.
This is the principle behind locking nuts, which are almost exclusively found on instruments with a locking vibrato system.
A locking nut uses a set of screws and metal clamps to clamp down on and lock the strings in place, immobilizing them. While they’re mechanically the most stable and frictionless nut design, locking nuts also prevent the tuners from altering the pitch of a locked-down string, necessitating the presence of fine-tuners on the bridge itself, and preventing e.g. quick detuning to drop D.
-
Excessive magnetic pull from the pickups
I have to emphasize something here.
The first three causes of tuning instability I outlined account for a vast majority of problematic cases I’ve seen. It’s such a dramatic majority that the cause I’m going to outline next isn’t even confirmed by much more than anecdotal evidence online. That’s how rare it is for tuning instability to be caused by something else than those three points.
Having said that, I have seen and heard instruments that just wouldn’t play in tune… until they had their pickups lowered.
Bringing a pickup closer to the strings increases its output and signal-to-noise ratio, but it also increases the magnetic pull on the strings themselves. With pickups that are very close to the strings, that effect can get strong enough to pull the string out of tune on its own, over time or as a result of harder picking.
I don’t know how common this is, but if all else fails and your pickups are particularly close to the strings, try lowering them - it might just do the trick.
And… that’s it! Those are all the common causes of tuning instability, and the available solutions for each of them.
“Wait, what? Really? What about tuners?”
What about them?
“I thought if my guitar won’t stay in tune I’m supposed to upgrade the tuners!”
…Okay, fine. Let’s talk about tuners.
Tuners
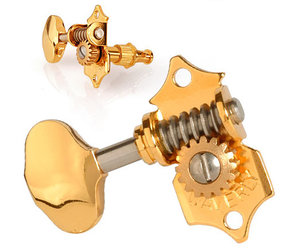 An open-back-style tuning
machine.
An open-back-style tuning
machine.
You probably don’t need to swap your tuners out. Really.
Well, maybe you do, if your tuners are damaged in some way or just really bad. But the truth is — a tuner is just a worm gear and a screw. It has a whopping two moving parts, which also happen to be some of the most frequently and reliably manufactured parts in any mechanism in the world.
Even bad tuners are generally good enough, and the quality improvement you get for buying extremely high-end tuners is negligible. Yes, they will probably have less slack and depending on the gear ratio, might make accurate adjustments easier. But they won’t fix your tuning stability issues — we got that part down really well, and even the cheapest tuners will hold pitch just fine, as long as they’re not broken or massively worn out.
There’s an old saying in engineering about gears: if they don’t have any slack (backlash)… they will make their own slack. A certain degree of takeup and free rotation before the tuner engages is unavoidable, so that won’t be affected by upgrading to “higher quality” tuning machines either.
That doesn’t mean there is no benefit in upgrading tuners, though:
-
Higher quality tuners will usually use better and longer-lasting grease or other lubrication, and will operate smoother and wear out slower than “cheap” tuners.
-
You may want to change the gearing ratio of your tuners. I don’t have reliable information about stock gearing ratios (anecdotally, I’ve heard Fender guitars use 18:1 ratio tuners, and Gibson uses 14:1, but I can’t verify how true that is), but replacements will usually list their ratio explicitly.
L + ratio + skill issue
What the hell does a “tuner ratio” represent?
It’s very simple, actually. It tells you how many rotations of the tuning peg translate to one full rotation of the tuner post; i.e. on a 18:1 ratio tuner, if I make nine complete revolutions of the tuning peg, that will rotate the post 180°.
A higher gearing ratio allows for more precise pitch adjustments and tuning; a lower gearing ratio makes tuning and restringing faster.
I’d say this is a tradeoff, but in my experience, most people strictly prefer higher-ratio tuners. Restringing is something you do maybe once a couple weeks (mayyybe once or twice a week if you’re actively touring) — making small tuning adjustments is something you do, probably, every time you pick up your guitar.
Graph Tech even makes special tuner sets with different gearing ratios for every string, so that a semitone is always about half a rotation of the tuning peg!
-
Weight savings! This is mainly a factor in the bass world, where tuners are much more massive than in the electric guitar realm. If your instrument is particularly neck-heavy, you may find — thanks to the law of the lever — that even a small weight reduction at the headstock end may greatly reduce neck dive. A number of hardware manufacturers (chiefly Hipshot) make ultralight bass tuners for this reason.
-
Locking. This feature deserves its own section.
Let’s talk about locking tuners.
Locking Tuners
I have to admit something: I lied in the last section. A bit. Kinda. Maybe.
Locking tuners… can improve your tuning stability, but not because they’re in any way better than normal tuners. They remove the need to wind the string around the tuning post, therefore reducing the length of the string that can hide slack or bind due to friction, and as we know those are among the primary reasons for tuning instability — however, if you string your instrument correctly and take care to stretch the strings properly each time, locking tuners will not impact your tuning stability at all. They will only reduce the effects of already improper stringing technique.
Locking tuners are pretty much exclusively a guitar thing. There is a total of one company that I could find (Sperzel) making locking tuners for bass.
That aside, what even are locking tuners?
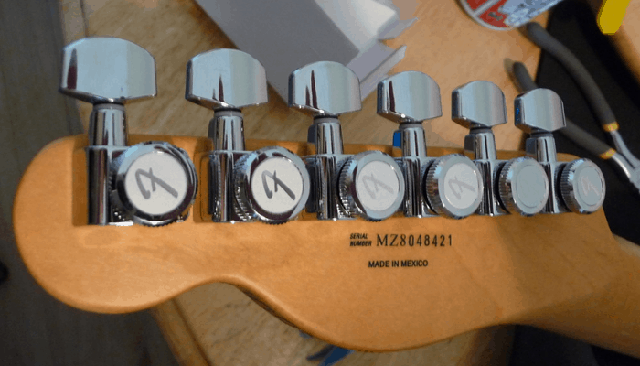 Fender locking tuners on a
Mexican Telecaster.
Fender locking tuners on a
Mexican Telecaster.
A locking tuner has some form of mechanism (in their most common form, an additional knob on the back of the tuner itself) that allows the player to mechanically lock the string inside the tuning post, much like a locking nut.
This has two purposes. Like mentioned above, it eliminates the need to wrap the string around the tuning post, therefore removing one of the possible places for slack to hide in in the system; it also makes restringing much faster, since all you need to do with a locking tuner is thread the string through the tuning post, lock it, and clip the excess — without the need to carefully guide it under the existing windings for the entire process of tuning it up to pitch. A locked string also needs much fewer rotations of the tuning peg to get up to pitch, compared to one wrapped around a traditional tuner.
Funky Locking Tuners
Most locking tuners just have the gear at the back for manually locking them, and that system works just fine. However, you may find two further variants on the locking tuner formula. I don’t have much experience with either (I never tried them due to pretty negative feedback I’ve read online), but I will attempt to describe them to the best of my ability.
The first variant is “Self-Locking” tuners — these don’t use a gear on the back, instead having some mechanism that locks the string on its own when the player starts tightening it.
I’ve heard mixed opinions about the reliability and ease of use of these.
The second category is “Auto-Trim” tuners — these also include a cutting mechanism that, when locking the string, cuts the excess off automatically.
Since I use roundcore strings exclusively, and they need a sharp kink put into them before the cut-off point, I never tried auto-trimmers either — I can’t see how they’d work with roundcore strings. Also, a wire cuter is like $5; auto-trim tuners seem like a solution in search of a problem.
Upgrading tuners
Remember how I said we’re generally really good at making tuners? We’re really good at making tuners. Most replacement tuners will be excellent.
There are a number of tuning machine manufacturers whose names have become almost synonymous with quality:
- Hipshot, especially for their ultralight bass tuners
- Schaller, to the point where certain tuner designs are referred to as “Schaller-style”
- Grover (stock on newer Gibsons)
- Kluson (stock on older Gibsons)
- Graph Tech and Sperzel, known for their innovative designs
- Gotoh 💙
…and many more. If you buy any of those, you will almost definitely not be disappointed.
Kluson? No clue, son.
Okay. You will almost definitely not be disappointed… unless you get vintage Kluson-style tuners.
Kluson-style tuners on a Gibson Les Paul.
They’re pretty good tuners and they have a pretty iconic look, but vintage-style Kluson tuners tend to develop a number of issues over time.
When talking about the degree of protection around a mechanical component, especially a bearing or gears, there are three possible design options. Let’s discuss them in terms of tuners:
- They can be open-back — the gears are entirely exposed, leading to lighter overall weight and easy access for lubrication, but allowing for easier ingress of liquids, dust, and debris.
- They can be shielded — the mechanism is covered by a shroud, preventing larger particles and superficial mechanical impacts from damaging the components, but allowing for ingress of liquids and dust. Shielded components will also generally lose lubrication over time, but cannot be easily re-lubricated.
- They can be sealed — the mechanism is protected by a watertight seal, completely preventing ingress of dust and liquids, while also keeping the grease or other lubricant permanently inside. This kind of mechanism is impossible to re-lubricate, but it will most probably never need re-lubrication in its lifetime.
Most “modern” guitar tuners — like the Grover tuner pictured a couple paragraphs up — are sealed; it’s a design that both looks modern and provides the greatest longevity and reliability (acoustic and classical guitars generally use open-back tuners for what I assume are entirely historical reasons).
Bass tuners tend to be much larger and heavier, which, combined with the bass’s longer scale length, easily leads to neck dive. For that reason (and for looks, let’s face it), a lot of basses use open-back tuners or particularly lightweight guitar-style sealed tuners.
Vintage Klusons style tuners… are shielded. Not only that, but they’re shielded by a metal plate that also holds the entire mechanism together. That metal plate is held in place not with screws, but with two metal tabs that can, over years of use, come loose and eventually pop out entirely.
A vintage Kluson-style tuner with its back cover popped open.
If there’s one thing I can be sure of, it’s that you probably don’t want your tuner falling apart mid-gig.
Being a shielded mechanism, Klusons also tend to lose their lubrication and become scratchy and rough over time — to re-lubricate them, you will need to take off the back cover, and it’s pretty much impossible to put it back on securely. When your Kluson is out of grease, I’d suggest replacing — rather than trying to re-lubricate — it entirely.
Considering how good all the replacement tuners are, when replacing tuners, I would suggest just going with whatever is closest to what’s already on your instrument. That will save you the headache of having to drill new screw holes for the mounting, expand the tuner holes, or — worst of all — having to fill the tuner holes because they’re too big for your new tuners.
If you’re looking to replace tuners on a guitar, I would also suggest going for locking tuners - there’s no downside to them, really1, and they’re one of the nicest quality-of-life upgrades you can make to a guitar.
You could argue that one downside is that they weigh more than non-locking tuners, but guitar tuners are small enough — and the balance of most guitars is good enough — for it to not matter, in my opinion.
If you cannot find tuners that match, are not sure, or want to upgrade to a specific set of tuners which may or may not match, measure.
Take off one of the tuners on your instrument and measure the post hole.
On guitar, most modern tuners use a 10 mm (13/32“) hole, but vintage and vintage-style tuners will often use a hole somewhere between 10-11/32“ (8–8.8 mm). These are the most common, but other hole diameters are not unheard of.
Bass tuners will come in 1/2“ (12.7 mm) post hole diameter for vintage-style tuners, or 3/8“ (9.5 mm) for “modern” ones.
If it turns out your post hole is smaller than the tuners you want to put on, grab a drill bit and ream it out carefully.
If it turns out your post hole is larger… You can either glue in a wooden dowel to fill it and then carefully redrill the hole, or try to find conversion bushings for the appropriate hole sizes. These are oversize replacement bushings that have an outer diameter slightly larger than the original hole, and an inner diameter equal to the diameter of the desired hole — you hammer them in in place of the original bushings and get a hole of an appropriate size easily.
Different tuners may have different screw patterns - once again, I recommend buying ones that match what you already have, but if that’s not an option, you can glue wooden toothpicks into the old holes to fill them, trim them down flush with the headstock, and then carefully drill the new screw holes.
For removing tuner bushings… I will refrain from making recommendations; look for guides from smarter people than me online on how to do it safely and with no damage to the instrument. I tend to just grab something of a similar diameter to press against the bushing and proceed to beat the shit out it — and, by extension, my instrument — with a hammer until the bushing comes out.
Don’t do that.
But also, where’s the fun in working on your instrument if you don’t risk splitting a neck or two in half?
No, really — don’t do that.
Detuners
There’s one last product I’d like to mention - detuners (or “D-tuners”); There are a couple designs on the market, the most prominent being Hipshot’s X-Tender.
A detuner is a special tuning machine with an additional lever that allows you to turn the entire tuning machine between two positions. In the usual scenario, you’d replace your low E string tuner with a detuner, tune the string up to E with the lever in the “up” position, then drop the lever to the “down” position and tune the string to D. This will allow you to flip between E standard tuning and drop D accurately and repeatably with one flick of the detuner lever.
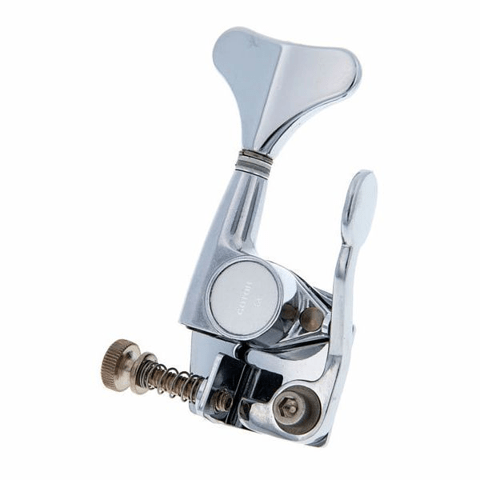 A Hipshot/Gotoh
D-Tuner.
A Hipshot/Gotoh
D-Tuner.
These are available in all styles and colors, and — having recently installed one on my beater bass — work wonderfully. They’re much more popular on bass than on guitar, but you can find guitar versions of them as well (albeit quite limited in styles, compared to the bass ones).
Having said that, they are really expensive, and may require permanent modification to your instrument. If you’re not sure about them, there is a product called the Pitch-Key, which achieves very similar functionality while just being a snap-on accessory that you can take on and off in a matter of seconds.
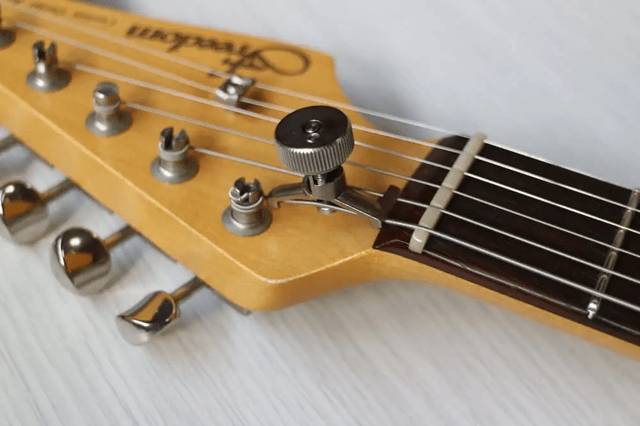 The Pitch-Key.
The Pitch-Key is a clamp you can mount on one of your strings with a large thumbwheel that bends the string behind the nut, raising its pitch. I can’t speak to its effect on tuning stability or string breakage — which seem like potential concerns with this design — because I have never used one, but it does seem like a reasonable and useful alternative to the much more expensive X-Tenders.