Preface
I don’t know about you, but I’ve been dreaming of having my own signature instrument ever since my first days of learning how to play the guitar. I don’t mean “signature” in the sense of a commercial collaboration with a large manufacturer where I sign my name on a model so that they can sell more of it; I mean “signature” as in made to my exact specifications, with every little detail being the way I prefer.
Luckily, an electric guitar or bass being basically a plank with some strings on it, it’s very easy to swap little pieces out and, piece by piece, get closer to that dream of having a completely personalized instrument. I’ll try to write down virtually everything I know about guitar parts in this guide, and boy does guitar hardware have a lot of quirks and details.
Let’s get on your Road To A Signature Guitar.
Getting The Instrument
If you don’t already have an instrument that you plan to mod the hell out of, you’ll need to get one.
On Kits
I’m not a fan of overpaying for gear; manufacturing technology has reached the point where even cheap guitars — Squier, Cort, lower-end Ibanez models — are usually really good. Having said that, not even the best setup and components in the world could make some of the really bad guitars out there enjoyable to play. I would recommend staying away from the lowest-end lines of most manufacturers (Squier Bullets and Affinities immediately come to mind; the low-end lines are usually fine, it’s the absolute lowest-end you need to be wary of) and from DIY kits.
It may seem like a DIY kit is the perfect way to get a guitar that is truly yours, but most the kits out there are absolutely abysmal in quality, with misplaced and mis-measured holes for mounting hardware, neck pockets that either don’t fit the neck or only vaguely contact the neck wood at all, the absolute worst quality hardware anyone produces (often reusing parts that failed the quality assurance process and couldn’t be used for an actual instrument); they require a tremendous investment of time and money to build into anything resembling an instrument (the finish is, imo, the most tedious, time-consuming, and one of the costlier part of making an instrument), and most luthiers won’t touch kit guitars because there’s nothing less pleasant than fixing someone else’s mistakes, much less fixing both your- and the kit manufacturer’s mistakes. Buy a kit if you want to build a kit and don’t necessarily require the end result to be enjoyable to play. Don’t buy a kit if you want a good instrument.
Partscasters
DIY kits may generally be awful, but “Partscasters” are often a tremendous way to get a great guitar. You can easily find brand new or secondhand Fender necks and bodies online, and building a Strat or Tele from parts can often result in a nicer and more personal instrument than what you’d get for the same money if you bought a complete guitar.
Fender neck compatibility
Tele and Strat necks have the same width and sit at the same distance from the bridge, but have different-shaped heels — the Strat has a rounded heel that rounds the corners of the Tele’s square heel.
For this reason, a Strat neck will fit in a Tele body (although it will leave a gap at the end of the heel), but a Tele neck will not fit in a Strat body.
Jazz and Precision bass necks are interchangeable.
StewMac have a very detailed guide on building a partscaster.
Shopping for Complete Guitars
If you don’t have a guitar that you plan to mod already, and you’re not building a partscaster, you’ll need to buy a new instrument. There are a couple things to keep in mind when buying a project guitar:
- Make sure the guitar plays nicely out of the box, has a solid fret job, the wood and finish are nice. Changing the frets and finish is very costly, difficult, and time-consuming so you probably want to avoid it if possible.
- To make it easier for yourself, find a guitar that has all the routing necessary for whatever mods you want to do. If you plan to put in humbuckers, it’s easier to buy a guitar that comes with humbuckers already. If you want to put an active preamp into your bass, you might want to look for a bass that already has a battery box and enough potentiometer holes for your preamp to fit.
- If buying a hollowbody as a project guitar, try to find one that has a removable control plate on the back. A lot of hollowbodies have solid backs and the electronics have to be put in through the F-holes, which makes mods after the fact extremely annoying and difficult.
- Keeping to standard designs (Strats, Teles, Les Pauls, Jazz/Precision basses) will make it a lot easier to find replacement hardware. In the component-specific sections of this guide I will run through the standard variants of each piece of hardware and how to recognize them — a lot of designs, even if they’re non standard, will use standard hardware. Do your research; make sure you’ll be able to find a replacement bridge before you buy a guitar planning to replace the bridge.
Now, shopping.
Make a list of the features you’d like, starting with the most important to you and ending with the least important. Such a list might contain points like:
- Body shape (e.g. singlecut, LP-style, offset, semihollow, telecaster, strat; contoured heel, etc.)
- Body wood (ash/alder/poplar/mahogany)
- Brand (Squier, Fender, Ibanez, Gibson, Cort, etc)
- Bridge (hardtail, jazzmaster trem, strat trem, floyd rose, bigsby)
- Color (yellow/natural/white/sunburst)
- Control layout (1V1T, 2V2T, 1V2T, push-pulls for switching, 3-position toggle vs 5-position blade switch, etc.)
- Active electronics (yes/no)
- Fretboard wood (maple/rosewood/ebony)
- Fret count (20, 21, 22, 24)
- Fret material (nickel, stainless steel)
- Hardware color (nickel, chrome, gold, black)
- Headstock angle (straight, angled, headless)
- Inlays (dot, block; black, white acrylic, mother of pearl)
- Neck mounting system (bolt-on/set-in/neck-thru)
- Neck profile (C, D, V, etc)
- Number of strings (mainly relevant to bass: four, five; on guitar: six, seven)
- Pickup brand (Seymour Duncan, Fender, Fishman Fluence, Bare Knuckle, etc)
- Pickup configuration (e.g. HH, SSS, SS (tele), PJ (bass), P90/P90)
- Scale length (guitar: 24 3/4“/25.5“/multiscale; bass: 34“/35“/multiscale)
- Truss rod style (bullet, vintage bottom-of-heel access, Music Man-style)
- Tuners (traditional, locking)
- Weight (e.g. sub-7lbs)
Now that you have your list ready, make a copy and remove the points that can be easily changed in the future (i.e. without sanding down the finish or woodworking). That will be your shopping list.
Go to your preferred online music store (I’m a big fan of Thomann in Europe; Sweetwater in the US also have a very nice selection of guitars), click on the appropriate filters, and go through all the guitars that match what you’re looking for at least in part. Write down those that have a price that doesn’t make you flinch.
Chances are, you’ll find plenty of instruments that work for you.
Be Opinionated!
The beautiful thing about instruments is that they’re equal parts tools, commercial products, fashion accessories, and works of art. When buying, building, or modifying an instrument, it’s important to acknowledge all those aspects and use them to evaluate what you’re aiming for.
There is an entire universe of variations on and approaches to every detail of the guitar, no matter how minor. Even tuner buttons can be found in a variety of styles, colors, and materials.
Don’t get me started on tone woods — alder, ash, swamp ash, mahogany, poplar, basswood… How are you supposed to choose when there are this many options, and little to no way of evaluating them objectively?
Be opinionated.
Make up your opinions out of thin air.
Sometimes it’s viable to evaluate all the choices and list their advantages and shortcomings — e.g. locking tuners are pretty much always preferable to non-locking ones — but most of the time, that’s not an option. In those cases, follow your gut.
I strongly recommend, in those cases, making up preferences purely based on vibes. It’s not only perfectly valid, but generally leads to greater satisfaction with your instrument.
Don’t have a preference for tone wood? Look at all the options and pick the one you like best based on how it looks, or the vibe it has in your head, or even based on how much you like the name!
Mahogany, to me, sounds like a wood that’s warm and rich and makes me think of lovingly hand-crafted instruments, so I like instruments that use it.
Is that a rational opinion? Is it based on any research, factual analysis, or experience? No! But it helps me choose, and it helps me love an instrument more if it uses mahogany.
Do things that help you love your instruments. Invent silly opinions.
Guitar-related decisionmaking is driven 80–90% by pure vibes. People love or hate design decisions and components because they either vibe with them or not. The remaining fraction of the reasons for a decision is split between feel (i.e. how well something works for your personal style, technique, anatomy, or even visual taste) and rational evaluation (i.e. comparing the pros and cons of various options).
Hop onto any guitar forum and you’ll see this principle in practice, although often thinly disguised under the pretense of “tone” or “sustain”. You’ll find hordes of people on Tele forums swearing that there’s nothing better than the vintage tele bridge — although objectively worse than compensated saddles, and arguably strictly worse than six-saddle bridges — because it gets the “best tone”; hell, I’ve even seen claims that vintage Kluson tuners improve the tone of a guitar while writing this book.
This is all bullshit, of course. It’s code speak for “I have a preference for this particular component that I cannot justify through rational means”. And you know what? That’s fine! Not only is it fine, I encourage it. Just don’t go start flamewars on forums about it, and try to steer clear of making claims about “tone” unless you’re talking about pickups (and mayyyyybe strings).
So, once again: be opinionated. Follow your gut, make choices based on the subtlest vibes. Pick one guitar over another because you like the pickup covers better. Pick a guitar over another because it comes in a prettier color. Form arbitrary preferences and act on them.
If you do this, you will not only have an easier time choosing — you’ll also end up with an instrument you love more, and you’ll run into plenty of opportunities to try stuff out and help inform the more rational opinions.
When it comes to instruments, however, the irrational opinions are just as important as valid as the rational ones.
💙
Acquiring And Installing Gear
Before we start talking about swapping stuff on your guitar for other stuff, it helps to know where and what other stuff to get. I’ll also quickly run through tools but try not to give specific recommendations because I don’t want to get into tool discourse.
Tools, or “How Do I Actually Install This Thing?”
Every hardware upgrade or swap will fall into one of a few categories, based on the tooling necessary to achieve it. I will run through them quickly and suggest additional equipment that might make your job easier.
Hope you have a screwdriver!
For virtually all of these, you will need at least a screwdriver. I will assume you have an appropriate screwdriver for any screw you may encounter, and will not mention screwdrivers when listing requirements from this point onwards. If you do not have a set of screwdrivers, I highly recommend getting e.g. an iFixit driver kit or anything similar.
-
“It Just Goes On” This is stuff like knobs, strap buttons, pickguards (sometimes), string trees, some tuners, etc etc etc, where it’s held on by friction or a couple screws. If I don’t mention tools when talking about a piece of hardware, that probably means it falls into this category.
-
“A Soldering Iron” Pickups, jacks, switches — anything that’s wired up, you will need to desolder to replace and solder back together afterwards.
I cannot overstate the utility of a good soldering iron — use a chisel tip, and the hotter it gets, the better.
Also, use leaded solder — although “leaded” sounds scary, the lead-free solder is more expensive, is an absolute pain to work with, and doesn’t actually make a difference to your health (disclaimer: am not a doctor, this is not medical advice, don’t sue me if you decide to snort leaded solder) because the boiling point of lead is far above the temperature of soldering irons, so the smoke from soldering is not lead but toxic flux fumes which are equally present in both types of solder.
Speaking of toxic flux fumes, if you’re soldering, please do so in a well-ventilated area. Worst case, just pop a window open as far as it will go, solder everything up, and vacate the room after you’re done. Other than solder and a soldering iron, a third hand is often a tremendous help. Third hands are cheap and basically all the same, just preferably get one with gooseneck arms; the ones with solid, jointed arms can be hard to get into the right position.
A multimeter with a continuity tester is extremely useful for double-checking that the connections you make are solid, and there’s no connection between anything that shouldn’t be connected. It’s also useful to measure pots and pickups sometimes when trying to troubleshoot a broken circuit.
For neatness, I also suggest having handy multiple colors of wire if you ever need to splice some in, some heatshrink, and electrical tape. Copper tape might also come in handy if you ever need to fix some shielding, or decide to do the Fox Bridge Grounding Fix:
The Fox Bridge Grounding Fix
The Fox Bridge Grounding Fix is a mod I always do the first time I’m messing with a guitar.
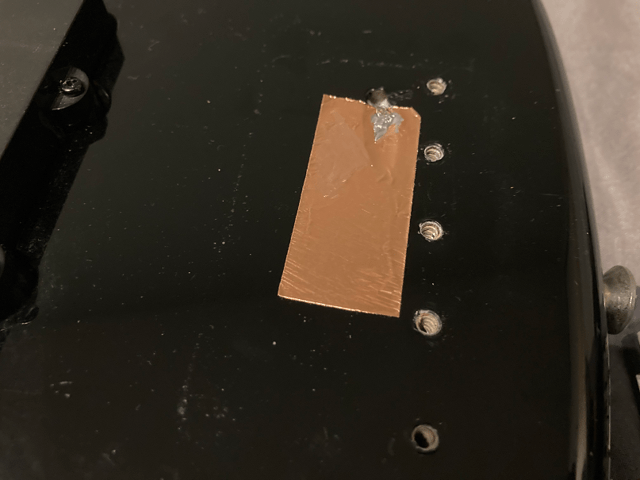 A bit of copper
tape under the bridge, with a ground wire spot-soldered on.
A bit of copper
tape under the bridge, with a ground wire spot-soldered on. Unfortunately, most manufacturers only run an extremely thin ground wire to the bridge and rely entirely on pressure to hold it there; that wire can easily become dislodged and make the guitar noisy as all hell. I’ve played gigs where I’ve had to twist an aluminium sandwich wrapper up and lodge it between the bridge and output jack to fix the noise from a grounding wire that came loose mid-show!
On voltage and grounding
Voltage is the difference in electric potential between two points — saying one point is at 1.5V is meaningless without a reference point. For that reason, one “end” of a circuit must be connected to “ground”, i.e. a reference point that can absorb lots of electricity without changing its electrical potential.
In most guitars, the ground is connected to the bridge, which contacts the strings and in turn grounds the entire circuit through the strings to the player’s body. This means that if the contact is poor or the connection to the bridge breaks, the circuit’s reference point will lose its “stability” and the guitar will become much more susceptible to noise.
I have a simple solution: the first time I take the strings off a new guitar, I always unscrew the bridge and stick a little square of copper tape underneath it, then solder the grounding wire to it. The copper tape ensures excellent conductivity and a large contact area, and the solder joint makes sure the wire will never come loose.
There’s two categories of tooling left, and those are the two I will only gloss over in this guide.
-
“A Paint Booth”
Some visual alterations, like adding decals on a headstock or painting patterns onto the body, will require you to refinish at least part of the guitar.
You can paint a guitar at home. I’ve done it. Would I recommend doing it? Fuck no.
First of all, unless you have a balcony, garage, or garden that you can afford to splatter in paint, you cannot paint a guitar safely. Paint fumes are extremely toxic and you need an extremely well-ventilated area and respiratory protection at the very minimum.
The problem with well-ventilated areas is… they’re well-ventilated. If you’re painting in a garage or a garden, you will end up with tons of plant pollen, seeds, other floaty plant bits, dust, debris, insects, and all that stuff embedded in your finish. You can get around some of it by building yourself a little paint booth with forced exhaust (I built one out of cardboard boxes and used an array of computer fans to pull air and dust out), but you’ll still end up needing to sand down every couple layers because a mosquito got stuck in the clearcoat. It takes weeks, and then the sheer amount of scrubbing and sanding necessary to get the finish to be smooth and glossy and polished will absolutely destroy your arms.
Just, don’t. It’s not worth it.
-
“A Woodworking Shop”
Take it to a luthier. Some of the more extreme mods will require you to drill or route out significant amounts of wood from your guitar. Want to replace a single coil pickup with a humbucker? You’ll probably1 need to do some woodworking — or, I would suggest, have someone else do the woodworking.
1Some Telecaster bodies are routed for humbuckers under the pickguard, even though they come with single coils.
Where To Buy Hardware From
We’re going to be talking about guitar hardware, so I would suggest finding a guitar hardware store that carries a broad range of parts at good prices and with good shipping times. If you’re in the US, stewmac is great but they kinda just carry a few items from each category. There are probably retailers with a wider selection of gear.
If you’re in Europe, Thomann is very hard to beat, although for very specialized things you might have to look elsewhere. They’re improving year by year, though — they used to have a very small selection of e.g. pickups, and now they carry pretty much everything I’m interested in.
If you’re looking for novelty hardware — knobs, pickguards, etc with cool patterns or made of funky materials — spend some time searching Reverb, Etsy, Ebay, and Amazon. Chances are you’ll find what you’re looking for; if not, googling for e.g. “custom pickguards” should bring up plenty of craftspeople who will happily make what you want.
Who To Buy Hardware From
Like with most things, there are dozens of hardware manufacturers that make products at every price point, and it can be tricky to choose if you’re not already familiar with their offerings.
My recommendations, in descending order of price:
- Hipshot (USA) — Very pricy. They make some of the highest-quality bridges you can get, excellent tuners (especially their bass tuners are somewhat of an industry standard in basses with high-end hardware), and some funky specialty hardware like detuners (under the X-Tender name) and B-benders.
- Graph-tech (Canada) — Very pricy. They mainly make nuts, but also piezo bridge systems and saddles made out of specialty engineered materials. They also make tuners.
- ABM (Germany) — Pricy. They mainly make bridges; usually out of very high quality brass.
- Schaller (Germany) — Very high quality, but still somewhat reasonably priced. They make virtually everything, from bridges, through tuners, to switches and knobs. Always superbly machined, usually using premium materials (brass, aluminium, titanium). Their straplocks are also pretty much the industry standard.
- Gotoh (Japan) — My preferred supplier of guitar hardware. Not only do they make virtually everything and at reasonable prices, but they also have an extremely wide selection of colors, styles, and materials for their products. I also appreciate that unlike most other manufacturers, they prominently list the materials used in their products — so you have the luxury of making an informed choice when you try to decide between e.g. steel, brass, or titanium saddles.
- Göldo (Germany) — They make everything, pretty cheap, and generally pretty good. Not much else I can say here. I often reach to Göldo for minor hardware that doesn’t affect playability. Göldo owns Duesenberg, btw.
- Allparts (USA, but I’d be shocked if their hardware is not made in China at those prices) — Affordable! They also make virtually everything. Hardware is good quality with solid materials.
Honorable mentions:
- Fender (USA, but hardware generally made in China) — Fender designs are so standard and so widely copied that sometimes the best way to ensure you have something that fits is to go directly to the source. Fender stuff ranges from overpriced as hell to pretty reasonable, and the quality is also all over the place, so make sure to read reviews and make a decision for yourself.
What Can I Swap Out, Exactly?
It’s hard to make informed decisions about whether you can make a guitar into your dream instrument by swapping parts if you don’t know what parts can be swapped. Let’s start from the bottom end of the guitar and make our way towards the headstock.
On the effects of hardware on tone
In theory, pretty much anything you do to your guitar can impact its tone. An instrument is a very complex physical system and changing any parameter of it will have a non-zero effect on the behavior of the system as a whole. Especially for parts that interact with the strings — the bridge, nut, etc — it’s not unreasonable to expect swapping them out to change the way a guitar sounds.
I will not talk about the effect of hardware on tone. It’s extremely subjective, and there’s no consensus or evidence that it matters at all. I will discuss the way electronics influence tone, since that part is known and measureable and described by a variety of well-understood physical equations. I will not discuss the way e.g. different materials or types of bridges can or can’t change your sound.
Strap Pins
Yes! Even the humble strap pin is potentially upgradeable.
On the importance of strap pins
If you play standing, your strap pin is all that stands between a great performance and making a guitar-shaped dent in your floor. It’s much more important to both your comfort and your guitar’s safety than it might seem at first!
There are a number of reasons why one might consider replacing the strap pins on their guitar:
- Switching to a different color for aesthetic reasons (e.g. replacing a chrome strap pin with a black one)
- Switching to a different design for aesthetic reasons or to minimize strap slippage (e.g. switching from a V-shaped pin to a T-shaped one)
- Upgrading to strap locks to entirely remove the risk of the strap coming loose
- Relocating the strap pin to improve the balance of the instrument (e.g. moving it from the back of the body to the upper horn on some SG-style guitars)
Let’s talk about all the different kinds of strap pins.
A strap pin is very simple in construction — it’s a piece of (usually) metal, attached to the guitar body with a simple screw with a (usually felt) washer between the pin and the body to avoid damaging the finish. Strap pins come in all kinds of shapes and sizes — from the classic V-shape all the way to novelty designs like skulls and stars — and in all finishes and materials, from classic nickel to buffalo horn.
Strap Pins Of All Shapes And Sizes
Almost all guitars will come stock with the — frankly, subpar — V-shaped strap pins (pictured to the right).
Honestly, I hate this design. As you can clearly see, there is very little holding the strap in place, and heavier guitars or basses will readily come crashing to the floor if the strap slips.
Luckily, there are plenty of variations on this standard formula.
Fox’s Gear: Gotoh EP-B3 oversize strap pins
My personal favorite by far is Gotoh’s EP-B3 style of strap pin, once again visible on the right.
They’re significantly oversized compared to a classic V-shape pin and have a “T” rather than a “V” profile, making them much more resistant to strap slippage. I also think they look great; they look big and unique and, especially if your hardware contrasts with the color of your guitar’s finish, can stand out in a very positively striking way. Check them out on the FGN Iliad, below:
> The FGN Iliad JIL2ASHM, with oversize Gotoh EP-B3 strap pins.
Every hardware manufacturer and their mom have a bunch of minor variations on the basic strap pin. Gotoh, for instance, other than the oversized-T EP-B3 mentioned above, also make a standard V-shape EP-B2 and a standard-size T-shape EP-B1.
D’Addario makes strap pins with an elliptical profile, which seems like a great solution for strap retention, but I happen to dislike the way they look. Pictured on the right:
There are innumerable variations on these few designs, but there are also two other significant categories of strap pins: novelty designs and strap locks.
Let’s talk about novelty strap pins.
Since a strap pin is just a piece of metal with a screw, it turns out that anything you can attach a screw to can be a strap pin with the right attitude!
Grover is the only “big” hardware manufacturer I know of to make novelty strap pins. They have a small selection of designs, including classics like skulls or stars.
For anything else, you’ll probably have to look to Etsy, Reverb, Amazon, or Ebay. Strap pins are the one piece of hardware where I would even suggest looking to Aliexpress, but I couldn’t find any novelty pins on there. I did find some nice ones on Ebay, though.
Now that we’ve looked at all the different kinds of “standard” strap pins, let’s talk about strap locks.
Strap Blocks, Strap Locks
What’s a strap lock, anyway?
A “strap lock” is any solution that goes over your strap once you’ve secured it onto the strap pin and locks it in place.
If the strap pin is not sufficient for keeping your strap secure — and, let’s face it, it almost never is — it’s time to look for straplocks.
Depending on the design, the chance of your strap coming loose if you have a straplock on ranges from “basically impossible” to “mechanically impossible”.
Let’s start with my favorite, the zero-cost solution that requires no modification to the guitar, does not make the strap pin any more bulky, and can serve as a nice colorful accent: the “Blues Straplock”.
If you’re of drinking age, Grolsch beer comes in a fancy flip top bottle with a rubber seal on the cap. With a bit of effort, you can get the seal off the cap, pull it over the top of your strap and pin, and have a very secure and near-zero-cost solution that will keep the strap in place:
 The “Blues
Straplock”.
The “Blues
Straplock”.
If you’re not of drinking age, the rubber seals can be ordered in bulk from Amazon or any homebrewing supplier for dirt cheap; google for “Grolsch gaskets pack”. These are such a classic that a couple guitar companies even sell branded versions in a variety of colors for a couple bucks (the Fender ones pictured on the right)!
“Proper” strap locks, on the other hand, are something quite significantly different, but they all broadly follow the same idea — rather than having a one-piece pin that your strap is pulled over the top of, and held in place with gravity, friction, and prayers, a strap lock adds a second mechanical part that is then secured over the top of the strap, preventing it from coming loose.
The industry standard (to the point that some manufacturers, like Ibanez, are now including them as a standard feature on some of their guitars!), and the example I will use to explain how a strap lock works, is Schaller’s S-Lock system:
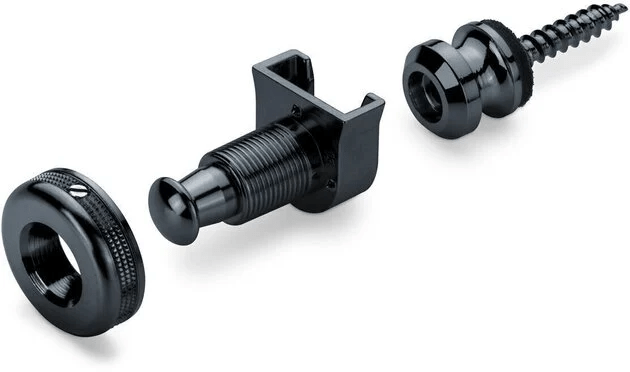 The Schaller S-Lock System.
With Schaller S-Locks, you “clamp” the strap between the lock wheel (the round part with a threaded hole) and the lock body (the long threaded part); when you want to attach the strap to the guitar, you pull on the pin at the end of the lock body (which retracts an internal bolt that locks into the hole at the end of the strap button itself) and slide the whole assembly over the strap button.
Conversely, to detach the strap, you pull on the pin and slide the lock+strap+wheel assembly off the strap button.
This arrangement makes it mechanically impossible for the strap to come loose unless you pull on the lock pin.
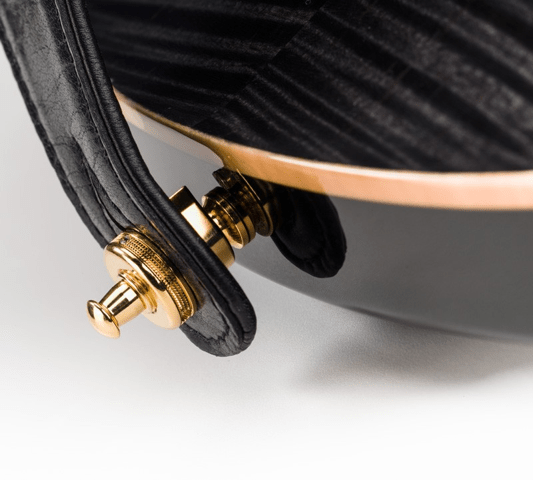 A strap attached to a guitar with
a Schaller S-Lock.
A strap attached to a guitar with
a Schaller S-Lock.
Virtually all other strap locks work on the same principle — the exact locking and unlocking method may differ, but they’re all some form of mechanism that slides over the strap button and locks in place.
Although they’re all kinda the same, there are two strap locks that I’d like to give a special shoutout to:
- Fender Infinity Strap Locks, because they come in a pretty sick metallic red:
- Dunlop Flush Mount Straploks, because they’re unique in that they don’t stick out massively from your guitar. On the other hand, this is because they mount into the body, and thus require you to drill a big hole into your guitar:
On that last note, I don’t like strap locks precisely because almost all the designs out there stick out a mile and look extremely gamer, and some of the pointier designs (Schaller) make it actively painful to play in a classical position because they will stab your thigh. Having said that, that’s just my personal take, and by all means, if you struggle with strap retention or want your guitar to be as gamer as possible — look into strap locks.
The Output Jack
It’s an output jack!
Please, for the love of all that is holy, DON’T call it an “input jack”.
Your guitar is outputting signal. If you input signal into a guitar, nothing will happen. Your amp has an input jack. Your guitar has an output jack.
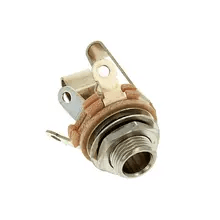 A nice, “bare” Switchcraft
jack.
A nice, “bare” Switchcraft
jack.
There is… very little reason to ever swap out your jack, unless it’s broken.
Having said that, I hate barrel jacks with a passion — they just feel bad to plug into, and fail regularly - and I will always happily replace them with a nice non-barrel (“bare”) Switchcraft. If you have active electronics, make sure to use a stereo (TRS) jack — the third contact is used to turn the electronics off to stop your battery from dying when the guitar is unplugged.
Common output jack mounts
On the other hand, you may very well find yourself wanting to swap out the jack panel. There are a few different kinds of these, but they’re mostly standard:
- Barrel jacks will sit in a 1/2“ hole and be mounted flush with the wood, or sometimes even countersunk or counterbored (as Ibanez often does); these have no jack panel to speak of and there’s nothing you can do with them except rue being stuck with a barrel jack.
- A lot of guitars, especially superstrats, use standard “football” style jack plates. You can get these in a variety of colors and with a recessed or flush jack mount. These generally cover a hole between 3/4“ and 7/8“ in diameter.
- Thicker body styles (Les Pauls, some Telecasters) may opt for a square plate. Les Pauls use a perfectly square one, most other brands will use a rectangular plate. Measure before ordering! These, again, are available in a variety of colors and with a recess for the jack or flat, and will cover a hole between 3/4“ and 7/8“.
- Stratocasters use a funky “ferrule” to mount a standard “bare” jack. These are standard across strats and available in many colors, but be careful when ordering a ferrule for similar but non-Fender guitars — e.g. the Ibanez Talman line, although it looks like it uses a very similar ferrule, will not fit a Strat jack ferrule.
-
Telecaster jack cups
Telecasters, especially the vintage ones, use an abysmal “cup” for mounting the jack. That thing is a disaster, and a mistake on every level. Get rid of it as soon as you can. It sucks.
Why does it suck so much? As is usually the case with Fender, because of aggressive cost-cutting at every corner. The tele “cup” is a flimsy piece of the cheapest scrap “metal” Fender had available held in place with a tiny clip with about the same strength and durability as the spring in a ball-point pen.
These universally start rattling around and eventually come loose after a couple plugs–unplugs. They’re also a pain to remove. It’s like they were invented by Satan just to be the biggest pain in the ass imaginable. They’re so bad StewMac suggests periodically replacing the clip and rebuilding the inner wall of the jack hole with epoxy and sawdust as a way of preserving the original look while fixing the wobble. Nope.
Luckily, as is also usually the case with Fender, someone else fixed their mistakes! You can drop in an Electrosocket-style jack plate, a much more substantial piece of metal that mounts with two screws rather than a flimsy clip. These are inexpensive and work flawlessly. There is a bit of an art to removing the vintage “cup“s, so I would recommend looking up a video on how to do it.
Visual Mods: Minor Hardware
Visual mods are perhaps the coolest way to make a guitar truly feel special and one-of-a-kind. While it’s true that basically all of the things I talk about in this book technically do change the appearance of your guitar, I want to talk specifically about the mods that have no functional purpose in this section; the things that are “just for looks”.
One aspect I will not talk about in detail is stickerbombing and repainting your instrument — refinishing is a complicated, difficult, and expensive operation that could have an entire book devoted to itself alone; stickers are basically self-explanatory.
Headstock decals
Decals are a bit more complex to apply and generally will need a coat of clear paint over them for protection anyway, so I won’t talk about them in-depth either.
In the guitar world, there is one particular flavor of decal that needs special mention, though - headstock decals.
Yes, you can buy bootleg “Fender” or “Gibson” logos to put on your headstock. You probably shouldn’t, though, except maybe ironically on a guitar that clearly isn’t one. These headstock decals are primarily applied by scammers trying to sell fake guitars, and if there’s ever a chance you’ll be selling your instrument, websites may take down your posting, delivery services may refuse to ship your instrument, and potential buyers may hate you for selling a “fake”.
Having said that, applying a custom decal with your own logo to the headstock — even if it’s a brand-name neck — doesn’t have the same legal and ethical problems, and it’s pretty cool to play a guitar that has your name on the headstock.
Broadly, visual mods can be divided into two distinct categories: “flat” things where the primary way to modify them is through changing their outline or surface colors or patterns, and “three-dimensional” objects where it’s possible to replace them with something of an entirely different shape.
Things You Can Paint
Throughout this book, I try to stay away from talking about painting things on your own, but parts in this category are simple enough where you can usually get away with just giving them a couple coats of spray paint, and may not even need to sand down or polish the finish.
If you want to do decorate your “flat” hardware with some sick patterns, stickers are the obvious solution, but you may also want to draw something freehand. In that case, I suggest looking into acrylic paint pens.
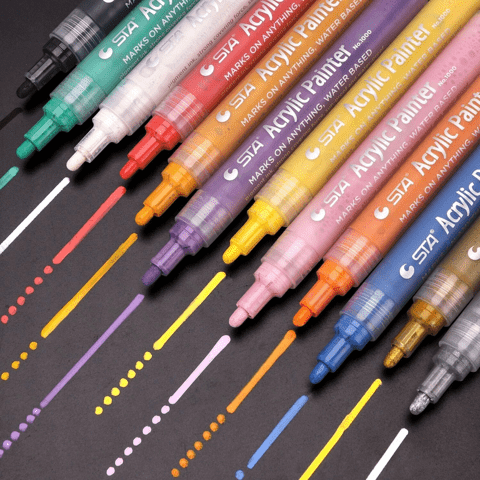 Acrylic paint pens.
These are just like normal marker pens, except they use acrylic paint — the same kind that your guitar finish may use! The result is waterproof and very durable, and if you pop a coat of clearcoat over it, will be able to stand up to even the hardest playing.
Pickguards
A lot of guitars come with a pickguard.
“Pick guard”?
The name “pickguard” is a bit of a misnomer, actually; the pickguard doesn’t actually guard against the pick scratching the finish.
On acoustic guitars, pickguards serve to protect the wood from the nails or fingerpicks when playing the guitar fingerstyle — when playing with a pick, the pick comes nowhere near to the pickguard.
On electric guitars, even that use for a pickguard is mostly irrelevant. It’s much cheaper and faster to manufacture an instrument if you can route all the control cavities into the top — without any complicated routing or drilling necessary for the cable runs — and a pickguard serves as a plate that hides the routs and allows easy mounting of components. Going a step further, mounting all the electronics to the pickguard enables the manufacturer (or anyone else who works on the guitar later) to solder and mount all the electronics outside of the guitar, and then just screw the complete assembly to the body of the guitar itself with a couple screws. Pickguards can make manufacturing and repairs easier!
…But sometimes — like on a Les Paul — they’re just decorative.
Since a pickguard is generally just a flat sheet of plastic (rarely, metal) cut into a shape, it’s very easy to paint or make your own.
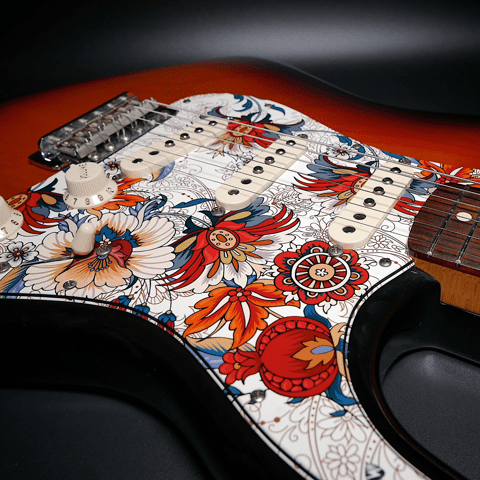 A custom pickguard on a
Strat.
A custom pickguard on a
Strat.
Custom pickguards can be found all over the Internet easily for common models of guitars; if your guitar is more unique or doesn’t normally have a pickguard, you can buy sheets of pickguard material and easily trace and cut your own, custom pickguard. A bit of sanding and it will look stunning.
One thing to bear in mind when buying replacement pickguards is that screw placement is… all over the place, generally. Sometimes the screw holes will match what you have, but generally you should not rely on that being true, and you may need to drill some new holes in your pickguard or guitar — or affix it with double-sided tape instead; that works too.
Pickup covers
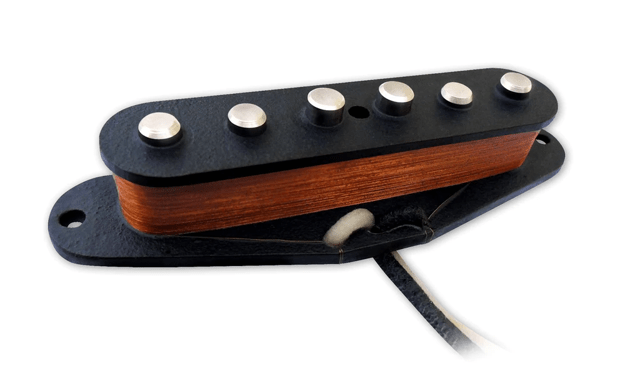 An uncovered single-coil
guitar pickup.
An uncovered single-coil
guitar pickup.
Pickups generally come with plastic or metal covers that protect the fragile coils from damage, but some (especially humbuckers) eschew covers and just use some tape wrapped around the coils.
It’s sometimes possible to remove covers from pickups that have them on — the exact process may be difficult and is outside the scope of this book.
If you have a pickup without a cover — whether because that’s the way it shipped from the factory, or because you removed the covers it came with — congratulations, you have a wonderful opportunity for a striking visual mod!
Plastic covers for common pickup form factors can easily be found in a variety of different colors, and they’re trivial to spray-paint if the existing selection doesn’t satisfy you.
Because the pickups are so central to the whole look of an instrument, putting some striking covers on can make a dramatic impact on how your instrument looks — they can provide a lot of contrast and visual interest, or offer a splash of color amid a mostly monochrome design.
If plastic pickup covers are not to your liking, there are also metal pickup covers that come in various shades of chrome, nickel, black, and gold. They come in a couple different varieties — “open” covers, which only cover the sides of a pickup, leaving the top open (to minimize the impact on tone that I’ll address in the next paragraph), covers with exposed pole pieces (the kind you might see on a classic Les Paul), and fully-closed covers (typical for active and “modern” pickups).
There’s a catch here, though — metal pickup covers can have a non-negligible impact on tone. The exact specifics are slightly out-of-scope for this book, so I will direct you instead to this stellar analysis by Alex Kenis.
The takeaway, overall, is that the material, thickness, and distance of a pickup cover from the poles can influence the noise level and sound of a pickup quite a bit — cheap and thick brass and steel pickup covers lying very close to the pole pieces dull high frequencies quite a bit but offer a significant level of noise shielding, whereas higher-quality thin nickel silver covers spaced out from the pole pieces don’t reduce noise as well but will also not impact tone nearly as much.
When using metal pickup covers, you should attach them to the pickup by soldering them onto the pickup’s metal base plate, or running a short grounding wire from a grounded point to the cover to shield the pickup from electromagnetic interference.
Metal pickup covers have one advantage over plastic ones when it comes to visual mods — you can pull off a really sick “etched” look by masking off a pattern with some tape and then carefully scratching the pickup cover within the outlines with a knife or something similar. You could probably take them to a local laser-etching place and ask for a custom laser-engraved pattern, too; the possibilities are endless.
On pickup pole piece spacing
Not all pickups are created equal. Take humbuckers, for example — although they look very similar, there are actually two equally common types of humbucker, differing in pole spacing; more if we go into details and extra strings, but we’ll talk about that in the chapter on pickups.
Gibson-style bridges have a narrower string spacing than Fender-style bridges. While it makes little difference for humbuckers in neck position, the difference closer to the bridge is significant enough where you’ll find two different designs, depending on the style of bridge your guitar has.
“Standard” or “G-style” humbuckers are the ones you’ll find in Gibson-style guitars. They have a spacing of somewhere between 49-50 mm between the centers of the outermost pole pieces.
On Fender guitars and ones with Fender-style vibrato systems, the string spacing at the bridge is wider than on Gibson designs, which in turn implies the pickups themselves are wider and have wider pole spacing. These are referred to as “trembuckers” or “F-style” humbuckers. The string spacing on these is somewhere between 51-52 mm.
This issue gets even more complicated when combined with the fact that Gibson have recently started moving towards wider pole spacing, with some modern Gibson pickups being as wide as 52 mm in the bridge position.
Similarly to humbuckers, single-coil pickups vary wildly in pole-piece spacing as well. Some Stratocaster sets can have as much as 4 mm of difference in the pole spacing of the neck and bridge pickups!
When shopping for pickup covers with exposed pole pieces, measure the pickup you’re going to be putting the cover on, and make sure the pole spacing matches!
Minor Hardware
There’s a lot of other minor hardware on your guitar, and the good news is: the more standard your guitar is (i.e. the closer it is to e.g. the standard Stratocaster formula), the more likely it is you’ll find a drop-in replacement!
Pickup Rings
There are two ways to mount a humbucker — directly to the body, or to a pickup ring which decouples height adjustment and mounting force. Pickup rings generally come in a variety of different sizes, differing in height and profile. Guitars like the Les Paul, with a significant neck angle and a bridge that sits at quite some height above the body will use pickup rings with an arched bottom surface — to match the contour of the body — and an angled top surface — to match the angle of the neck — where the bridge pickup ring will be significantly taller than the neck pickup ring. On the other extreme, guitars with low bridges and a neck that’s parallel to the body will generally use very thin and flat pickup rings. Make sure to inspect and measure your pickup rings before buying replacements.
Other sizes of pickup — trembuckers and mini-humbuckers, and even some P90s — may also mount to pickup rings, but they’re harder to find replacements for.
You can find pickup rings made of metal or plastic in a variety of different colors and designs — even clear acrylic ones! They’re trivial to replace, and a set of eye-catching pickup rings can add a lot of flair to an instrument.
A Triple Shot, in default configuration, allows you to achieve four different tones out of a single humbucker — the two coils connected in series, parallel, the neck-side coil solo, or the bridge-side coil solo. With two Triple Shots and two humbuckers, that’s a four tones out of the neck pickup, four tones out of the bridge pickup, and \(4\times4=16\) tones out of both, for a whopping total of 24 different tones!
The downside is — Triple Shots are really expensive. Frankly, obscenely so, but that comes down to the lack of competition — they’re the only such product on the market, as far as I know. If you have too much money and want the ultimate flexibility out of your guitar without sacrificing aesthetics, they might be the choice for you.
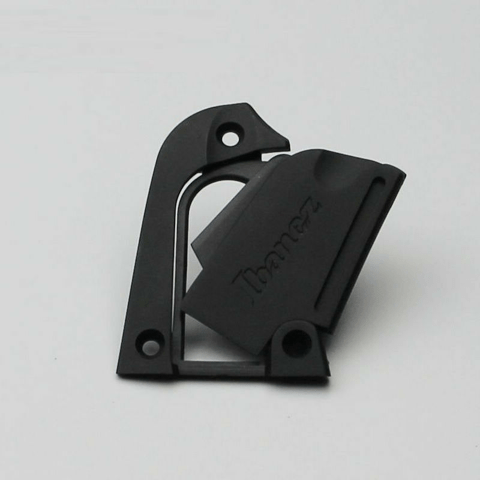
Control Plates
I’m going to cheat a little bit in this section and talk about two very different pieces of hardware.
The first is toggle switch plates. You know those little chips you get under a Les Paul-style toggle switch that say “RHYTHM” and “TREBLE”? You can easily find places that will make those with custom text, or even with elaborate metal designs, like skulls and stars. A custom toggle switch plate is another fantastic way to add a small visual accent to your instrument. These are also absolutely trivial to install, and pretty cheap.
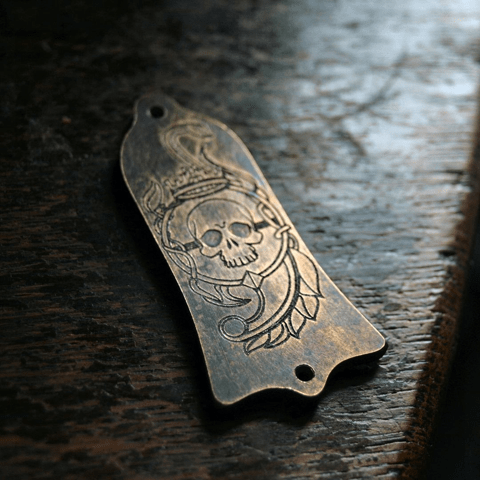
Then there’s control plates. These are not particularly common, but feature prominently on e.g. Jazz Basses and Telecasters. They’re the metal plates the electronics are attached to for shielding and ease of assembly.
As with most metal hardware, you can generally find them at least in the standard colors of nickel, chrome, gold, and black. There’s a significantly wider selection of Tele control plates compared to bass ones, so you might also find those made out of different materials, like wood. Both variants exist with custom engraving on them, as pictured.
The Tele Switch Conundrum
The Telecaster control plate has a pretty famous minor design flaw — it puts the volume knob extremely close to the pickup selector, so that with the bridge pickup selected, it’s difficult to adjust the volume without bumping the pickup selector or get a solid grip on the pickup selector without bumping the volume knob.
For that reason, fiddling with the control plate itself is one of the most common mods done to Telecasters.
A Telecaster with a reversed control plate.
Players who strongly favor the bridge pickup or want easier access to their volume knob will often reverse the control plate entirely — it’s an easy $0 mod that just requires flipping the existing control plate and rewiring the controls “in reverse”. This allows very easy access to the volume or tone knob and stops the switch from interfering with the knobs when in the bridge position.
A variety of Telecaster control plate styles.
For those who want to put more space between the knobs and the switch entirely, there exist a variety of Telecaster control plates that change the positioning of the potentiometer and switch holes to adjust the spacing of the individual controls on the instrument. A particularly common variant has the switch mounted at an angle, rather than in-line with the knobs; there also exist control plates that have cutouts for Les Paul-style toggle switches, rather than the stock blade switch, or ones that just move the knobs closer together.
If you have a Telecaster, consider getting yourself a control plate with a non-standard layout — they’re cheap, not particularly visually intrusive, easy to install, and they can make a big difference to how your instrument feels.
Neck Plates, Truss Rod Covers, and Other Minor Things
There’s a lot of other minor hardware on a guitar — bolt-on designs often have neck plates that prevent the screws from damaging the woods (although more modern instruments often use per-screw ferrules), a lot of guitars with tiltback headstocks have the truss rod covered by a little plastic cover, and if your guitar has a rear-routed control cavity (like a Les Paul), its covers can also often be replaced.
I’ll run through these with examples very quick.
Neck Plates
 An engraved neck
plate from Gotoh.
An engraved neck
plate from Gotoh.
Neck plates, most commonly found on Fender-style bolt-on designs, serve to distribute the force from the neck screws — to avoid damaging the wood or finish of the instrument. They’re just a flat metal plate with (usually) four screw holes, so they’re very cheap and easily available with a variety of custom designs and engravings.
Control Cavity Covers
![]() A clear
control cavity cover for a Les Paul.
A clear
control cavity cover for a Les Paul.
Guitars with rear-routed control cavities generally have them covered by a plastic (rarely, wooden) control cavity cover plate. Since it’s yet another flat, untextured piece of plastic, it’s a prime candidate for stickerbombing or replacing with a different-colored one, much like a pickguard! They’re also pretty easy to make yourself with a hand saw, some sandpaper, and time. I particularly like clear acrylic control cavity covers that let you see the electronics inside. Replacement Strat tremolo covers and Les Paul control cavity covers are easily available in a million different variants.
Truss Rod Covers
 A custom metal truss
rod cover.
A custom metal truss
rod cover.
On guitars with tiltback headstocks, the truss rod — if accessible at the headstock — is usually hidden under a plastic cover. This also happens to be one of the most commonly misplaced parts of a guitar — lots of secondhand guitars are missing this little piece of plastic, and a lot of players (yours truly included) prefer to keep it permanently off, since it does nothing but make setup more of a hassle. If you do, however, choose to keep your truss rod cover on, you may want to get some fun custom text on it, or maybe an entirely custom-made metal one. There are a lot of options, especially if you have a Les Paul or are willing to drill a couple tiny holes in your headstock.
 An Ibanez truss rod
cover.
An Ibanez truss rod
cover.
If you want the best of both worlds — to keep your truss rod covered, yet not have to unscrew the cover for adjustment — Ibanez, in their never-ending quest to overengineer every single part of a guitar, have truss rod covers that have a little plastic “door” that swings out to the side and a channel cut in-line with the truss rod to allow you to get an adjustment tool in there without unscrewing the pickup cover. Neat!
Things You Can Make
Everything we’ve talked about so far is mostly “flat” stuff where most of the visual customization options available to you will be changing the part to one of a different color or pattern. It’s time to talk about things that vary in shape.
Knobs
Okay, let’s get the laughter out of the way first, ha ha, there’s going to be lots of unfortunate phrasing in this section. It was unavoidable.
Knobs. My favorite thing to swap out, believe it or not. The knobs on a guitar can be anything from a purely utilitarian piece of plastic to a beautiful central piece of the composition that is your instrument. Every knob is a design statement.
How To Avoid Getting Shafted By Shafts
Before we talk about the different styles of knobs, let’s talk about compatibility first. As far as knobs are concerned, there are two types of potentiometers (there are more, but only this distinction matters for the purpose of what knobs will fit): split shaft and solid shaft.
Split shaft potentiometers have — you guessed it — a split shaft. The shaft is knurled to stop the knob from spinning freely, and split down the middle to allow you to adjust the pressure it exerts on the inner surface of the knob by slightly forcing the two halves apart with e.g. a flat-blade screwdriver. These are used on virtually all modern guitars.
Split shaft pot shafts have an outer diameter of 6 mm or 0.235“.
Cryptid pots
I’m told there are two different types of split shaft pots that differ by the density of the knurling, but… I’ve never seen them actually used. In my experience, split shaft knobs fit on split shaft pots; if there are distinct types of split shaft pots, then the “other” kind is extremely obscure and I have never come across it or knobs made for it.
To install a knob with a set screw on a split shaft pot, align the set screw with the split.
A solid shaft potentiometer’s shaft is a completely smooth, solid cylinder. Since they don’t have knurling or a way to compress and exert pressure that would hold a knob in place, solid shaft potentiometers rely instead on a small set screw in the knob itself that presses up against the shaft.
The outer diameter of a solid shaft potentiometer’s shaft is about 6.35 mm, or 1/4“. This means they will not fit most knobs.
Solid shaft potentiometers are used pretty much only in vintage guitars — primarily on Telecasters.
Before shopping for knobs, make sure to check what style of potentiometer your guitar is using, and plan accordingly. Most knobs will fit split shafts; if you have a solid shaft, double-check that the description of the knob specifies a 1/4“ inner diameter.
Classic Knob Styles
There are many, many styles of knobs in the guitar world. Let’s start by looking at the classics.
-
Strat-style
If there is a classic knob design, this is it. Legible, utilitarian, available in a plethora of colors — I never quite figured out which way the numbers are supposed to go. These have a certain air of lightness and yet ruggedness to them — they will feel right at home on a sleek yet classic-influenced guitar — just like a Strat!
-
Gibson “Top Hat”
These are the knobs most Les Pauls and similar designs come with. They have a solid colored plastic base plate with numbers, while the top of the knob is made of a different, translucent plastic. Their shape is similar to the Strat knobs’, but they lack any knurling. You can also get them with metal inserts on the top with labels describing the knob functions.
-
Speed knobs
Somewhere in the 80s (I think) Gibson introduced a new knob design that wasn’t stepped midway through to a wide cone, like the classic top hats, but rather had completely straight walls. For whatever reason, these are called speed knobs. They used to be a favorite of many, many guitar manufacturers, until metal dome knobs became fashionable in recent years.
-
Telecaster/Precision Bass
These are classy as hell. Heavy, solid knurled metal, these were made for the 1/4“ solid shaft potentiometers — but you can easily find copies for split shafts. There are two styles of these — the more vintage flat-tops, and the more modern “dome” variant.
The set screw makes them uniquely easy to adjust or replace even on split-shaft pots, because rather than try to pull the knob off with force all you need to do is loosen one screw. They also feel great — the knurling provides lots of grip, and a lot of the knobs of this style feel very substantial and high-quality due to the material choices — solid brass is popular, as is aluminium.
The Fender replacement tele knobs are… questionable. They are horrifically overpriced, and the “Tele/Precision Bass Knurled Knobs” are garbage quality as well — they’re probably cast zinc or something similarly cheap. The “Pure Vintage” ‘52, ‘58, and ‘60s knobs Fender stocks are much higher quality — and made from proper brass and aluminium — but cost over $20, which is slightly ridiculous for a pair of knobs.
Psst, Allparts makes very nice replacement tele knobs for half the price Fender wants.
-
Jazz Bass
These are quite funky and look more like amp or pedal knobs than like typical guitar knobs — in fact, MXR uses these on a lot of their pedals.
- “Witch Hats” Not only do these have the sickest name of any knob style, they also have tremendous vibes. They were used by both Gibson (ES-335s, SGs) and Fender (Jazzmaster, Tele Deluxe) — they are minor variations between the two styles, and you can find “witch hat” knobs with or without a set screw, but they all look broadly similar — a narrow knurled shaft with a silver plate at the top and a flatter, wide base.
-
PRS “Lampshade”
These are quite similar to Gibson speed knobs but have a polygonal, rather than completely round, profile and flare out slightly towards the bottom. I think they look sick. Especially the clear ones look stunning on a guitar with e.g. a flat black and white color scheme, they look almost like crystal or glass.
Unique and Novelty Knobs
Of course, the classic knobs are not the only flavor of knob out there. Etsy in particular has tons of unique knobs, and I highly recommend browsing through all the varieties out there and picking something that will look great on your guitar. Here are some of my favorites to give you an idea of the variety of knobs you could put on your guitar:
-
Lucky Dog Dragonback II (Etsy)
Self-describing as “the most aggressively knurled knob on the market”, these are machined out of solid aluminium and have a particularly heavy industrial look to them. Excellent.
-
Fancy-topped knobs
Feel like solid brass isn’t premium enough for you? How about solid brass with a mother-of-pearl top? There are plenty of these in all shapes and sizes. Similarly, you can find ones topped with abalone, faux-tortoiseshell, faux-gemstones (and probably real ones too!), and a variety of other eye-catching materials. Want a geeky Star Trek-themed guitar? How about some Starfleet insignia-topped knobs?
The possibilities are endless.
-
Wooden knobs
If you want to add a “handmade” flavor to your guitar — especially if it has a natural finish — it’s hard to beat wooden knobs. These can be found in a million billion designs and you’re certain to find one that will fit your instrument.
-
Funky knob shapes
Want a knob that looks like a star? A D20? A shotgun shell? How about a skull? Anything you can drill a hole in, someone probably makes guitar knobs out of. Thingiverse also has plenty of these, if you have access to a 3D printer.
-
Patterned knobs
A particularly common trend in knob design is to have a metal knob with some kind of pattern or symbol engraved on the top. You can find a wide variety of these — with vines, celtic weaves, pentagrams, old US coins pressed into the top, etc etc.
Summary
The knobs are the second most-frequently touched part of your instrument, after the neck.
If you want to give your guitar that extra bit of premium feel, try swapping them out for heavy, solid metal knobs. If you want a more industrial vibe, try witch hats or any of the rougher, beefier metal knobs. If you want something high-class and shiny, try PRS knobs or ones with premium material inlays.
Fox’s Gear: Screw-fit Dome Knobs
Knobs are one of the first things I replace on my instruments, because they’re cheap and taking off press-in (as opposed to screw-tightened) knobs is an absolute pain in the ass, so I’d rather avoid doing it more than once — especially if I’m going to ever mess with the electronics.
Metal knobs also, subjectively, for me, make an instrument feel a lot more premium than plastic ones, so I usually get rid of plastic knobs and replace them with brass dome knobs held on by set screws.
Experiment! Knobs are inexpensive and easy to swap out, and they can add a lot of flavor to an instrument. Well-selected knobs really tie together a guitar visually and can make it feel more personal and consciously designed rather than mass-produced on an assembly line.
Switch tips
We’ve talked about switches in-depth in the chapter on wiring — this is about switch tips.
Most “big” guitar switches (the kind you find used as pickup selectors) come with (usually plastic) removable switch tips.
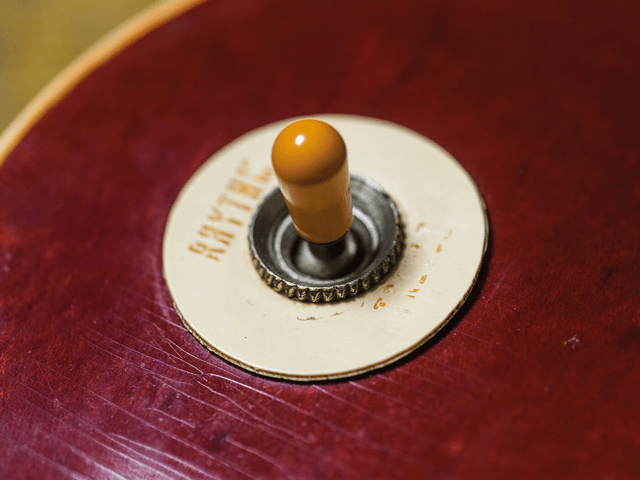 The toggle switch on
a Les Paul, with a cream plastic switch tip.
The toggle switch on
a Les Paul, with a cream plastic switch tip.
Switch tips come in almost as wide a variety as knobs. The blade-style switch tips are interchangeable, for toggle switches you’ll have to find one made specifically for your switch (although the Les Paul shaft is pretty standard).
Much like we did with knobs, you’re going to have the most luck looking for novelty switch tips on sites like Etsy and Ebay; some show up on Amazon and Aliexpress, and sometimes you can find interesting switch tips in stock at usual guitar hardware retailers or sold by individual manufacturers.
The interesting thing about switch tips — and knobs, now that I think about it — is that basically anything you can drill a hole in (if you have a toggle switch) or cut a slot in (if you have a blade switch) can be a switch tip. Go wild — hell, make switch tips out of old Hot Wheels cars if you so desire. With a drill or a dremel and maybe some hot glue, anything you want can be a switch tip.
Plastic switch tips can also be easily purchased in basically any color you’d like, and are very easy to paint yourself — just give it a couple quick layers of spray paint and you might not even need to sand it.
The Electrical Systems
Oh boy, it’s time to talk about the elephant in the control cavity.
The electrical systems in guitars are much, much simpler than most people think they are, and a basic understanding of how they work is crucial to figuring out your own wiring and switching setups, and often for making basic repairs and modifications.
Electronic or electrical?
I’m deliberately trying to avoid using the term “electronics” because the distinction between electric and electronic is a bit blurry and I, frankly, don’t understand it. But there’s probably a reason why it’s an “electric” guitar, but an “electronic” keyboard.
What Makes The Angry Pixies Dance
At its core, every guitar wiring setup looks basically like this:
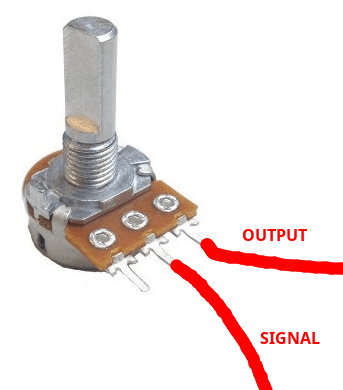
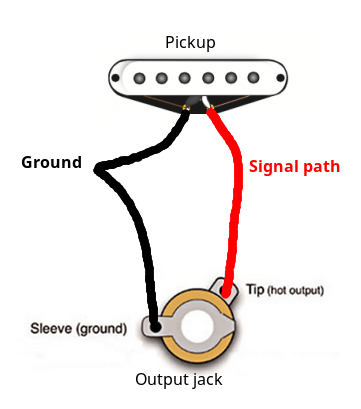 A basic wiring setup for one
pickup, with the ground wire connected to the sleeve of the output jack, and
the hot wire connected to its tip.
A basic wiring setup for one
pickup, with the ground wire connected to the sleeve of the output jack, and
the hot wire connected to its tip.
All the electrically-neutral components are connected together and form the ground, which is the reference point for the output signal of your guitar to be measured against.
You can think of a pickup as an electrical doodad that takes the electrical potential of the ground as an “input”, and “adds” the energy of the vibrating strings to it; our ground wire goes into the pickup, and out comes a wire carrying signal.
Inputs and outputs
Remember this detail, because I’ll be referencing it a lot — the ground is like the “input” of a pickup, and the signal is its “output”.
The wire carrying signal needs to connect to the tip of the output jack, while the ground wire is connected to its sleeve to provide a reference point.
Voltage only makes sense as the difference in electrical potential between two points — you always need two points at different electrical potentials to measure or use voltage in any way! That’s why we need both a ground and a “hot” wire.
That’s the basic principle.
Inventing a Volume Knob
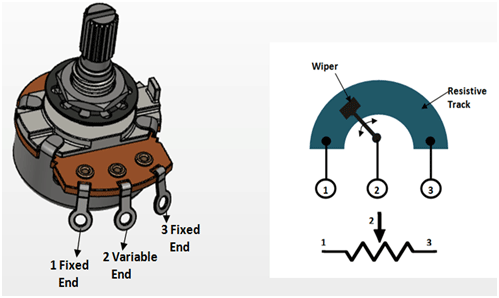 A diagram of how a
potentiometer is built.
A diagram of how a
potentiometer is built.
Your guitar probably has one or more potentiometers to control the volume, tone, and possibly other aspects of the instrument’s sound. A potentiometer is very simple: it controls a wiper that glides along a conductive, resistive track between two points.
The resistance between the two end points of the track is equal to the potentiometer’s rating. The middle contact on a potentiometer connects directly to the wiper. This means that:
-
At full counterclockwise rotation:
The wiper connects contacts 1 and 2 directly (the resistance between them is 0). The resistance between contact 1|2 and contact 3 is equal to the potentiometer’s rating (e.g. 500 kΩ if the potentiometer is rated at 500k)
-
At full clockwise rotation:
The wiper connects contacts 2 and 3 directly (the resistance between them is 0). The resistance between contact 1 and contact 2|3 is equal to the potentiometer’s rating (e.g. 500 kΩ if the potentiometer is rated at 500k)
-
Between those extreme points, the resistances between contacts 1-2 and 2–3 are proportional to the potentiometer’s travel, i.e. on a 500k pot set to exactly 50%, there would be 250 kΩ between contacts 1–2 and 250 kΩ between contacts 2–3.
This is enough for us to now invent a volume knob.
We know that:
- At 100% (full clockwise), all of the signal inside the “hot” wire should reach the output.
- At 0% (full counterclockwise), none of the signal from the hot wire should reach the output.
This would hint that we need the output and the hot wire to be connected to contacts 2 and 3, because at full clockwise rotation those are the ones connected directly — i.e. all of the signal on contact 2 goes into contact 3, and vice versa.
The thing about electricity, however is that it tries very hard to get to ground, and so if we wired the volume pot like this:
 A potentiometer with the
hot wire connected to the middle pad, the output connected to one of the outer
pads, and the other output pad left unconnected to anything.
A potentiometer with the
hot wire connected to the middle pad, the output connected to one of the outer
pads, and the other output pad left unconnected to anything.
The signal would still reach the output, even at full counterclockwise rotation. The potentiometer adds resistance, but it never disconnects the contacts entirely. Also, leaving the output unconnected to either signal or ground makes it susceptible to noise. We can solve both of these problems by grounding the output at full counterclockwise rotation.
Our revised constraints are:
- At full clockwise rotation, the signal wire must be connected directly to the output
- At full clockwise rotation, contacts 2 and 3 are connected directly
- At full counterclockwise rotation, the output must be connected directly to ground
- At full counterclockwise rotation, contacts 1 and 2 are connected directly
It’s easy to see that the output must be connected to contact 2, contact 1 being ground and contact 3 being signal:
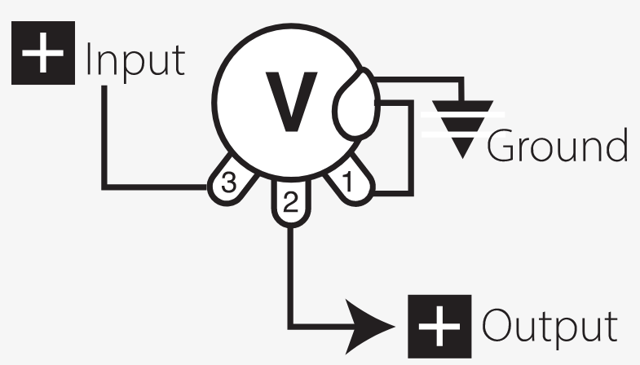 Input connected to one of
the outer pads of a potentiometer, with the middle pad connected to the output,
and the other outer pad grounded.
Input connected to one of
the outer pads of a potentiometer, with the middle pad connected to the output,
and the other outer pad grounded.
“Volume independent” wiring
The volume pot wiring we just invented presents a certain problem particularly prevalent in Gibson guitars, which often use it; if your guitar has multiple pickups (and multiple volume pots), turning the volume down on any one of them shorts the output to ground, and thus silences all pickups! If you’re in that situation and find it a concern, just swap the input and output, so that the input (signal), rather than the entire output, is shorted to ground at 0% volume.
Inventing a Tone Knob
Oh no, I have a Telecaster and the bridge pickup is so bright it sounds like it’s Trotskying my head! Fear not, let’s invent a treble roll-off potentiometer. We’ll need a new component: the capacitor.
For our purposes, all that matters is that a capacitor blocks low frequencies and passes through high frequencies. The cutoff frequency depends on the capacitor rating — the higher the rating, the more frequencies it lets through.
Knowing this, we can infer that we can use a capacitor connected to ground to selectively ground high frequencies (effectively removing them from the signal) while leaving low frequencies unaffected.
There are lots of ways to wire up a tone pot, so I will skip ahead to just showing you a working diagram.
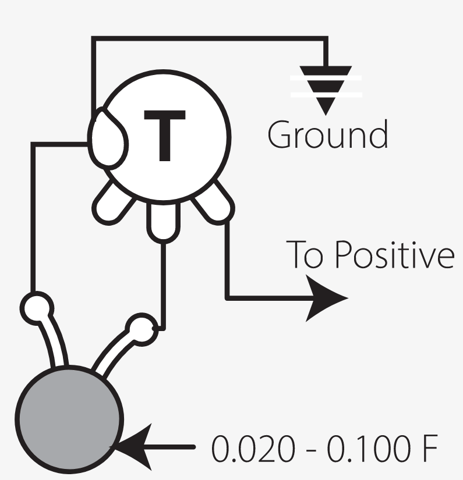 One of the many possible ways
to wire a tone pot, by putting a capacitor between the middle lug of a
potentiometer and ground, and soldering the hot wire to one of the outer lugs.
One of the many possible ways
to wire a tone pot, by putting a capacitor between the middle lug of a
potentiometer and ground, and soldering the hot wire to one of the outer lugs.
Connecting a pot wired like this to your signal wire will let you control the treble roll-off. Let’s analyze why it works:
- At one end of the travel, the capacitor is connected directly to the positive (signal) wire, so high frequencies pass unimpeded through it into ground. This removes the maximum amount of high frequencies from the signal.
- At the other end of the travel, the full resistive track of the potentiometer is between the positive wire and the capacitor, so the signal will prefer to take a path of less resistance, and will not go down the capacitor — i.e. the signal will be unaffected.
Switching Things Up
It’s time to invent switches!
There are many different types of switches used in guitars:
- Les Paul-style three-position toggle switches:
- Telecaster-style three-position blade switches:
You can also find four-position versions of these, for the (wonderful) four-position Tele mod — which adds a position with both pickups in series for a massive sound.
-
Stratocaster-style five-position blade switches:
These are actually interchangeable with Tele-style three and four-position switches!
There are also a number of specialized types of switches that allow for expanded switching options:
-
Push-pull pots, where you can pull up on the knob to toggle between two states.
These are generally DPDT, meaning they have six contacts — one position connects each of the middle contacts with their corresponding upper ones, and the other connects them to the ones on the bottom.
- Mini toggle switches that come in a ton of different variations (SPST,
SPDT, DPDT, 3PDT…)
SPST, DPDT?
Those funky “_P_T” acronyms stand for “_ Pole, _ Throw”. The number of “poles” a switch describes the number of independent circuits it can control; the number of “throws” indicates the number of internal contacts (you can think of them as “connections”) each circuit has. For example, an SPST (Single Pole, Single Throw) switch just has two contacts which are connected in one state and disconnected in the other.
A DPDT (Double Pole, Double Throw) switch has two circuits (double pole), each with three contacts (two connections per circuit, i.e. double throw) — in one position the middle contact of each circuit is connected to the top one, in the other position it’s connected to the bottom one.
- Rotary switches, which work similarly to normal three, four, five, six- position switches but can replace e.g. a volume or tone knob.
- The Super Switch — a five-position switch with four poles that can replace a Tele or Strat-style blade switch.
- Freeway switches, which add a second “side” to a normal 3- or 5-position switch, turning them into a 6 or 10 position switch respectively.
- And even arcade button-style momentary switches, famously used by Buckethead as a killswitch (a momentary switch wired to mute the signal from the pickups as long as it’s held down).
- They’re not switches, but I’d like to also mention the existence of concentric (stacked, dual) potentiometers — they’re basically two independent potentiometers constructed so that one shaft is contained within another and sticks out above it; these let you control two different things independently using just one hole for a potentiometer!
A note about basses — blend pots
It’s quite uncommon to find guitar-style pickup selectors on a bass.
Most basses just use individual volumes for each pickup, or a master volume combined with a blend pot (also called a balance or pan pot, or more technically a dual gang potentiometer).
A blend pot is pretty much just two stacked volume potentiometers controlled by a single knob. They’re usually wired so that one of the banks works as a normal volume control for the neck pickup, and the other bank works as a volume control for the bridge pickup wired by reverse — i.e. turning the knob increases the volume of one pickup while simultaneously decreasing the volume of the other.
> A pan pot.
Inventing a Telecaster Pickup Selector
Let’s start by examining the simple case of wiring up a Telecaster so that we can have switching between the pickups.
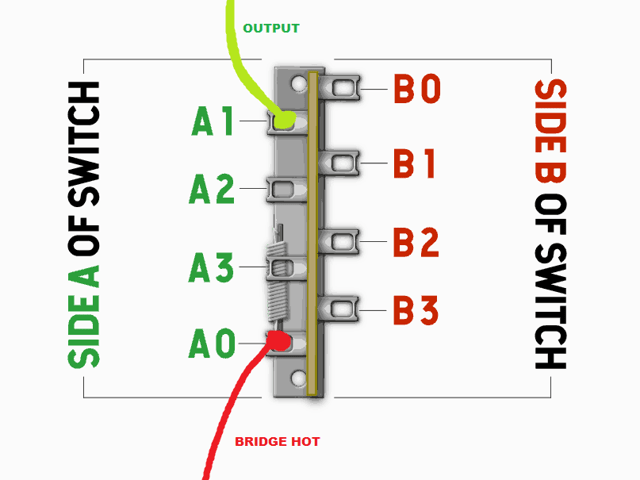
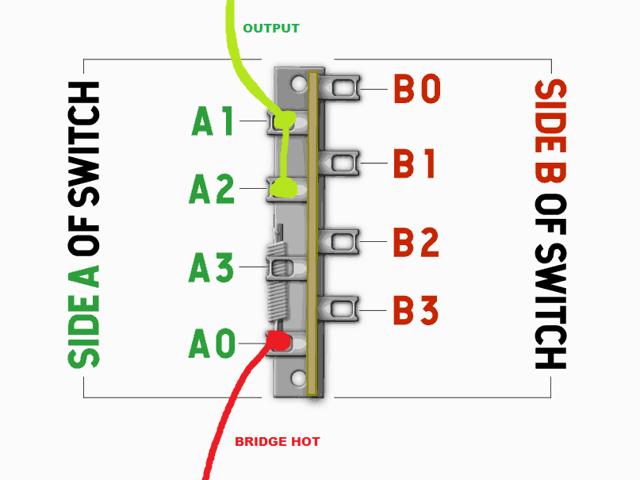
Although there are so many types of guitar switches, virtually all of them work on the same principle: there are one or more “sides”, and each side has a common contact, usually marked C or 0, which connects to a different “non-common” contact for each position (it’s called “common” because it’s part of the switched circuit in every position of the switch). Looking at the bottom of a Telecaster switch:
 A diagram of the
contacts on a three-position Telecaster blade switch.
A diagram of the
contacts on a three-position Telecaster blade switch.
In position 1, contact B0 is connected to B1, and A0 is connected to A1. All other contacts remain unconnected.
In position 2, contact B0 is connected to B2, and A0 is connected to A2. All other contacts remain unconnected.
In position 3, contact B0 is connected to B3, and A0 is connected to A3. All other contacts remain unconnected.
Simple enough!
Let’s figure out how to wire up a Tele switch so that we get:
- Only the bridge pickup in position 1
- Both pickups in parallel in position 2
- Only the neck pickup in position 3
Series and parallel
Remember how I talked about voltage being a difference in electric potential, and about thinking of pickups as “adding” the energy of the vibrating strings to their reference (ground)?
You can connect multiple pickups in series or in parallel.
Parallel is the obvious one — you just connect their outputs together. That way, both signals reach the output directly. You can think of the result as the average of the two signals; it’s a pretty transparent sound that preserves the dynamics of each pickup and matches their individual sounds in volume.
Series wiring is a bit spicy — you take the output of your first pickup and run it directly into the input (the “ground” wire) of your second pickup. That way, the signal will be the sum of the two pickups’ outputs.
With series wiring, the electricity has to travel through both pickups, which does some funky things to the sound; overall, this means that series wiring is beefier, darker, and louder than parallel wiring.
To figure this out, let’s do a similar logic puzzle to what we did with to invent a volume knob:
- To connect the bridge pickup to the output in position 1, the bridge pickup and output must be connected to pads A0 and A1 (in any order), or B0 and B1 (in any order).
- To connect both pickups to the output in position 2, the bridge pickup, neck pickup, and output must be connected to some of the pads A0, A2, B0, B2.
- To connect the neck pickup to the output in position 3, the neck pickup and output must be connected to pads A0 and A3 (in any order), or B0 and B1 (in any order).
There’s not that much difference between wiring and Sudoku, really.
Let’s solve this by… picking pads at random! I’ll just start from the top and use the first appropriate pad for each connection.
First on our list is the hot wire from the bridge pickup, and we know by constraint a. that it can be connected to A0, A1, B0, or B1. Let’s connect it to A0. By constraint a., we also know that if the bridge pickup is connected to A0, A1 must be connected to the output:
 We connect the output
to pad A1, and the bridge hot to the switch’s side A common pad.
We connect the output
to pad A1, and the bridge hot to the switch’s side A common pad.
Continuing, we know that the bridge pickup should also be connected to the output in position 2, which connects pads A0-A2 and B0-B2. Since A0 already has signal from the bridge, we can just connect A2 to the output to ensure the bridge pickup remains active both in position 1 and position 2.
 Connecting pad A2 to
A1 as well ensures that the bridge pickup remains active in both position 1
and 2.
Connecting pad A2 to
A1 as well ensures that the bridge pickup remains active in both position 1
and 2.
This leaves us with the neck pickup. We know by constraint b. that the pads we can use in position 2 are A0, A2, B0, B2, but we’ve already used A0 and A2 for other things, so let’s just pick the first remaining pad and connect the hot wire from the neck pickup to B0. For the neck pickup to be active in position 2 and 3, that means B2 and B3 should be connected to the output:
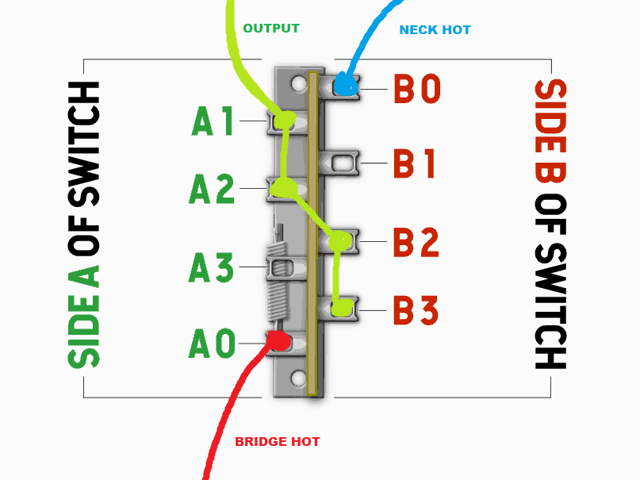 All that’s
left is to also connect pads B2 and B3 to the output, connect the neck pickup
to the common pad of side B, and we’re done!
All that’s
left is to also connect pads B2 and B3 to the output, connect the neck pickup
to the common pad of side B, and we’re done!
Aaand… Our switch is all wired up and ready to go into the guitar! Let’s double-check:
-
In position 1:
A0(bridge hot) is connected toA1(output), so we get sound from the bridge pickup.B0(neck hot) is connected toB1, which isn’t connected anywhere, so we don’t get sound from the neck pickup. -
In position 2:
A0(bridge hot) is connected toA2, which has a wire running toA1(output), so we get sound from the bridge pickup.B0(neck hot) is connected toB2, which has a wire running toA2, which has a wire running toA1(output), so we get sound from the neck pickup. -
In position 3:
A0(bridge hot) is connected toA3, which isn’t connected anywhere, so we don’t get sound from the bridge pickup.B0(neck hot) is connected toB3, which has a wire running throughB2andA2toA1(output), so we get sound from the neck pickup.
Get the confetti ready, we just reinvented a seventy-year old wiring scheme! Great job.
Is there a point to all of this?
Frankly — no; you can easily find clear and simple wiring diagrams for basically any wiring scheme you can imagine online.
The reason I wanted to explain how this stuff works to you is, even though those wiring diagrams are usually very clear and easy to follow, they don’t do anything to help you understand why things are connected the way they are.
An instrument is a tool, a piece of art, a friend; all those titles have something in common — you can only interact with them best once you take the time to truly understand them.
The road to a more personal instrument is the same one as the road to an instrument you understand. An instrument becomes truly personal once it stops being a product that someone else manufactured, making design decisions and choices that you don’t care about or understand. You don’t need a fully personalized guitar for it to be personal — you just have to know and understand it as you would a close friend.
The wiring is a key component in that, and understanding why a guitar works will not only improve your familiarity with the instrument, but also help you plan and make modifications, troubleshoot, and make repairs.
Upgrading The Wiring
For the purposes of this section, we’re only concerned with the stuff that happens between the pickups and the output jack. We talked about output jacks already, we will talk about pickups later.
First of all, there’s a lot of snake oil in guitar folklore. Tales of magical vintage capacitors or special potentiometers that sound better than anything else. Fuck that. Unless they’re broken, there’s no reason to change your capacitors. If your pots crackle, spray some contact cleaner inside and run them back and forth a couple times. If they keep crackling, then it might make sense to consider a swap.
Broadly speaking, in upgrading the wiring of your guitar, you will generally strive to achieve either the ability to get more tones out of your instrument, or tones different to the ones you have available stock.
Prerequisites and What To Keep In Mind
We’ll talk about pickups in depth in a later section, but what matters for the purposes of planning wiring mods is that humbuckers are basically two single-coil pickups next to each other, wired in series — the output of the first coil going into the input of the second coil.
Older or cheaper guitars will often only have two wires running out of a humbucker— the “input” wire of the first coil and the “output” of the second coil; if that is the case with your pickup, you will not be able to split the coils without physically altering the pickup, which is tricky to do. Most brand-name pickups you buy (and, as of late, more and more stock pickups) will come with four wires — two for each coil — which does allow for all the possible combinations of wiring.
Telecaster neck pickups deserve a special mention. They’re unique in that they sit under a metal cover, which is connected to ground. This means that if you try to wire telecaster pickups in series, you’ll be effectively grounding your signal, and the whole thing won’t work.
Luckily, as is the pattern with Fender design issues, this is pretty easy to work around — there’s a small solder joint on the underside of the pickup connecting the grounded cover (central pad) to the pickup input (leftmost pad, if looking at the pickup with the wires coming off the bottom). You’ll need to cut or desolder that connection and attach a third, grounding wire to the central pad that you’ll connect to the common ground in your circuit:
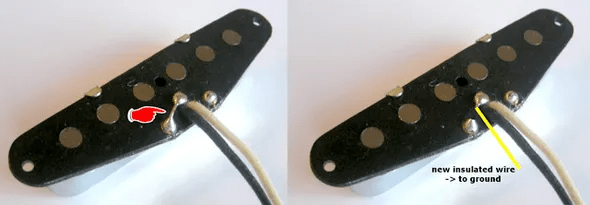 To get a separate
“input” wire for your Tele neck pickup, you’ll need to get rid of the solder
joint between the ground wire and the metal cover, and attach a new ground wire
to the central pad.
To get a separate
“input” wire for your Tele neck pickup, you’ll need to get rid of the solder
joint between the ground wire and the metal cover, and attach a new ground wire
to the central pad.
You should now have three wires coming off your neck pickup: a “hot” output wire, an “input” pickup ground wire, and a separate ground wire for just the metal cover. If you want to wire your pickup in series, you would connect the cover ground to the common ground (the sleeve of your output jack), the neck pickup ground to the bridge pickup output, and the neck pickup output to the output jack tip.
The Possibilities Are Endless
What wiring mods can you actually do to your guitar? Everything you can imagine.
Broadly speaking, any combination of multiple pickup coils can be wired:
- In parallel — this is how multiple pickups are usually combined; this gives you a very clear combination of all the coils’ sounds; think middle position on a Tele. To do this, connect the coil grounds to a common ground, and the outputs to a common output.
- In series — this is how the coils in a humbucker are wired, and what the popular four-position Telecaster mod and the series/parallel Strat mod give you access to. The signal from multiple coils connected in series is louder, bassier, and more compressed. To do this, connect the output of each coil into the input of the next coil, and then connect the ground of the first coil to a common ground, then the output of the last coil to the common output.
They can also be wired in phase or out of phase. In-phase is the sound you know and love.
Out-of-phase wiring means you swap the ground and hot wires of a pickup, effectively running it “in reverse”. This means that the common frequencies between a coil wired in phase and one wired out of phase will cancel each other out, leaving you with a very distinct, “hollow” and thin sound.
Frequency cancelling
This out of phase sound happens because the wavelength of bass frequencies is much longer than the wavelength of treble frequencies, so there’s less difference in bass between coils placed at different positions. The common frequencies between coils of opposite phase get cancelled out, so as a result you get funky treble and very little bass.
Add to that the possibility of disconnecting one of the coils entirely, and these alone give you six distinct tones (parallel, series, out-of-phase parallel, out-of-phase series, only north coil, only south coil) you could get out of a single humbucker or pair of single-coil pickups! Add more pickups to the equation, and the number of combinations explodes exponentially.
Bridges And Tailpieces
No, we’re not at pickups yet, sorry! This is the “Fox rants about cost cutting” section, strap in.
The bridge is the part of the guitar that supports the strings and transmits their vibration through to the body.
Bridges have one or more saddles that the strings “break” over which determine the intonation and action height of the instrument.
The strings are anchored at one end by the tailpiece, which may be a separate part or integrated into the bridge itself.
Bridges are one of the most mysterious parts of an electric guitar or bass. Seriously! You’ll be able to find literally every take on bridges and their impact on tone online.
“High-mass bridges resonate better”
“Lighter bridges don’t color tone as much/have faster attack”
“Brass saddles have the fastest attack”
“Brass saddles have a slow attack, only graphite or bone saddles can get you real good tone”
“Roller saddles don’t transfer vibrations effectively”
“The vintage Telecaster two-strings-per-saddle approach leads to much better tone”
I… don’t think it matters. Surely if it really mattered we’d have reached some kind of consensus over the last 70 years.
Still, every few years someone will claim to have reinvented the bridge and fixed some inherent flaw that’s present in every other bridge design… and then immediately fade into obscurity because there’s not really much reason to switch from the existing good bridge designs other than novelty.
Having said that, I do hold some strong opinions about bridges. I’m a material nerd, so I like brass and aluminium; I trust brass and aluminium. I like beefy bridges with lots of adjustment options — a significant part of why I’m such a fan of Sandberg basses is that their bridges even have adjustable string spacing!
The upgrade options depend heavily on the style of bridge or tailpiece that’s already on your instrument, and each of the various different types has its pros, cons, quirks, and secrets.
I will go in detail about all the common styles of bridges and tailpieces I’ve had experience with over the course of the next few chapters.
Tune-O-Matic
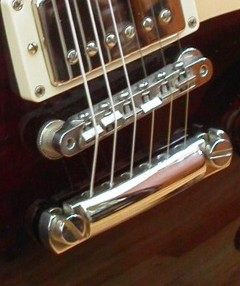 A Tune-O-Matic bridge.
The venerable Tune-O-Matic, a typical sight on Gibson models since the early 50s, now also seen on some Fender models (under the name Adjusto-matic) and countless other brands’ guitars. It has its pros and cons, but overall is a pretty great design.
It’s a two-part construction, with a separate bridge and tailpiece; the tailpiece is held in place by the tension of the strings — I recommend taping it down when restringing or doing maintenance to keep it from falling onto the body and damaging the finish.
The bridge itself sits on two posts and has a set of six saddles, individually adjustable for intonation from the front with (usually) a flat-head screw. This has certain problems; on guitars with particularly tall bridge pickups it’s almost impossible to adjust intonation without taking the bridge off, and action adjustments are very crude, since you only have two points to adjust the action at. Adjusting the action is done with very finely knurled thumb-wheels rather than, e.g., screws, and doing it under string tension ranges from “borderline impossible” to “very difficult but risking permanent damage to the guitar”. Loosen all the strings before fiddling with your TOM’s height!
Some versions of a Tune-O-Matic can be easily modded to allow for adjustment from the back by just taking out the screws and saddles and reinserting them from the other side, or reversing the saddles and then flipping the entire bridge, but then the tailpiece gets in the way of adjustment.
The range of intonation adjustment is also pretty narrow, and it’s not uncommon to see one or more saddles on a Tune-O-Matic maxed out in their travel in an attempt to get the instrument to intonate correctly.
Bridge collapse
The Tune-O-Matic bridge has one inherent design flaw. Because it’s only supported at the ends, while the strings exert pressure over its entire width, a lot of cheaper TOM-style bridges will collapse over time.
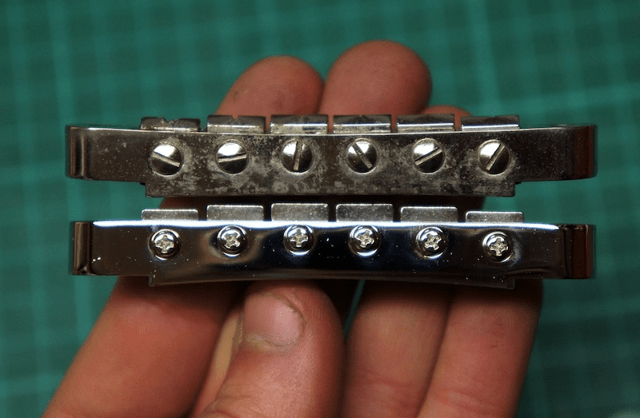 A collapsed (top)
Tune-O-Matic bridge compared to a “healthy” (bottom) one.
A collapsed (top)
Tune-O-Matic bridge compared to a “healthy” (bottom) one.
The saddles of a Tune-O-Matic are not individually adjustable for height, and so when the bridge collapses — i.e. when its middle section sags under string pressure — the middle strings end up having much less clearance over the fretboard compared to the outer ones.
If your Tune-O-Matic-equipped guitar develops a buzz on the D and G strings or seems to require higher action than it used to, that’s usually a warning sign that you’ve got a collapsing bridge.
I’m aware of one solution that actually fixes the problem by having the entire bridge be in contact with the body — the Babicz version of the Tune-O-Matic — but it’s expensive and quite distinct from a standard TOM visually. You can, however, highly reduce the chance of a bridge collapse without resorting to such drastic measures.
A bridge made with higher-quality materials (e.g. brass, aluminium) will not collapse as readily as one made with cheaper metals, so getting high-quality parts is particularly important with a Tune-O-Matic.
The primary course of action to help avoid a bridge collapse, however, is setting your tailpiece height properly.
A tailpiece set too low leads to a very sharp string break angle over the bridge and so lots of downwards force that can hasten a bridge collapse. Setting the tailpiece height on a Tune-O-Matic is a balancing act between too much downwards force — risking a bridge collapse — and too little, which can cause buzz and problems with tuning stability and string retention.
A good rule-of-thumb I’ve found for setting the height on a Tune-O-Matic tailpiece is to start by lining up the top surface of the tailpiece with the highest saddles on the bridge and adjust from there.
Upgrade Options
Certain manufacturers (Gotoh, Hipshot) make aftermarket TOM-style bridges that can additionally slide back and forward on the support posts and can be locked down with a screw in an attempt to extend the available range of intonation adjustment. If you find that you don’t have enough saddle travel to get your guitar to intonate properly, they might be something worth looking into.
I’d like to also mention the Babicz FCH version of the Tune-O-Matic, as that’s — as far as I’m aware — the only design which attempts to fix all the issues inherent to the standard TOM design.
It’s extremely pricy, annoying to adjust (because it has so many screws and adjustment points), and, in my personal opinion, ugly as hell, but it does have individually-adjustable string action, the intonation is adjusted by a prominent hex screw — which lets you do it from an angle with an allen key rather than trying to awkwardly fit a screwdriver in — and it has a much larger range of motion than standard TOM saddles (and if that’s not enough, you can push the entire bridge back or angle it slightly by adjusting the screws that bind against the posts). Not only that, but the “full contact” design means it’s unlikely this bridge will ever collapse.
On the other end of the spectrum, Schaller make Tune-O-Matic clones with roller saddles (for use with vibrato tailpieces) that are adjustable for string spacing.
To my surprise, compared to Fender-style bridges, there just aren’t that many variations on the Tune-O-Matic formula. I suppose it’s not that weird — it’s a pretty good design and there aren’t that many low-hanging fruit issues with it which can be easily fixed without a fundamental redesign.
My suggestion? If you have a Tune-O-Matic bridge on your guitar, it’s probably good, and there’s not much reason to upgrade it. If you do decide to swap it out, make sure to double- and triple-check the specs. There are lots of minor variations on the mounting with slightly (and I mean fractions of a millimeter, but enough to make them incompatible with each other) different string spacing, post spacing, post and thumb-wheel diameter… Measure every part of your bridge, and then see if your desired replacement bridge will fit. Worst case, you might need to rip out the old bushings and press in new ones.
Related designs
We’ve talked about the standard Tune-O-Matic, but there’s a lot of variations on the classic formula.
I talk a lot about Fender cutting every possible corner, but Gibson is not immune to sacrificing quality in the name of saving a couple cents either.
When trying to figure out the answer to “what is the cheapest, worst guitar we can possibly make?” Gibson looked even to the venerable Tune-O-Matic in search of cost savings. After, no doubt, a night of smoking two thirds of the periodic table, someone suggested the brilliant idea of just removing the bridge altogether.
“What if we just feed the strings into the tailpiece from the front, wrap them around and call it a day?”
I would like to present to you, the worst excuse for a bridge ever conceived by a commercial guitar manufacturer; the vintage wraparound bridge:
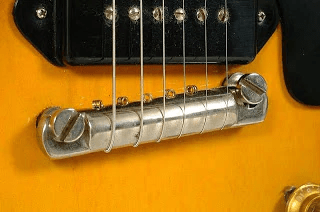 A vintage wraparound
bridge.
A vintage wraparound
bridge.
Yup. That’s just a tailpiece. There’s no adjustment for intonation, there’s only symbolic adjustment for action, the strings don’t really have anything preventing them from moving side-to-side. Restringing these is also an adventure, because you need string tension pulling them towards the neck to keep them from crashing onto the body, but you have to pull strings through them away from the neck… It’s fun™️.
Some years later Gibson realized that this disaster is beneath even them, and added… some raised pieces to work as saddles.
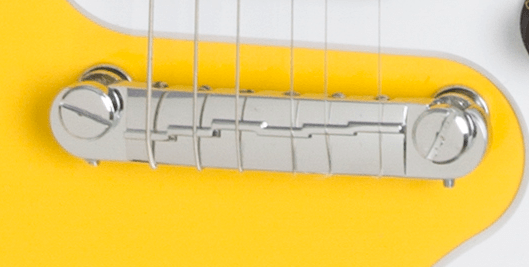 A “modern”, compensated
wraparound bridge.
A “modern”, compensated
wraparound bridge.
High-fives were had all around, no doubt, and this variant survives to this day on low-end models like the Melody Maker. There’s still no adjustability, but at least there’s some compensation to make it vaguely intonate.
Fortunately, plenty of other companies have stepped up and offer wraparound designs that actually work as a bridge. Gotoh and Schaller come to mind immediately, both offering wraparound bridges that are easier to restring, with saddles individually adjustable for intonation.
Of course, since Gibson removed the bridge itself from some of their guitars, they also removed the tailpiece from others. Turns out, you can avoid having to use a tailpiece if you just thread the strings through the body:
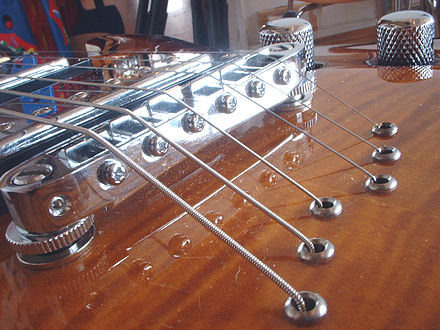 A Tune-O-Matic bridge
with through-body stringing.
A Tune-O-Matic bridge
with through-body stringing.
Alternately, you can then combine your Tune-O-Matic bridge with a vibrato tailpiece, like a Bigsby or a Jazzmaster trem. Jazzmaster bridges suck so badly that it is pretty common for both Fender/Squier and offbrand copies of Jazzmasters to just use a Tune-O-Matic bridge with a Jazzmaster tailpiece.
Telecaster Bridges
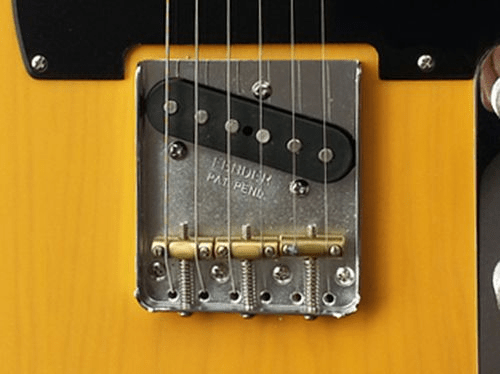 A vintage-style Telecaster
bridge.
A vintage-style Telecaster
bridge.
A Tele bridge is perhaps the clearest example of Leo Fender’s burning hatred of spending money. It’s literally a bunch of screws, a piece of sheet metal bent into shape, and a brass rod cut into three sections. I’d be surprised if these cost more than a dollar to manufacture.
When shopping for an upgrade, make sure to double-check the dimensions and number and placement of mounting screws. There are a number of variants of Tele bridges, and although the four-screw mount (pictured at the top) is the most common, there are also three-screw bridges that have the screws in different locations. Some bridges will also only allow you to string the guitar through the body, while some will offer the option to load in the strings from the back of the bridge.
Tele bridges have… a number of problems and quirks. The most obvious and painful one is the fact that, because there are two strings per saddle and so you cannot adjust the intonation of each string individually, it is physically impossible to get a vintage-style telecaster bridge to intonate correctly.
Older vintage bridges may also not have string grooves at all, and rely only on friction for the string to stay in place and not move side-to-side. These are prone to the “sitar effect”, horrendous buzzing, and messy string spacing.
Upgrade Options
Over the years, both Fender and third parties have attempted a number of remedies to these problems. First came the “hammer-saddle” bridge:
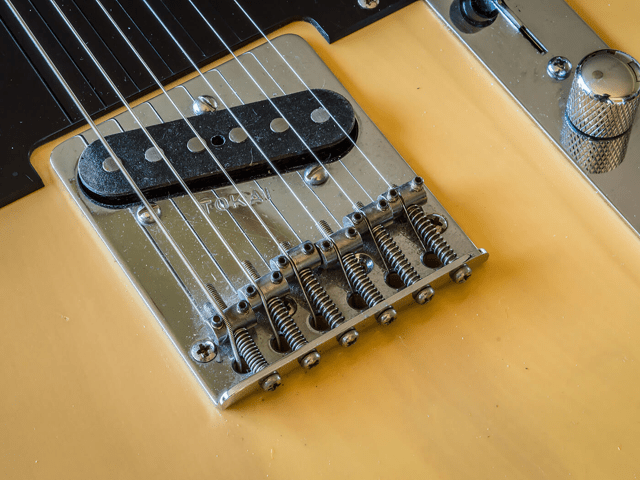 A
“hammer-saddle”-style Tele bridge.
A
“hammer-saddle”-style Tele bridge.
These are, somehow, even worse than the old design. They break strings quite often — because the strings end up rubbing against the sharp threads of the height adjustment screws — the saddles are very rattly and can even end up flipping (because the string applies heavy pressure to only one side of the saddle), and they either don’t have string grooves at all, or the string grooves are not deep enough to get rid of the “sitar” effect. My recommendation — stay away from these. If you have one of those, it’s a prime candidate for an upgrade.
Later came the “modern” six-saddle bridge, with saddles resembling those on a Stratocaster. There’s not much I can say about these; it’s an okay design, on par with most other guitar bridges. I, personally, think it can look slightly out of place on a Tele, but it does the job pretty well. There’s lots of aftermarket variants of this design.
Fox’s Gear: Compensated Saddles
There is a middle ground that lets you keep your beefy telecaster saddles with two strings holding each of them down and vintage look, and fixes the “sitar effect” while letting you achieve perfect intonation: compensated saddles.
> ABM compensated Telecaster bridge saddles.
These are a drop-in replacement for vintage saddles that have string grooves cut into them at precise depths that allow each pair of strings to intonate correctly.
Full disclosure, I didn’t trust them until I ordered and installed a set of Gotoh compensated saddles in my Tele on a whim and was shocked to discover that it intonates perfectly with them on. If you have a vintage-style bridge and want to keep the vintage vibe, I highly recommend trying them out.
They’re available in a variety of styles, colors, and materials — even including titanium — from loads of different manufacturers. Fender even makes a set of compensated saddles that have the intonation individually adjustable with a screw, but I’m told they break very easily, so I would suggest staying away from those ones.
Quirks
The vintage-style saddles, compensated or not, have another quirk that makes setup slightly different from setting up other kinds of saddles or bridges — because of how bulky they are and how high they sit above the bridge, intonation and action adjustments are not truly independent with these saddles. Raising the action simultaneously extends the scale length, and extending the scale length (tightening the screw that sets intonation) simultaneously raises the action. Setting up a vintage Telecaster bridge is a bit of a balancing act, but on the other hand it’s not more time-consuming than other bridges because you only have three — rather than six — saddles to adjust.
If you happen to have a Tele where the saddles sit particularly low for correct action or particularly far back for correct intonation, you may find that either the long intonation screws or the small saddle height screws dig painfully into your palm when palm muting. In that case, just grab a dremel and shave off a bit off the ends of the screws; don’t worry too much about messing it up, the screws are dirt cheap.
If you’re planning on pickup swaps or alterations, there are also “cut off” or “short” Tele bridges made to accommodate a bridge humbucker. However, if you keep a single coil in the bridge position with a “short” bridge, you will have to alter the mounting and drill new holes, as the bridge pickup on a Tele normally mounts to the bridge.
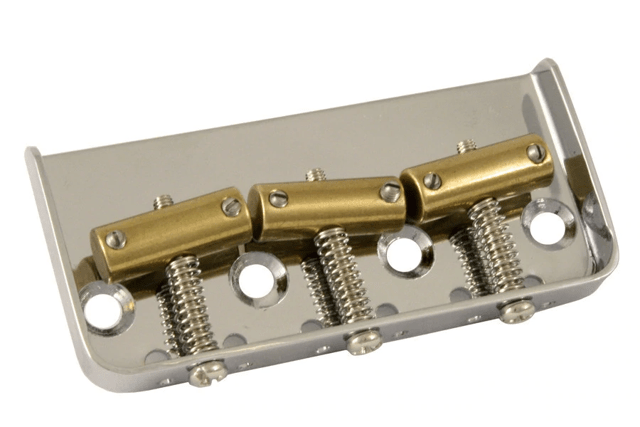 A “short” Tele bridge.
The Synchronized Tremolo
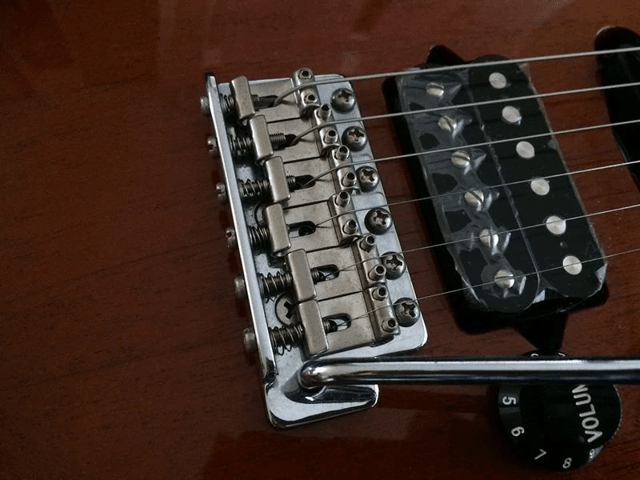 A vintage-style
Synchronized Tremolo.
A vintage-style
Synchronized Tremolo.
Ah, the One Really Good Fender Design. The Synchronized Tremolo, featured on Strats, is a fantastic design, and since its introduction in 1954 it’s become by far the most popular vibrato system in the guitar world. It owes that honor to its many excellent features — unlike a Bigsby or Jazzmaster tailpiece, it takes very little space on the front of the guitar (since all the working parts of the Synchronized Trem are in the back); it has six saddles, each individually adjustable for action and intonation; the tension is very finely and very easily adjustable, by changing the spring arrangement or turning the claw screws in the back of the guitar, and unlike a Floyd Rose, doesn’t require fiddly finetuners and string locks.
TL;DR: It’s easy to use, easy to adjust, and every part of its operation can be adjusted.
Quirks
There’s a common misconception about synchronized trems, popularized no doubt in the Floyd Rose era — that they only allow the player to drop the pitch of the note down, but do not allow for raising the pitch. That’s false.
That misconception stems from the fact that most Synchronized Trems are set up decked — “decking” a bridge of this design means reducing the height and increasing the tension (by adding springs and tightening the claw screws) until it pulls the bridge flush with the body.
A “decked” trem is limited in its rearward travel by the body, and so can only bend notes down in pitch. This has a number of advantages — the tuning is quite stable, since the tension is high enough that it will always try to pull the strings to the right pitch; bending or breaking a string will also not throw your other strings out of tune, and you can detune at any time easily if you so desire.
If you desire the ability to pull notes up, you can also float a Synchronized Tremolo by carefully adjusting its height and the tension so that it floats with a gap between the rear of the bridge and the body, pulled one way by the string tension and the other way by its springs.
A floated trem can bend notes both up and down, but that flexibility comes at a cost. Since it now depends on string tension to keep it in the right place, any change to that tension throws all the strings out of tune — bending a note will make other notes that ring out simultaneously go flat, breaking a string will make the whole guitar go sharp, and you lose the ability to quickly switch to drop D by just detuning one string. The tuning is also much less stable than on a decked trem.
On the other hand, a floated trem is extremely sensitive to the lightest pressure on the vibrato arm, so you can get some very nice, gentle vibrato with small movements, which isn’t quite achievable on a decked trem — Jeff Beck is a master of this technique. Like him, you can also learn to compensate for the tuning instability by gently pulling or pushing notes back in tune using the vibrato arm.
Seriously, go check out Jeff Beck’s vibrato technique. I don’t know any other guitar players who have as complete a mastery of this vibrato system as him.
Variants
There are two main variants of the Synchronized Tremolo and they differ pretty much only in mounting.
At its introduction in 1954, the Synchronized Tremolo was mounted to the guitar body with six screws, one in front of each saddle. This “vintage” variant — referred to as the six-point version — is pictured at the top and is the most common in non-Fender guitars with synchronized trems.
At some point Fender switched from six screws to just two big flathead screws that thread into threaded brass bushings in the body rather than screwing directly into the wood. This is known as the “modern” or “two-point” Synchronized Trem and is pretty much entirely superior to the six-point variant. The different mounting system allows for a wider range of adjustment and wider range of motion when floated, and makes adjustment much simpler.
Two-point trems are found on basically all modern Fender-made Strats.
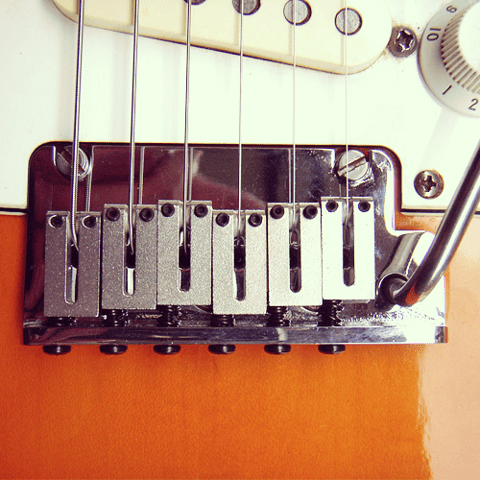 A two-point
Synchronized Tremolo.
A two-point
Synchronized Tremolo.
Going between the two variants
A two-point variant is not a drop-in replacement for a six-point trem, and vice versa. If you intend to replace your trem with one with a different mounting system, you will need to carefully fill the old mounting holes and, ideally, use a drill press to make the new ones — otherwise the drill bit will try to wander into the old holes, since they overlap.
Upgrade options
Remember how I called this the One Really Good Fender Design? Turns out, there aren’t that many upgrades for the Synchronized Trem out there. It’s a really good design, and it’s hard to improve upon it without adding a lot of extra complexity (see: Floyd Rose).
Most of the replacements are just the exact same design, but with nicer materials and machining, beefier saddles, maybe a locking vibrato arm. A lot of them look pretty sick, but they’re still mostly a visual upgrade rather than a functional one.
One design that does improve on the Synchronized Trem is the Vegatrem, a drop-in upgrade for any two-point or six-point design.
It’s quite expensive, but it shortens the bridge and slightly moves the pivot point to allow for a much wider range of movement than the standard Synchronized Trem. It also features locking saddles and a locking vibrato arm sleeve.
Bass Bridges
Since a bass bridge is much beefier and larger than a guitar bridge and because — unlike guitar — the electric bass is pretty much entirely a Fender invention, bass bridges in general offer much greater compatibility and adjustability than guitar bridges.
Let’s start with the most basic of them all.
The Standard Fender Bass Bridge
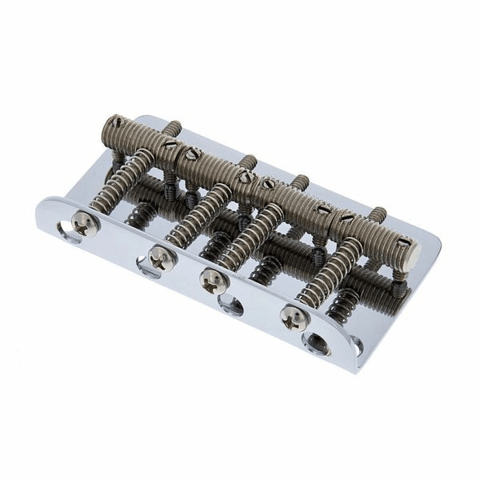 A vintage-style Fender
bass bridge.
A vintage-style Fender
bass bridge.
Twelve screws, a threaded rod cut in three places, and a bent sheet metal plate. This design — used by both the Jazz and Precision basses and a myriad of non-Fender designs — is even less sophisticated than a Telecaster bridge, yet it has remained pretty much unchanged since the 50s.
In its original 1951 iteration, much like the Telecaster, it had two strings per saddle, for a whopping two individually adjustable saddles in total. It soon got revised with individual saddles for every string, and later revised again so that the saddles were smooth, rather than threaded. The basic design remains to this day.
When shopping for bass bridges, double-check the spacing and number of screw holes for the mount — there are both four- and five-screw mount variants, but if the screws match, the bridge is generally a drop-in replacement.
The vintage bridge has a certain shoddiness to it, and some players (myself included) have a strong dislike for it just because of how cheap it looks and feels. Those players quickly found themselves swapping these bridges out in the 70s, when the Badass bridge entered the market.
The Badass Bridge
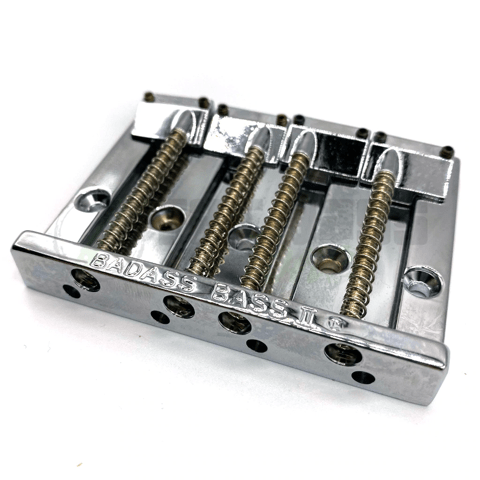 A Badass II bass bridge.
The Badass bridge is, to this day, one of the most common hardware upgrades for guitars and basses, second perhaps only to pickup swaps.
While the Badass is a brand name and a trademark, the design itself has been cloned by virtually every hardware manufacturer and their mom. Even Fender make their own Badass-style bridges, under the name “Hi-Mass”.
The Badass is… not a particularly big improvement over the standard design, actually. It uses a beefier baseplate and saddles that are much more stable, but overall it’s pretty much the same design, just with some geometry tweaked. Nevertheless, it’s a nice and inexpensive drop-in upgrade for most basses.
When I say “inexpensive” I mean it — the Fender Hi-Mass bridges are some of the cheapest bass bridges you can buy. I’ve seen them go for as low as $20 new!
Hipshot Bass Bridges
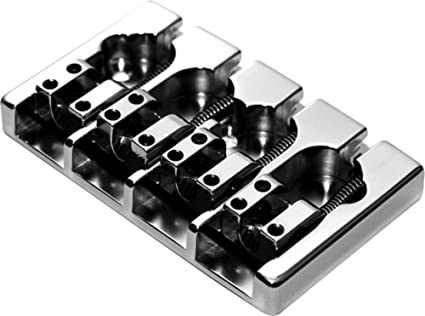 A Hipshot A-Style bridge.
Ah, now we’re getting into the realm of ultra-premium hardware.
Let me get this out of the way first—these are very pricy. I mean “$150 and up” pricy.
Hipshot make a variety of extremely high-quality bass bridges, available with screw-patterns matching all the most common designs — Fender-style, Gibson-style, and even Rickenbacker bridges. They’re machined from heavy aluminium and brass and usually feature very fine adjustment for action, intonation, and even string spacing. On basses with high-end hardware, you’ll find either a Hipshot, or a bespoke bridge more often than anything else.
Other Common Designs
Gibson 3-Point Bridge
These virtually never show up on non-Gibson basses — and there aren’t that many Gibson basses out there — but they’re a pretty good (if a bit quirky) design.
The Gibson 3-point design, rather than being tightly screwed into the body like most other bass bridges, is instead forced by string tension to press against a trio of studs embedded in the body. Much like a Tune-O-Matic tailpiece, it can move freely rearward once string tension is removed.
I had a quick check, and I don’t think anyone other than the ultra-premium manufacturers — Hipshot and Babicz –– makes a retrofit for this design that improves on it in any way, rather than being a direct clone.
Schaller 3D
These are a bit of a wildcard here. They’re not a drop-in replacement for anything, nor do they come preinstalled on a lot of instruments (some Warwicks used to come with Schaller 3D bridges, I don’t know if they still do it). Nevertheless, they are a popular upgrade, and it doesn’t take a lot of effort to fill the old bridge holes and drill some new ones so that you can pop a 3D bridge on your bass.
This design is unique is that it’s available as a guitar bridge as well. These are pretty great bridges — massive, with roller saddles, easy and precise intonation and height adjustments, and even adjustable string spacing.
A word on “Quick Release” bridges
There is one design choice I don’t necessarily agree with that’s particularly prevalent in bass bridges (as opposed to those meant for guitar): “Quick Release”.
Broadly speaking, a “quick release” bridge is one where the strings, rather than being threaded through a hole, are anchored in a slot so that upon releasing the tension on the string it can immediately and easily be popped out of the bridge without having to pull the entire length of the string through a narrow hole.
This design has some very real benefits — it makes destringing your instrument a lot easier and faster, removes the occasional need to clip off the old string (thus rendering it impossible to reuse), and makes it trivial to use the same strings again after taking them off your instrument (repeatedly, perhaps).
All this comes at the minor cost of making stringing up your instrument trickier. Because a quick release bridge relies on the tension of the string to keep it seated, it’s up to you to provide that tension before the string has been properly anchored at the tuner and pulled up to pitch. This makes stringing a bit of a three-hand operation, since you need to, at the same time, guide the string around the tuner (which often requires two hands), maintain a constant pull on it, and keep the ball end anchored in the bridge.
I’m not a fan of that, and I value the quicker stringing of non-quick-release bridges more than the ease of destringing and the ability to reuse strings. Make your own decision about which one seems more attractive to you!
Tuners, Nuts, String Trees: On Tuning Stability
Tuning Stability Issues And Their Common Causes
Some guitars seem almost incapable of staying in tune. There’s nothing worse than going into a big, climactic solo only to realize one or more of your strings are wildly flat! Fortunately, problems with tuning stability generally arise from the same set of common causes. I’ll run through them from most to least common.
-
Improper stringing or tuning technique, string choice
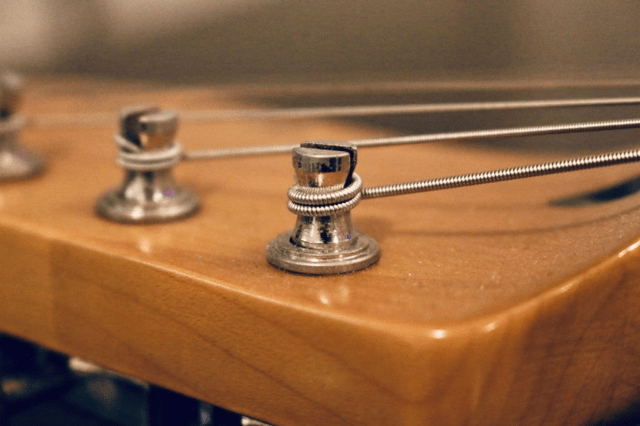 A somewhat correctly
wrapped low E string — although personally I’d use a couple more windings!
A somewhat correctly
wrapped low E string — although personally I’d use a couple more windings!
It’s quite surprising how many guitarists and bassists don’t know how to actually restring their instrument properly. It’s not good enough for the strings to “be on”; electric guitar and bass tuning machines are part of a complex system carefully designed to keep your instrument in tune, and not utilizing them to the fullest is asking for trouble.
On a properly strung instrument, the string winds around the tuner multiple times in a way such that previous windings push the new windings down, helping increase the break angle over the nut. It’s a bit of a balancing act and the ability to guesstimate the correct length of string necessary to achieve a good break angle comes with practice — too little and you won’t get enough break angle, too much and you’ll have to wrap the string around itself, leading to friction and tuning instability.
Roundcore strings need special care when restringing — since the wrappings are free to move around the core of the string, you need to put a sharp bend in them before cutting the excess off, to prevent the windings from coming loose.
After a string is secure on your tuning machine, you should give it a couple solid (and I mean really solid) tugs — tuning it back up to pitch every time — to get the slack out of the string and let it stretch to the length it “wants” to be at. Repeat until the string stops going out of tune after giving it a sharp pull.
Do strings “stretch”?
Whether strings actually stretch or if the slackening that happens when tugging on fresh strings is a combination of windings shifting around and tuner slop has long been a topic of debate in the guitar world.
Do metal strings really stretch? I don’t know — let’s do some math and find out!
The formula for the elongation of a circular bar is
\[ \Delta L = \frac{4WL}{\pi d^2 E} \]
where:
- \(W\) is the load on the bar, in Newtons
- \(L\) is the length and \(\Delta L\) is the resulting elongation (stretching) in meters
- \(d\) is the diameter of the bar, in meters
- \(E\) is the elastic modulus of the material, in \(\frac{\mathrm{N}}{\mathrm{m^2}}\)
We can see that the elongation depends on these terms as follows:
- Increasing the load on the string \(W\) or its length \(L\) makes it stretch more, and decreasing them makes it stretch less
- Increasing the diameter of the string \(d\) makes it stretch less, and decreasing it makes it stretch more
- \(E\) is constant for the material, so we don’t need to consider changing it (but it works similarly to the diameter, i.e. the greater the elastic modulus, the smaller the elongation).
I’ve often heard people say that the metal in the string doesn’t actually stretch meaningfully, and by “stretching” the strings all we do is remove slack and distribute it across the entire length of the string and its wrappings. I figure the most promising way to prove or disprove that claim is to calculate the elongation in terms of length for the most stretch-friendly conditions possible — i.e. we’ll choose our values to maximize \(\Delta L\).
We know that the thinner a string, the more it stretches; the thinnest-core string I could find is a .007“ (0.0001778 m), so that’s the number we’ll use.
We know that the higher the tension, the more a string stretches; the highest tension I could find listed in any string tension chart was around 30 lbs, so let’s double that to adjust for ridiculous tunings and use 60 lbs (267 N) as our \(W\).
All that’s left now is the elastic modulus — which is a constant, and for steel is equal to \( 29~\mathrm{GPa} = 29 000 000 000~\mathrm{Pa} = 2.9 \times 10^{10} \frac{\mathrm{N}}{\mathrm{m^2}} \).
Let’s solve for \(\Delta L\) in terms of \(L\) for those extremes:
\( \Delta L = \frac{4WL}{\pi d^2 E} = \frac{4 \times 267~\mathrm{N} \times L} {\pi (0.0001778~\mathrm{m})^2 \times 2.9 \times 10^{10} \frac{\mathrm{N}}{\mathrm{m^2}}} = \frac{1068}{2880.125}L = 0.371~L \)
Huh. There’s our answer: a guitar string can theoretically stretch to over 30% longer than its unloaded length! That’s a significant change.
In practice, it will probably break long before then, but still, that’s not what I expected; I learned a new thing today!
It’s always fun to disprove your misconceptions with hard numbers. Turns out — it’s hard to steer clear of misinformation. I rewrote the paragraph immediately preceding this section after doing the math, since I originally wrote it with the assumption that the metal does not actually stretch meaningfully under the forces present in a guitar!
So: yes. Guitar strings do stretch. And lesson learned for me: always do your research before repeating factual claims heard from someone else.
Knowing that strings do actually stretch, I would suggest pre-stretching your strings by pulling on them not only after putting fresh strings on, but also with every tuning change.
Another common source of tuning instability I see all the time is tuning from above. To avoid string binding and help the slack settle better, you should always tune a string up to pitch from below and avoid over-tightening then tuning down to pitch.
While we’re on the topic of strings, please change your strings regularly, or at least clean them. The more gunk, rust, and dead skin cells accumulate on a string, the more its behavior diverges from how an ideal string should vibrate — and that can not only ruin your tone, but also be a problem for having your instrument hold tuning.
If your strings seem to drift out of tune no matter what you do, you may also want to try heavier gauges, which tend to hold a tuning better than thinner strings.
Although, personally, I wouldn’t trade the feel of playing thin strings even for an improvement in tuning stability.
-
Bad string break angle over the nut
Oh gods. It blows my mind how some manufacturers have still not figured this out in 2022.
Break angle is a balancing act. On one hand, we want an angle as sharp as possible, so that there is a lot of force holding the string in place. On the other hand, we also want to minimize the friction in the nut slot, because a nut that “grabs” a string too tightly can prevent it from moving the way it wants to move to ring out clearly and achieve stable tuning.
A nut slot is cut precisely by the luthier or guitar manufacturer so that it has a “ramp” that allows the string to break over the nut smoothly, rather than forming an abrupt edge that can catch on windings, leading to tuning issues. The slot is cut vertically into the nut.
If the string doesn’t come into the nut at a right angle, but instead approaches diagonally from one of the sides, it will bear and exert force not just on the carefully-cut “ramp”, but also on one of the walls of the nut slot. This greatly increases the friction present in the system, and diminishes the benefits of a properly cut nut.
Thinking about this three-dimensionally, there are two ways the angle of the string coming into the nut can pose a problem: the angle can be too shallow vertically, or too steep horizontally (i.e. side-to-side).
Coincidentally, the first of these problems is particularly prevalent in Fender-style designs, while the latter is common to Gibson designs. Let’s look at how to fix them.
Shallow vertical angle
If you hear people talking about string break angle, this is usually what they mean.
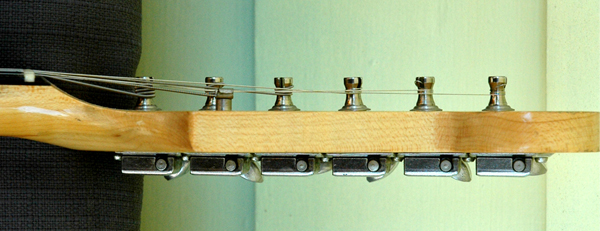 Somewhat shallow
string break angle on a Stratocaster-style headstock.
Somewhat shallow
string break angle on a Stratocaster-style headstock. Broadly speaking, there are two kinds of guitar headstock designs — “straight” and “angled” (or “tiltback”) headstocks. Most Fender-style headstocks are “straight” — i.e. the headstock is parallel to the fretboard — which can lead to break angle problems, if not supplemented by one or more workarounds.
The most common of these is a string tree.
String trees
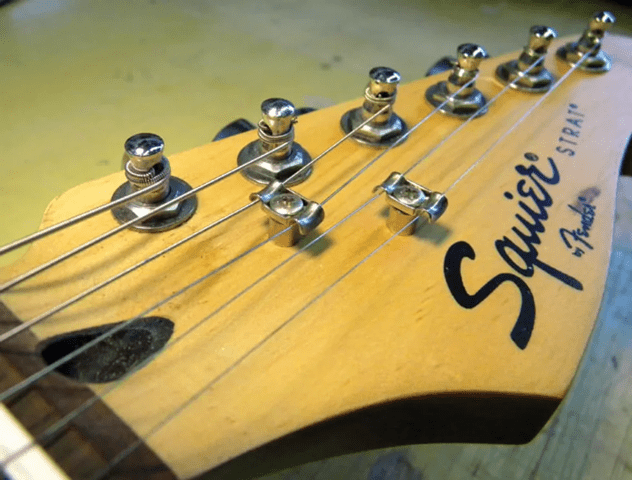 A pair of string trees
on a Squier Strat.
A pair of string trees
on a Squier Strat. A string tree is anything that holds one or more strings down, helping increase the angle they enter the nut at. They’re extremely inexpensive, require drilling just one screw hole to install, and they offer a pretty great solution to the problem of insufficient string break angle.
Unfortunately, string trees introduce yet another source of friction that impedes the string’s movement, and another edge that the string can bind against.
Higher-end instruments will often use retainer bars (a round bar of metal that sits across all the strings, providing an identical break angle and a smooth, round surface that minimizes friction) or roller string trees that use freely rotating “rollers” to hold down the string.
These are especially handy if you have a vibrato system, the use of which would cause lots of friction — and even the risk of string breakage! — with a conventional string tree.
If you have a straight-headstock instrument and it seems like you’re not getting enough break angle, try adding a string tree. It might be just what your instrument needs to get rid of annoying string buzz and tuning instability.
Staggered tuners
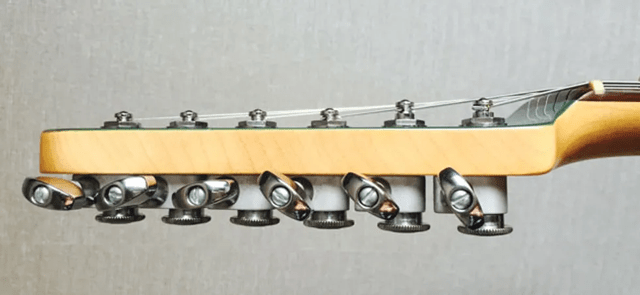 A Strat-style guitar
fitted with staggered tuners.
A Strat-style guitar
fitted with staggered tuners. I mentioned string trees come with their own friction and binding issues, and while roller-style trees somewhat address the issue, another clear solution is to… just avoid having string trees altogether.
Unfortunately, this is only really possible by building the headstock at an angle, like Gibson do. There does, however, exist a kind of a middle-ground solution — staggered-height tuners.
These are made so that the tuners’ string posts get shorter and shorter as you get further away from the nut, in a way “creating” an angle in the stringing where the headstock provides none.
This does make the situation better, but, due to how short a tuner post is, relatively to the distance from the nut, doesn’t provide nearly the benefit that an actual string tree does. Due to their limited usefulness, staggered tuners have a bit of a “last-resort gimmick” reputation, but perhaps you’ll find that they are just the fix you need.
Steep horizontal angle
This problem is as old as the guitar itself. While Fender’s flat, inline-six headstock design often makes the vertical angle of the strings too shallow to provide stable and buzz-free tuning, he did a fantastic job — first with the Fender inline six, and later with the Music Man 4+2 headstocks — at keeping the strings straight, horizontally, as they break over the nut.
Instruments with classic 3+3 headstocks aren’t as fortunate. Especially the middle strings will often enter the nut at very steep angles, causing lots of friction and throwing the instrument out of tune with every bend.
Not all 3+3 headstocks suffer from this problem! PRS, for example, does a pretty good job of keeping the strings straight, even with a 3+3 headstock.
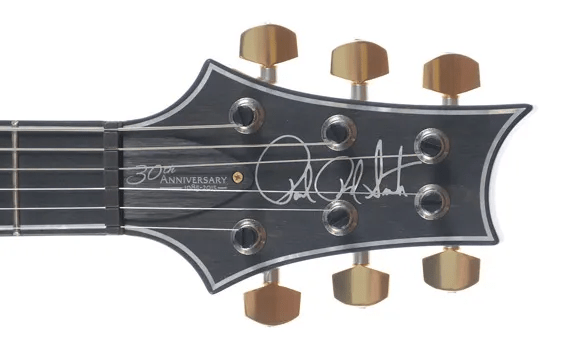 A PRS headstock, with
the strings entering the nut pretty close to straight.
A PRS headstock, with
the strings entering the nut pretty close to straight.The solution to this problem is a device not unlike a string tree, sold commercially under the name String Butler but trivial to DIY — any thin vertical post attached to the headstock that can be used to “anchor” the strings and change their direction will work just as well.
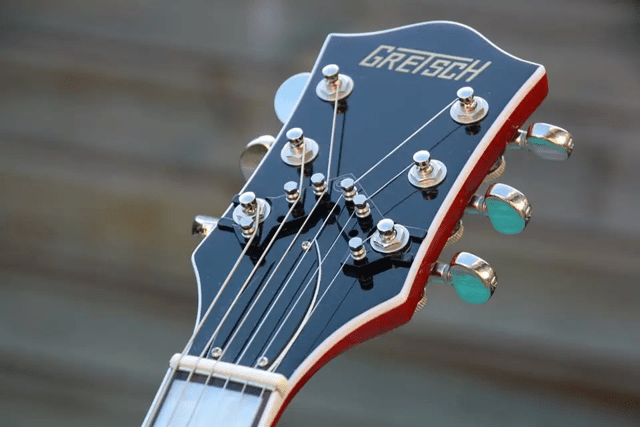 A String Butler in use.
Where a string tree forces the string vertically down, a String Butler forces it to extend sideways, horizontally. This way, the strings can be brought in-line with the nut slots, minimizing friction and binding.
There are a number of similar devices available, even in novelty shapes — I found a skull-shaped string guide on Etsy, visible on the right!
-
Nut and bridge saddle friction
Have you ever had one of your strings suddenly go “ping!” mid-bend and drop in pitch? That can happen when using strings too thick for your nut slots, or when there’s enough friction between your string and the nut or bridge saddle to make your string bind up against it.
This is rarely a problem with properly manufactured nuts on guitars without a vibrato system. It doesn’t hurt seeing if lube can fix your issues, but I wouldn’t suggest a nut replacement unless you know for certain that nut friction is causing issues and your guitar has a vibrato bridge or tailpiece.
Nevertheless, we’ve talked about bridges in a previous section, so let’s examine the nuts now.
Nut lubricants
Want to reduce friction? Use lube! Obvious in hindsight, there are a number of dedicated guitar nut lubricants on the market. Most famous perhaps is Big Bends Nut Sauce, but in a pinch, even a bit of pencil lead scrubbed up and down the nut slot will do — graphite is a pretty good lubricant.
Self-lubricating nuts
Nuts traditionally used to be made from bone; over time, we’ve partly shifted to plastic, then to specialized engineered materials and more specialized substances like brass or graphite.
Self-lubricating nuts are made from graphite or a specially engineered plastic that coats the surface of an object rubbing against it with microscopic particles of itself, making it smooth and greatly reducing the friction present in the system.
A particularly popular brand and material for engineered nuts is Graph Tech’s TUSQ plastic, which they advertise as “man-made bone”; marketing bullshit (like claims that it “increases harmonic content by 200%”, whatever the fuck that may mean) aside, it is — unlike real bone — isotropic and consistent, which makes it easy to work with and predictable — bone can have softer and harder spots, which may interfere with proper nut setup and use.
Graph Tech sells two brands of TUSQ nuts — “TUSQ” and “TUSQ XL”. Only TUSQ XL is self-lubricating, as it’s impregnated with PTFE (teflon).
The most “premium” option is brass, a self-lubricating metal. Since brass is much harder to file than bone or graphite, you’ll often find adjustable brass nuts. These have the benefit of being able to adjust string action without having to file the nut — which always risks rendering it unusable — and allowing for upwards action adjustments without a nut replacement.
Being much harder than other options, brass nuts also wear down much slower — they’re as close as you can get to a “nut for life”, “never needs a replacement” option. Unfortunately, they are also generally quite costly.
If you happen to need a nut replacement and have found friction to be a problem in the past, consider a brass, graphite or TUSQ XL nut!
Roller nuts
Just like with string trees and bridges, at some point someone figured using rollers for the bearing surface under the string would help reduce the friction present in a nut.
If you use your vibrato bar so heavily that even a lubricated nut cannot keep up, a roller nut might be the solution.
Nowadays, pretty much the only company making roller nuts is Fender, and they require permanent modification to the fretboard that will make it impossible to go back to a “normal” nut later. On the other hand, a roller nut has significant benefits — much like some brass nuts it is adjustable for height, and, since it uses rollers rather than pre-cut channels, the same nut can work for any string gauges.
Locking nuts
Finally, if even a roller nut interferes with your wild vibrato use, there’s one ultimate solution to the problem — preventing any movement of the string across the nut at all, therefore eliminating any friction.
This is the principle behind locking nuts, which are almost exclusively found on instruments with a locking vibrato system.
A locking nut uses a set of screws and metal clamps to clamp down on and lock the strings in place, immobilizing them. While they’re mechanically the most stable and frictionless nut design, locking nuts also prevent the tuners from altering the pitch of a locked-down string, necessitating the presence of fine-tuners on the bridge itself, and preventing e.g. quick detuning to drop D.
-
Excessive magnetic pull from the pickups
I have to emphasize something here.
The first three causes of tuning instability I outlined account for a vast majority of problematic cases I’ve seen. It’s such a dramatic majority that the cause I’m going to outline next isn’t even confirmed by much more than anecdotal evidence online. That’s how rare it is for tuning instability to be caused by something else than those three points.
Having said that, I have seen and heard instruments that just wouldn’t play in tune… until they had their pickups lowered.
Bringing a pickup closer to the strings increases its output and signal-to-noise ratio, but it also increases the magnetic pull on the strings themselves. With pickups that are very close to the strings, that effect can get strong enough to pull the string out of tune on its own, over time or as a result of harder picking.
I don’t know how common this is, but if all else fails and your pickups are particularly close to the strings, try lowering them - it might just do the trick.
And… that’s it! Those are all the common causes of tuning instability, and the available solutions for each of them.
“Wait, what? Really? What about tuners?”
What about them?
“I thought if my guitar won’t stay in tune I’m supposed to upgrade the tuners!”
…Okay, fine. Let’s talk about tuners.
Tuners
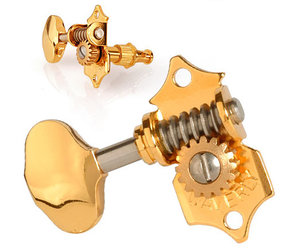 An open-back-style tuning
machine.
An open-back-style tuning
machine.
You probably don’t need to swap your tuners out. Really.
Well, maybe you do, if your tuners are damaged in some way or just really bad. But the truth is — a tuner is just a worm gear and a screw. It has a whopping two moving parts, which also happen to be some of the most frequently and reliably manufactured parts in any mechanism in the world.
Even bad tuners are generally good enough, and the quality improvement you get for buying extremely high-end tuners is negligible. Yes, they will probably have less slack and depending on the gear ratio, might make accurate adjustments easier. But they won’t fix your tuning stability issues — we got that part down really well, and even the cheapest tuners will hold pitch just fine, as long as they’re not broken or massively worn out.
There’s an old saying in engineering about gears: if they don’t have any slack (backlash)… they will make their own slack. A certain degree of takeup and free rotation before the tuner engages is unavoidable, so that won’t be affected by upgrading to “higher quality” tuning machines either.
That doesn’t mean there is no benefit in upgrading tuners, though:
-
Higher quality tuners will usually use better and longer-lasting grease or other lubrication, and will operate smoother and wear out slower than “cheap” tuners.
-
You may want to change the gearing ratio of your tuners. I don’t have reliable information about stock gearing ratios (anecdotally, I’ve heard Fender guitars use 18:1 ratio tuners, and Gibson uses 14:1, but I can’t verify how true that is), but replacements will usually list their ratio explicitly.
L + ratio + skill issue
What the hell does a “tuner ratio” represent?
It’s very simple, actually. It tells you how many rotations of the tuning peg translate to one full rotation of the tuner post; i.e. on a 18:1 ratio tuner, if I make nine complete revolutions of the tuning peg, that will rotate the post 180°.
A higher gearing ratio allows for more precise pitch adjustments and tuning; a lower gearing ratio makes tuning and restringing faster.
I’d say this is a tradeoff, but in my experience, most people strictly prefer higher-ratio tuners. Restringing is something you do maybe once a couple weeks (mayyybe once or twice a week if you’re actively touring) — making small tuning adjustments is something you do, probably, every time you pick up your guitar.
Graph Tech even makes special tuner sets with different gearing ratios for every string, so that a semitone is always about half a rotation of the tuning peg!
-
Weight savings! This is mainly a factor in the bass world, where tuners are much more massive than in the electric guitar realm. If your instrument is particularly neck-heavy, you may find — thanks to the law of the lever — that even a small weight reduction at the headstock end may greatly reduce neck dive. A number of hardware manufacturers (chiefly Hipshot) make ultralight bass tuners for this reason.
-
Locking. This feature deserves its own section.
Let’s talk about locking tuners.
Locking Tuners
I have to admit something: I lied in the last section. A bit. Kinda. Maybe.
Locking tuners… can improve your tuning stability, but not because they’re in any way better than normal tuners. They remove the need to wind the string around the tuning post, therefore reducing the length of the string that can hide slack or bind due to friction, and as we know those are among the primary reasons for tuning instability — however, if you string your instrument correctly and take care to stretch the strings properly each time, locking tuners will not impact your tuning stability at all. They will only reduce the effects of already improper stringing technique.
Locking tuners are pretty much exclusively a guitar thing. There is a total of one company that I could find (Sperzel) making locking tuners for bass.
That aside, what even are locking tuners?
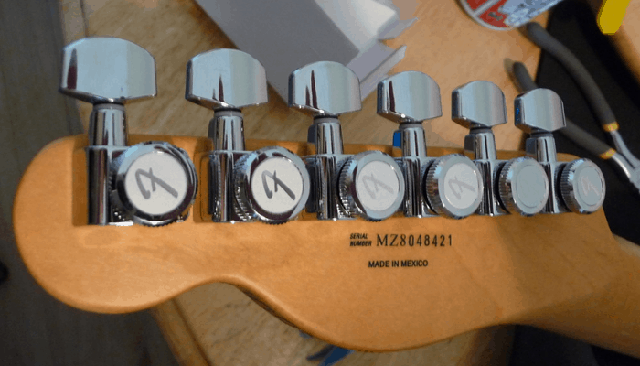 Fender locking tuners on a
Mexican Telecaster.
Fender locking tuners on a
Mexican Telecaster.
A locking tuner has some form of mechanism (in their most common form, an additional knob on the back of the tuner itself) that allows the player to mechanically lock the string inside the tuning post, much like a locking nut.
This has two purposes. Like mentioned above, it eliminates the need to wrap the string around the tuning post, therefore removing one of the possible places for slack to hide in in the system; it also makes restringing much faster, since all you need to do with a locking tuner is thread the string through the tuning post, lock it, and clip the excess — without the need to carefully guide it under the existing windings for the entire process of tuning it up to pitch. A locked string also needs much fewer rotations of the tuning peg to get up to pitch, compared to one wrapped around a traditional tuner.
Funky Locking Tuners
Most locking tuners just have the gear at the back for manually locking them, and that system works just fine. However, you may find two further variants on the locking tuner formula. I don’t have much experience with either (I never tried them due to pretty negative feedback I’ve read online), but I will attempt to describe them to the best of my ability.
The first variant is “Self-Locking” tuners — these don’t use a gear on the back, instead having some mechanism that locks the string on its own when the player starts tightening it.
I’ve heard mixed opinions about the reliability and ease of use of these.
The second category is “Auto-Trim” tuners — these also include a cutting mechanism that, when locking the string, cuts the excess off automatically.
Since I use roundcore strings exclusively, and they need a sharp kink put into them before the cut-off point, I never tried auto-trimmers either — I can’t see how they’d work with roundcore strings. Also, a wire cuter is like $5; auto-trim tuners seem like a solution in search of a problem.
Upgrading tuners
Remember how I said we’re generally really good at making tuners? We’re really good at making tuners. Most replacement tuners will be excellent.
There are a number of tuning machine manufacturers whose names have become almost synonymous with quality:
- Hipshot, especially for their ultralight bass tuners
- Schaller, to the point where certain tuner designs are referred to as “Schaller-style”
- Grover (stock on newer Gibsons)
- Kluson (stock on older Gibsons)
- Graph Tech and Sperzel, known for their innovative designs
- Gotoh 💙
…and many more. If you buy any of those, you will almost definitely not be disappointed.
Kluson? No clue, son.
Okay. You will almost definitely not be disappointed… unless you get vintage Kluson-style tuners.
Kluson-style tuners on a Gibson Les Paul.
They’re pretty good tuners and they have a pretty iconic look, but vintage-style Kluson tuners tend to develop a number of issues over time.
When talking about the degree of protection around a mechanical component, especially a bearing or gears, there are three possible design options. Let’s discuss them in terms of tuners:
- They can be open-back — the gears are entirely exposed, leading to lighter overall weight and easy access for lubrication, but allowing for easier ingress of liquids, dust, and debris.
- They can be shielded — the mechanism is covered by a shroud, preventing larger particles and superficial mechanical impacts from damaging the components, but allowing for ingress of liquids and dust. Shielded components will also generally lose lubrication over time, but cannot be easily re-lubricated.
- They can be sealed — the mechanism is protected by a watertight seal, completely preventing ingress of dust and liquids, while also keeping the grease or other lubricant permanently inside. This kind of mechanism is impossible to re-lubricate, but it will most probably never need re-lubrication in its lifetime.
Most “modern” guitar tuners — like the Grover tuner pictured a couple paragraphs up — are sealed; it’s a design that both looks modern and provides the greatest longevity and reliability (acoustic and classical guitars generally use open-back tuners for what I assume are entirely historical reasons).
Bass tuners tend to be much larger and heavier, which, combined with the bass’s longer scale length, easily leads to neck dive. For that reason (and for looks, let’s face it), a lot of basses use open-back tuners or particularly lightweight guitar-style sealed tuners.
Vintage Klusons style tuners… are shielded. Not only that, but they’re shielded by a metal plate that also holds the entire mechanism together. That metal plate is held in place not with screws, but with two metal tabs that can, over years of use, come loose and eventually pop out entirely.
A vintage Kluson-style tuner with its back cover popped open.
If there’s one thing I can be sure of, it’s that you probably don’t want your tuner falling apart mid-gig.
Being a shielded mechanism, Klusons also tend to lose their lubrication and become scratchy and rough over time — to re-lubricate them, you will need to take off the back cover, and it’s pretty much impossible to put it back on securely. When your Kluson is out of grease, I’d suggest replacing — rather than trying to re-lubricate — it entirely.
Considering how good all the replacement tuners are, when replacing tuners, I would suggest just going with whatever is closest to what’s already on your instrument. That will save you the headache of having to drill new screw holes for the mounting, expand the tuner holes, or — worst of all — having to fill the tuner holes because they’re too big for your new tuners.
If you’re looking to replace tuners on a guitar, I would also suggest going for locking tuners - there’s no downside to them, really1, and they’re one of the nicest quality-of-life upgrades you can make to a guitar.
You could argue that one downside is that they weigh more than non-locking tuners, but guitar tuners are small enough — and the balance of most guitars is good enough — for it to not matter, in my opinion.
If you cannot find tuners that match, are not sure, or want to upgrade to a specific set of tuners which may or may not match, measure.
Take off one of the tuners on your instrument and measure the post hole.
On guitar, most modern tuners use a 10 mm (13/32“) hole, but vintage and vintage-style tuners will often use a hole somewhere between 10-11/32“ (8–8.8 mm). These are the most common, but other hole diameters are not unheard of.
Bass tuners will come in 1/2“ (12.7 mm) post hole diameter for vintage-style tuners, or 3/8“ (9.5 mm) for “modern” ones.
If it turns out your post hole is smaller than the tuners you want to put on, grab a drill bit and ream it out carefully.
If it turns out your post hole is larger… You can either glue in a wooden dowel to fill it and then carefully redrill the hole, or try to find conversion bushings for the appropriate hole sizes. These are oversize replacement bushings that have an outer diameter slightly larger than the original hole, and an inner diameter equal to the diameter of the desired hole — you hammer them in in place of the original bushings and get a hole of an appropriate size easily.
Different tuners may have different screw patterns - once again, I recommend buying ones that match what you already have, but if that’s not an option, you can glue wooden toothpicks into the old holes to fill them, trim them down flush with the headstock, and then carefully drill the new screw holes.
For removing tuner bushings… I will refrain from making recommendations; look for guides from smarter people than me online on how to do it safely and with no damage to the instrument. I tend to just grab something of a similar diameter to press against the bushing and proceed to beat the shit out it — and, by extension, my instrument — with a hammer until the bushing comes out.
Don’t do that.
But also, where’s the fun in working on your instrument if you don’t risk splitting a neck or two in half?
No, really — don’t do that.
Detuners
There’s one last product I’d like to mention - detuners (or “D-tuners”); There are a couple designs on the market, the most prominent being Hipshot’s X-Tender.
A detuner is a special tuning machine with an additional lever that allows you to turn the entire tuning machine between two positions. In the usual scenario, you’d replace your low E string tuner with a detuner, tune the string up to E with the lever in the “up” position, then drop the lever to the “down” position and tune the string to D. This will allow you to flip between E standard tuning and drop D accurately and repeatably with one flick of the detuner lever.
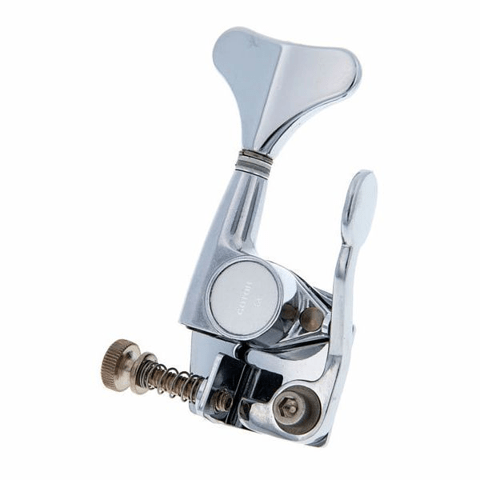 A Hipshot/Gotoh
D-Tuner.
A Hipshot/Gotoh
D-Tuner.
These are available in all styles and colors, and — having recently installed one on my beater bass — work wonderfully. They’re much more popular on bass than on guitar, but you can find guitar versions of them as well (albeit quite limited in styles, compared to the bass ones).
Having said that, they are really expensive, and may require permanent modification to your instrument. If you’re not sure about them, there is a product called the Pitch-Key, which achieves very similar functionality while just being a snap-on accessory that you can take on and off in a matter of seconds.
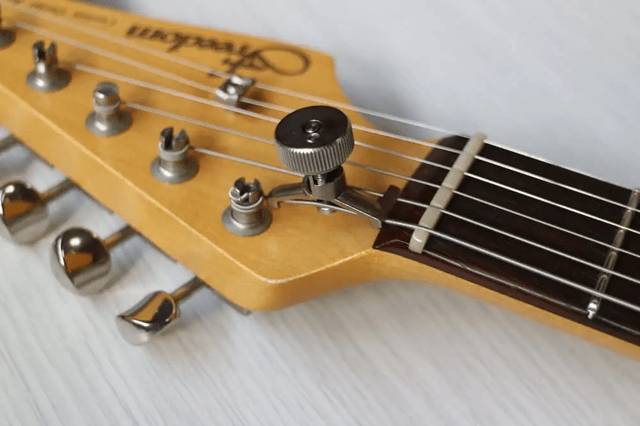 The Pitch-Key.
The Pitch-Key is a clamp you can mount on one of your strings with a large thumbwheel that bends the string behind the nut, raising its pitch. I can’t speak to its effect on tuning stability or string breakage — which seem like potential concerns with this design — because I have never used one, but it does seem like a reasonable and useful alternative to the much more expensive X-Tenders.
Straps
I cannot possibly overstate the difference a good strap makes.
Electric guitars and basses are heavy instruments! It’s not uncommon for e.g. Les Pauls to weigh 5 kg (11 pounds) or more. That might not sound like much at first, but it’s a lot of weight to hang from your shoulder for hours at a time.
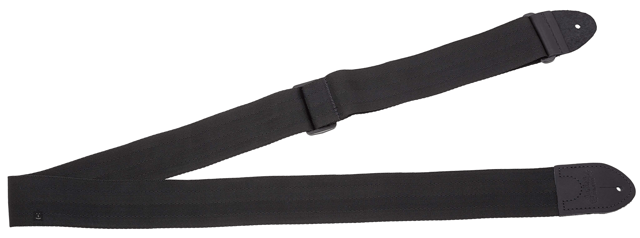 A generic nylon guitar strap.
A lot of players…
Including young Fox! Everyone makes mistakes.
…will just have grabbed the cheapest generic nylon strap in the shop when buying their first guitar — or maybe the store even threw in the strap for free! — without realizing how important strap choice is for player comfort and safety.
Fortunately, quality straps are not that expensive, and there is an entire world of much more ergonomic and comfortable solutions available. Let’s quickly explore the options available to us.
Choosing a strap
There are five aspects that matter in a strap: the material, the width, padding, adjustment method, and looks.
Material
Almost all straps are made out of plastic, cotton, leather, or neoprene.
Plastic (nylon, polyester, polypropylene) guitar straps are the cheapest and least pleasant to use, but they are extremely durable — they’re basically car seatbelts for your guitar, and they offer about the same level of comfort. Cotton straps are usually not much different in design, but softer.
Leather is what you’ll find most higher-end guitar straps are made of. There are a variety of leather strap designs out there, ranging from a simple strip of leather all the way to massive, multi-layer, generously cushioned and padded behemoths that feel not unlike a soft luxury car seat. You will also find leather straps made of all kinds of leather, including soft suede or vegan pleather.
Neoprene is a bit of a newcomer to the world of guitar strap materials, but it is quickly taking the market by storm. Neoprene is a type of synthetic rubber, resembling a dense, elastic foam. If you’ve ever been surfing, diving, canoeing, etc. — it’s what wetsuits are usually made of! Neoprene is soft and comfortable, vegan-friendly, and very durable.
Width
It’s pretty obvious that the wider a strap is, the larger the surface area in contact with your shoulder will be — and with a larger area to distribute the weight of your guitar over, the less pressure there will be on your shoulders.
The “standard” cheap nylon straps are generally about 2“ wide, but I’ve seen straps as wide as 4.5“. A 4“ strap (my usual for basses) will cut the pressure on your shoulder down to about half of what it would be with a 2“ strap, and indeed in my experience, when coupled with generous padding, a strap that wide makes the weight of the instrument almost disappear.
Padding
Going back to what I was saying about nylon straps and seatbelts — a seatbelt isn’t very comfortable, right? A padded strap is like adding a row of pillows to the inside of that seatbelt. Padding in itself will not reduce the amount of pressure on your shoulder, but it will make your strap much more comfortable to use and prevent it from painfully digging into your shoulder and back.
Adjustment method
There are generally two kinds of strap adjustment methods: stepped and continuous ones.
“Stepped” adjustment is most common in leather straps — I use the term to describe any adjustment method that lets you choose between a number of preset strap lengths. It does the job, usually, but I will often find that a guitar sits slightly too low in one position and slightly too high in the next.
“Continuous” adjustment straps do not have preset lengths — instead they let you adjust their length smoothly by moving one end of a loop of material. This is most common in nylon straps, but there are both neoprene and leather straps with continuous adjustment out there.
Looks
Straps don’t have to be just plain black or brown. If you want to look extra classy, maybe a completely white strap would provide the visual impact you need? A strap with a dense geometric pattern would complement a plain guitar wonderfully; perhaps you want to send a message by wearing one with the colors of your favorite pride flag, or characters from your favorite anime? Maybe you want one that’s entirely covered in spikes to look extra punk?
 Some patterned guitar straps.
You can find all kinds of patterns, colors, and graphics on guitar straps, and even places that will happily make you a custom strap. As usual: Etsy, Ebay, and Amazon have an entire world of options, and searching the Internet for “custom guitar strap” should provide you anything that you can’t find readily available from a store.
Thoughts
With strap choices, there aren’t really many tradeoffs — continuous adjustment is strictly better than stepped adjustment, a padded strap is pretty much always preferable to a non-padded one; the only real drawback is that the nicer straps will be more expensive, but straps are pretty cheap in general and your health and comfort is well worth the investment in a good strap.
Get yourself a strap that looks sick and feels great to wear. You’ll be glad you did.
Fox’s Gear: Straps
I have two straps that I use on all of my guitars:
All my heavy basses get a Minotaur 4“ Wide Padded Bass Strap: an absolute monster of a strap with padding so thick you could comfortably sleep on it, made of very tough Italian leather, while still costing less than $40.
I would happily make a blanket recommendation for these straps for heavier instruments (they’re a bit too stiff to use on anything lighter than 3.7 kg/8lbs-ish), if not for the fact that they seem impossible to purchase outside of Europe.
All my lighter instruments get Fender “Broken-In Leather” straps; these are not padded, but they’re made of extremely soft and pliable leather, which makes them very comfortable to wear despite the lack of padding and somewhat narrow (2.5“) width.
These are what I use, but I don’t think they’re the best options out there; both of these only have stepped adjustment, and the Fender straps are pretty overpriced for what they are; I just stick with the stuff I know I can depend on, without seeking out alternatives that may be better. For that reason — and because I don’t want to shill too hard, I don’t get paid a cent for writing any of this — I would suggest that it’s fine to use these as a starting point in your search for The Perfect Strap, but you should — as usual — Do Your Own Research.
If I didn’t already have a bunch of these and was shopping for a new strap, I’d definitely look towards neoprene rather than leather. Maybe some funky patterned straps, but I tend to lean towards the classy look of plain brown leather matched with natural and transparent finishes, and black leather to go with everything else.